If you’re looking to create a stunning crochet project, the Persian Tiles Blanket is an intricate and beautiful option. Combining vibrant colors and eye-catching geometric designs, this blanket brings a touch of the exotic to your home.
In this step-by-step tutorial, we’ll cover everything from choosing the right materials to understanding the crochet patterns involved.
By the end, you’ll have a gorgeous blanket that’s both functional and a work of art. Follow along to learn the details of this timeless croche pattern.
Materials and Tools You Will Need
Before starting your Persian Tiles Blanket, gather all the necessary tools and materials. You will need a crochet hook, yarn in several colors, stitch markers, and a tapestry needle. A 4.0mm crochet hook is recommended for this pattern, but make sure to adjust your hook size according to your tension. For the yarn, opt for 100% cotton or a cotton blend for durability and softness.
The Persian Tiles Blanket is known for its vibrant colors, so choose at least five or six different shades. Traditionally, jewel tones like sapphire, emerald, and ruby are popular choices. Stitch markers will help keep track of your rounds, especially in intricate sections. Finally, a tapestry needle is essential for weaving in the ends neatly to complete your project with a professional finish.
To ensure the best results, always check your gauge before you begin. Create a small swatch using your chosen hook and yarn to ensure your stitches match the required dimensions. This simple step can prevent your blanket from turning out too large or too small, saving you time and frustration later on.
Understanding the Basic Crochet Stitches
In this pattern, you’ll be using several crochet stitches that are essential to the final design. The most common stitches used are the chain (ch), slip stitch (sl st), single crochet (sc), and double crochet (dc). You will also encounter more advanced techniques such as treble crochet (tr), half double crochet (hdc), and clusters. If you’re familiar with these basic stitches, you’re ready to begin your Persian Tiles Blanket.
 Start by mastering the chain stitch, which forms the foundation of many crochet patterns. Practice creating a row of chain stitches, making sure each stitch is even and consistent in size. Once you’re comfortable with the chain stitch, move on to the single crochet, which creates a solid and dense fabric perfect for the central motifs in this blanket.
For this blanket, clusters are also essential, as they form the petals and intricate details of the tile designs. Practice making clusters by crocheting multiple stitches into the same space and then drawing them together at the top. Clusters create texture and dimension in your blanket, giving it the rich, ornate look that is characteristic of Persian tiles.
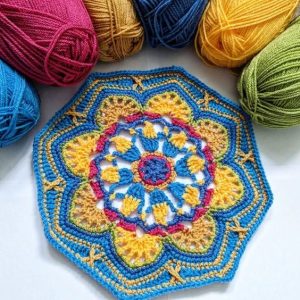
Creating the Center Motif of the Persian Tile
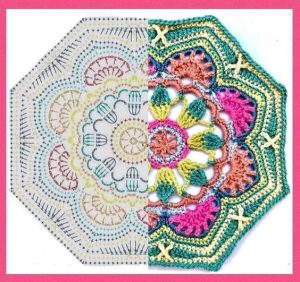
The Persian Tiles Blanket is built up of several large motifs, with the central motif being the focal point of the design. Start by creating a magic ring, which allows you to pull the center tight for a neat finish. Once the ring is secured, you’ll work in rounds, alternating colors to achieve the intricate tile pattern. Begin with your primary color and work a series of double crochets into the ring.
As you move through the rounds, you’ll incorporate different stitches and colors to create the layered, geometric look that makes this blanket so special. Use double crochet stitches for the first few rounds to build the base, then transition to treble crochets for the outer layers to add height and dimension. The contrasting colors will create the petal and star shapes that are iconic in this pattern.
Once the central motif is complete, block it to ensure that it lies flat and retains its shape. Blocking is an important step in this project, as it allows the intricate design to open up and the stitches to settle into their final positions. Use a blocking mat and pins to stretch the motif into shape, and lightly steam it if necessary.
Joining the Motifs Together
After completing all your central motifs, it’s time to join them together to form the blanket. The most common method for joining motifs in the Persian Tiles Blanket is the slip stitch method, which creates a nearly invisible seam. Lay out all your motifs on a flat surface and arrange them according to the pattern, ensuring that the colors are evenly distributed.
Begin by joining two motifs with a slip stitch along the edges. Insert your hook through the corresponding stitches of both motifs and pull the yarn through to create a seamless join. Continue slip stitching along the edges until all motifs are joined, working in rows or columns as needed. This method ensures that your blanket will have a professional and polished look without any bulky seams.
Once all motifs are connected, take the time to weave in any loose ends with your tapestry needle. This step is crucial for creating a neat finish and ensuring that your blanket is durable and long-lasting. With all the motifs securely joined, your Persian Tiles Blanket is almost complete!
Adding the Border
To finish off your Persian Tiles Blanket, you’ll want to add a border that ties everything together. A simple yet elegant border can complement the intricate designs of the central motifs while framing the entire piece beautifully. A popular choice for this pattern is a combination of single crochet and picot stitches, which adds texture without overwhelming the design.
Start by working a round of single crochet stitches around the entire edge of the blanket. This will create a clean, uniform edge and prepare the piece for the final decorative border. Be sure to work evenly around the corners, adding extra stitches if needed to keep the border flat. Once the single crochet round is complete, you can move on to the picot stitch.
Picot stitches create small loops along the edge, adding a delicate finishing touch to the blanket. To make a picot, chain three, then slip stitch into the first chain. Continue this pattern along the entire edge of the blanket. When you’ve completed the border, weave in any remaining ends, and block the blanket one final time to ensure that the border lies flat and the stitches are even.

Finishing and Care Instructions
Once your Persian Tiles Blanket is complete, it’s important to care for it properly to ensure that it stays beautiful for years to come. Since this blanket is made from cotton or a cotton blend, it can be machine washed on a gentle cycle, but be sure to use cold water to prevent any shrinking or color bleeding. Lay the blanket flat to dry to avoid stretching or distorting the intricate patterns.
Join our VIP list and receive exclusive free patterns. You’ll have daily access to the best designs, delivered straight to your device. Don’t miss this chance to get inspired and improve your projects with new and amazing patterns!
To maintain the vibrant colors of your Persian Tiles Blanket, avoid direct sunlight for extended periods. Store the blanket in a cool, dry place when not in use, and fold it neatly to prevent creases. If you need to freshen it up between washes, a light steam with an iron can help to remove any wrinkles and restore the blanket’s crisp appearance.
With proper care, your Persian Tiles Blanket will remain a treasured piece of your home decor. The time and effort you’ve put into this croche pattern will be rewarded with a stunning blanket that showcases your skills and creativity. Whether you’re using it as a throw, a bedspread, or even a wall hanging, this blanket is sure to be a showstopper.
By following these steps, you’ll create a Persian Tiles Blanket that captures the beauty and elegance of traditional tilework in a cozy, handmade form. Enjoy the process, and take pride in your finished project


