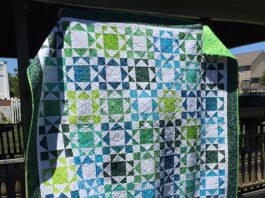
Are you looking for a striking quilt design that blends traditional elegance with a modern twist? The Falling Star quilt pattern is an ideal project for both seasoned and beginner quilters.
In this step-by-step guide, we’ll walk you through the entire process of creating this stunning quilt, from cutting fabric to the final assembly.
Using precise fabric measurements and cuts, this free quilt pattern is designed to ensure that your Falling Star quilt turns out beautifully.

Materials and Fabric Preparation
Before you begin, gather your materials. For this project, you will need quilting cotton in various colors, batting, and backing fabric. The fabrics you choose will define the overall look of your quilt, so feel free to experiment with different color combinations and prints to personalize your Falling Star quilt.
The standard Falling Star quilt typically requires at least four different fabrics: one for the star center, two for the star points, and one for the background. Depending on your chosen size, you will need about 2-3 yards for the background fabric, 1 yard each for the star fabrics, and 1/2 yard for the border. Make sure to prewash and iron your fabrics to prevent shrinkage and distortion.
Cutting the fabrics accurately is essential to achieve clean seams and perfect alignment. Using a rotary cutter, cutting mat, and quilting ruler, cut your fabrics into the necessary shapes and sizes. The Falling Star quilt pattern usually calls for squares and triangles, so take extra care to cut them precisely.
Cutting Your Fabrics
The Falling Star quilt features a combination of squares and half-square triangles (HSTs) that come together to form the star motif. Here’s a basic guideline for cutting your fabric for a standard 60” x 60” quilt top, though you can easily adjust the size to your preference.
Start by cutting your background fabric. You will need to cut 16 squares at 5 1/2″ x 5 1/2″. These squares will serve as the negative space around your star. Next, cut 8 squares from each of your star fabrics (for the points) at 6″ x 6″. These squares will be used to create the half-square triangles. Finally, for the star center, cut 4 squares at 4 1/2″ x 4 1/2″.
Additionally, if you plan to add borders to your quilt, cut strips of fabric that are 2 1/2″ wide and the length of the quilt sides. These borders can enhance the overall design, giving your Falling Star quilt a polished frame.
Making Half-Square Triangles (HSTs)
One of the fundamental techniques in quilt patterns like the Falling Star is creating half-square triangles. HSTs are versatile and allow quilters to add depth and movement to their designs. To make your HSTs, take your 6″ x 6″ squares and pair them with contrasting colors.
Place two squares right sides together, and draw a diagonal line from corner to corner on the back of one of the squares. Sew a seam 1/4″ from each side of the drawn line, then
cut along the diagonal line. This will create two HST units. Press the seams toward the darker fabric, and then square the HSTs to 5 1/2″ x 5 1/2″ using a quilting ruler. Repeat this process until you have created all the HST units required for the Falling Star quilt pattern.

Half-square triangles bring a dynamic element to any quilt. When arranged correctly, they form the star points of the Falling Star quilt. Take your time with the HST creation process to ensure that each unit is accurate and sharp. Once completed, you’ll notice how these small units are key in transforming simple squares into a cohesive and visually striking quilt design.
Arranging the Falling Star Quilt Pattern
Once you have all your pieces cut and sewn, it’s time to arrange them into the Falling Star pattern. Begin by laying out the quilt top on a large flat surface or a design wall. Start with the center square, placing the 4 1/2″ x 4 1/2″ square in the middle. Then, begin arranging the half-square triangles around it to form the star points.
Each star point will require two HST units. Arrange them so that the contrasting fabrics create the sharp star points that extend from the center outward. Continue placing your HST units until all the star points are formed, surrounding the center square. Once your star points are arranged, place the background squares around the perimeter of the star, forming the negative space that allows the star to “pop.”
Making a Falling Star quilt is a rewarding experience that allows you to combine creativity with precision. The design is both classic and modern, making it a versatile option for any quilting enthusiast. By following this step-by-step guide, you’ll create a beautiful quilt that showcases your skills and love for quilt patterns.
Whether you’re a seasoned quilter or just starting, the Falling Star quilt is a project worth tackling. Its bold design and endless customization options make it a great addition to your quilting repertoire.


