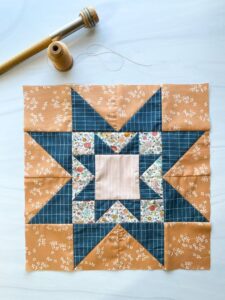
The Easy Double Sawtooth Star Block Pattern is a favorite among quilting enthusiasts for its bold design and timeless appeal. This versatile block is perfect for beginners looking to expand their skills and for seasoned quilters seeking a reliable pattern that delivers striking results. Combining two layers of star points around a central square, this pattern adds depth and sophistication to any quilt project.
One of the key reasons quilters love this block is its adaptability. The Easy Double Sawtooth Star Block Pattern can be used on its own for table toppers or as a repeating block in a larger quilt pattern. Its layered star design offers endless color and fabric possibilities, giving you the creative freedom to personalize every block.
In this article, we will guide you through a complete tutorial on how to make this beautiful quilt block from start to finish. We’ll cover fabric measurements, cutting instructions, sewing techniques, and helpful tips to ensure your final piece is both stunning and precise. Whether you’re crafting a gift or a personal keepsake, the Double Sawtooth Star will shine in any quilt.
Fabric Selection and Cutting Measurements
Choosing the right fabrics and cutting them accurately is essential to creating a flawless Easy Double Sawtooth Star Block Pattern.
- Fabric Requirements:
- Center Square: (1) 4.5″ x 4.5″
- Inner Star Points (Fabric A): (4) 2.5″ x 2.5″ and (4) 2.5″ x 4.5″
- Outer Star Points (Fabric B): (4) 3.5″ x 3.5″ and (4) 3.5″ x 6.5″
- Background Fabric: (8) 2.5″ x 2.5″, (4) 2.5″ x 4.5″, (4) 3.5″ x 3.5″, (4) 3.5″ x 6.5″
- Cutting Tips:
- Use a sharp rotary cutter and quilting ruler to ensure accuracy.
- Label your fabric pieces to keep everything organized before sewing.
- Fabric Choice:
- Use contrasting colors between your stars and background fabric to highlight the star shapes.
- Batiks, solids, or small prints work beautifully for the star points.
- Pre-washing and Ironing:
- Pre-wash all fabrics to avoid shrinkage and color bleeding.
- Iron each piece to remove wrinkles and make accurate cuts.
- Stay Organized:
- Lay out your cut pieces in order before starting. This helps avoid mistakes and ensures smooth sewing.
- Prepare Tools:
- You will need a sewing machine with a 1/4″ foot, pins, scissors, and an iron.
Assembling the Inner Sawtooth Star
The inner star is the first layer of your Double Sawtooth Star Block, forming a frame around the center square.
- Flying Geese Units:
- To make four flying geese, sew two 2.5″ background squares to each 2.5″ x 4.5″ rectangle (Fabric A).
- Draw a diagonal line on each small square and stitch on the line.
- Trim and Press:
- Trim 1/4″ away from the seam and press the triangle open. Repeat for the second triangle.
- Each finished unit should measure 2.5″ x 4.5″.
- Assemble the Inner Star:
- Layout the center square, flying geese units, and background fabric to form a 9-patch layout.
- Sew rows together using a 1/4″ seam.
- Pressing Seams:
- Press seams open or to one side based on your preference to reduce bulk.
- Make sure points align precisely for a clean look.
- Measure:
- The completed inner star block should measure 8.5″ x 8.5″.
- Trim if necessary to maintain square shape.
- Tips for Accuracy:
- Use pins to hold seams in place when joining rows.
- Check each unit with a ruler before assembly.
Adding the Outer Sawtooth Star Layer
Now that the inner star is complete, the second star frame adds dimension to your Easy Double Sawtooth Star Block Pattern.
- Second Flying Geese Units:
- Sew two 3.5″ background squares to each 3.5″ x 6.5″ rectangle (Fabric B) as done before.
- Repeat the same flying geese technique.
- Trim and Press:
- Again, trim 1/4″ from the seam and press open.
- Finished geese units should measure 3.5″ x 6.5″.
- Frame the Inner Star:
- Place the inner star in the center and surround it with flying geese units and 3.5″ squares.
- Layout forms a larger 9-patch grid.
- Sewing the Rows:
- Sew each row together, making sure points and seams line up.
- Use consistent seam allowance for uniformity.
- Final Assembly:
- Join the three rows and press seams.
- Your completed block should now measure 12.5″ x 12.5″.
- Quality Check:
- Measure all sides and trim any uneven edges.
- Ensure that star points are sharp and not cut off.
Finishing Tips and Quilt Ideas
Once your block is finished, it’s time to decide how to use it in your next quilt project. The Easy Double Sawtooth Star Block Pattern offers endless design possibilities.
- Single Block Projects:
- Turn a single block into a mini quilt, pillow cover, or wall hanging.
- Add a border and simple quilting for a polished finish.
- Multiple Block Quilts:
- Create a full quilt using repeated double sawtooth stars.
- Alternate star blocks with solid squares or simpler blocks for contrast.
- Color Variation:
- Use a gradient or rainbow palette to create visual movement.
- Try a monochromatic look for a modern twist.
- Sashing and Borders:
- Add sashing between blocks to help each star stand out.
- Use complementary border fabric to frame your quilt.
- Quilting Styles:
- Echo quilt around the stars or try custom motifs.
- Stitch-in-the-ditch can also enhance the block’s structure.
- Binding and Finishing:
- Choose a binding that complements your fabric colors.
- Hand-stitch or machine bind your quilt for a clean edge.
- PATTERN HERE
Creating a quilt using the Easy Double Sawtooth Star Block Pattern is both fun and satisfying. This pattern not only helps you practice fundamental quilting skills, but also results in a stunning visual piece that looks more complex than it really is. Whether you’re making one block or an entire quilt, this design is sure to become a favorite in your collection of quilt patterns. Happy quilting!


