The Fancy Fox quilt pattern is a fun, modern twist on traditional animal-themed quilts. It’s a favorite among quilters looking for a blend of whimsical design and geometric simplicity. Designed with clean lines and bold shapes, this pattern is perfect for beginner and experienced quilters alike.
What makes the Fancy Fox quilt pattern truly shine is its versatility. You can use a variety of fabric styles—solids, prints, or even upcycled scraps—to create adorable fox faces that are both charming and stylish. Whether you’re making a baby quilt, wall hanging, or full-sized throw, this pattern adapts beautifully to your project goals.
In this article, we’ll explore the full step-by-step process for making a Fancy Fox quilt, including fabric cuts, layout, and sewing instructions. You’ll also find helpful tips on color choices, layout ideas, and creative ways to personalize your quilt using popular quilt patterns.
Why Choose the Fancy Fox Quilt Pattern?
The Fancy Fox quilt pattern is perfect for anyone who wants to add character and personality to their quilting projects. Unlike traditional floral or geometric patterns, this design adds a playful twist while still being visually striking and easy to construct.
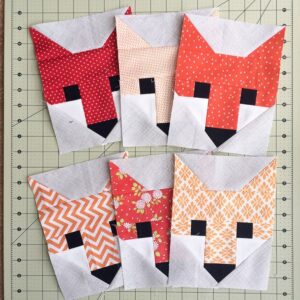
The fox motif appeals to both kids and adults. It’s perfect for children’s rooms, baby showers, woodland-themed nurseries, or simply as a fun accent piece. Because it’s a single block repeated multiple times, the pattern is scalable and can be easily adjusted in size.
Another reason this pattern is so popular among the quilt community is its simplicity. With straight-line piecing and minimal curves, the construction process is beginner-friendly and doesn’t require advanced techniques. You can even chain-piece to speed up production.
Each fox face is constructed from a mix of squares and rectangles, making fabric cutting straightforward. The design also gives quilters the opportunity to play with contrast and color. Bright, bold fabrics can create a pop-art feel, while earth tones or neutrals can produce a more minimalist, modern effect.
If you’re looking for a stash-busting quilt project, this is a great one to consider. You can mix and match fabrics for each fox or keep things cohesive with a consistent color palette. Either way, the Fancy Fox quilt pattern allows for tons of creativity.
Lastly, this pattern is popular because it offers quick satisfaction. Unlike intricate quilt patterns that take weeks to complete, this one can be finished in just a few days—even faster if you’re only making a small baby quilt or wall hanging.
Fabric Requirements and Cutting Instructions
To make the Fancy Fox quilt pattern, you’ll need a selection of fabrics and accurate measurements for each block. Below are the fabric suggestions and cut sizes to help you prepare your materials.
Each Fancy Fox block finishes at 8” x 8”. For a small quilt (baby size), you’ll want about 20–25 blocks. For a larger throw, aim for 40+ blocks. The more blocks you create, the larger the finished quilt will be.
Fabric Requirements (per block):
-
Background fabric: 1 fat quarter (white, gray, or other neutral)
-
Fox face fabric: 1 fat eighth or scrap (any color)
-
Inner ear fabric: Small scrap
-
Eye and nose fabric (black): Small scrap
-
Optional border or sashing: 1/2 yard (if desired)
Fabric Cuts (per block):
-
(2) 3.5” x 3.5” squares – fox face (top)
-
(1) 3.5” x 6.5” rectangle – fox face (bottom)
-
(2) 1.5” x 1.5” squares – black eyes
-
(2) 1.5” x 1.5” squares – white for eye background
-
(2) 1.5” x 1.5” squares – inner ear
-
(2) 3.5” x 3.5” squares – background fabric (used for HSTs to shape ears)
-
(1) 1” x 1” square – black nose
You can precut these pieces for multiple blocks in batches. This makes it easier to chain-piece and ensures your quilt comes together more quickly and consistently.
If adding borders or sashing, measure the finished block size and add 1.5″ wide strips between blocks for spacing. For binding, estimate around 1/2 yard of fabric for a baby quilt and 1 yard for a throw-size quilt.
Step-by-Step Guide to Piecing the Fox Block
Now that your pieces are cut, it’s time to sew your Fancy Fox quilt pattern block. These instructions walk you through each step so you can confidently construct the fox face and assemble your quilt top.
Step 1: Assemble the Eyes
Take one black 1.5” square and sew it to a white 1.5” square. Press the seam to the darker fabric. Repeat to create two eye units. Place them side by side in the center of the face for perfect placement.
Step 2: Make the Ears
Use the 3.5” background squares and 3.5” fox face squares to create two half-square triangles (HSTs). Mark a diagonal line, sew 1/4” on each side, cut, and press open. These will shape the outer ears.
Step 3: Add the Inner Ear Detail
Attach a 1.5” inner ear square to each of the ear HSTs. You can position them at the corner or angle for more character. Sew diagonally to create a small triangle detail.
Step 4: Piece the Fox Face
Join the two 3.5” x 3.5” squares for the top of the face, placing the ears above them. Then sew the eye unit below that, followed by the 3.5” x 6.5” bottom rectangle to complete the face shape.
Step 5: Add the Nose
Stitch the 1” black square to the center bottom of the face block. This detail gives the fox its cute expression. Be sure it’s centered to keep the design balanced.
Step 6: Square Up the Block
Once the block is complete, press it and trim to 8.5” x 8.5” to account for seam allowances. Repeat this process for as many foxes as you want in your quilt layout.
Following this step-by-step method ensures that each fox is uniform and easy to piece. If you’re planning to use sashing or alternate blocks, leave 1/4” seam allowances on all sides.
Layout, Assembly, and Quilting Techniques
Now that you’ve completed your fox blocks, it’s time to lay out your Fancy Fox quilt pattern and prepare for final assembly. This step is where your design really comes to life!
Start by arranging your blocks on a large flat surface. Play around with the layout—random, symmetrical, color-themed, or grouped by fabric style. The layout determines the overall look of the quilt and can create a strong visual impact.
If using sashing, sew strips between the blocks and rows. This helps frame each fox and adds a modern grid feel. For a baby quilt, you may want to keep it simple and skip the sashing for a tighter design.
Once the layout is finalized, sew the blocks together by rows, then join the rows. Be sure to match seams and press each row in opposite directions for easy nesting during final assembly.
After the top is sewn, create your quilt sandwich—top, batting, and backing. Use safety pins or basting spray to secure the layers. Choose a batting that suits your preferred weight and drape.
When quilting, straight-line stitching or echo quilting around the fox faces works beautifully. You can also free-motion quilt swirls, leaves, or geometric shapes in the background for added texture.
Finally, trim the edges and add your binding. A bright or contrasting binding can frame the quilt nicely. Don’t forget to label your quilt if it’s a gift—these foxes are bound to become a beloved keepsake.
Final Thoughts: A Whimsical Touch to Your Quilt Collection
The Fancy Fox quilt pattern is a delightful blend of charm and simplicity, making it a standout choice for your next quilting project. Whether you’re sewing for a child, a gift, or simply adding to your own collection, these fox faces bring a touch of joy to any quilt.
From cutting fabric to piecing and layout, each step offers opportunities for creativity. Mix and match colors, use scraps from your stash, or coordinate an entire woodland-themed design with other animals and motifs.
What makes this one of the most beloved quilt patterns is how approachable it is. You don’t need years of experience or special tools—just basic quilting supplies, a love for fabric, and a playful spirit.
This project is also a great way to improve your piecing skills, experiment with fabric choices, and create something that’s both practical and beautiful. And because the design is modular, it’s easy to scale up or down depending on your needs.
Whether you finish a single block as a mini wall hanging or create a full-sized quilt, the Fancy Fox will always stand out with personality. It’s a pattern that’s as fun to make as it is to share.
So grab your rotary cutter, choose your fabrics, and let your next quilt project be full of foxy flair!


