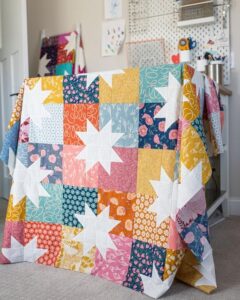
The Star Pop quilt pattern brings a playful yet modern aesthetic to the world of quilt patterns, making it a favorite among quilters who love stars, geometry, and bright, fun fabrics. Whether you’re a beginner or an experienced quilter, this pattern offers a rewarding creative process and a finished product that’s sure to turn heads. With its radiant star motif and bold color opportunities, the Star Pop quilt fits beautifully into home décor, baby gifts, or even wall hangings.
In the world of quilting, few designs are as iconic and satisfying as the star block. The Star Pop quilt pattern elevates this beloved motif by integrating modern design principles with clean lines, fresh layouts, and creative colorwork. This makes it not just a timeless choice, but also a trendy and fresh one. With the right color palette, your Star Pop quilt can evoke vintage charm or contemporary chic with equal ease.
This guide offers a full breakdown of how to make your own Star Pop quilt from scratch, including detailed cutting instructions and measurements. You’ll find step-by-step instructions below, along with useful tips to help you get the most from your materials. The goal is to help you create a beautiful, personalized quilt using one of the most dynamic quilt patterns out there today.
Fabric Requirements and Cutting Instructions
Before diving into piecing the Star Pop quilt pattern, it’s important to gather and prepare your materials. This quilt is often made using precut fabric bundles, such as fat quarters or layer cakes, but you can also cut from yardage if you prefer.
To make a 60″ x 72″ throw-size quilt, you will need:
-
20 fat quarters (each at least 18” x 21”)
-
2 yards of background fabric (white, gray, or a low-volume print)
-
3/4 yard for binding
-
4 yards for backing
-
Batting to match finished size (approx. 65” x 77”)
Start by cutting the fabric as follows:
-
From each fat quarter:
-
Cut (2) 5” squares for the star points
-
Cut (2) 4.5” squares for the center and background
-
-
From background fabric:
-
Cut (40) 5” squares
-
Cut (40) 4.5” squares
-
Accurate cutting is essential for this quilt pattern to come together cleanly. Take your time to align your ruler and rotary cutter carefully. Labeling your fabric pieces with sticky notes can help keep everything organized during the assembly process.
Remember that color placement is key to the Star Pop quilt’s visual impact. Consider pairing high-contrast fabrics for the stars and centers to make your design really “pop.” Low-volume or solid backgrounds work best to highlight the boldness of the stars.
A design wall or a large table can be incredibly helpful for laying out your blocks before sewing. This lets you visualize the overall layout and make adjustments to color placement before committing to the seams.
Piecing the Star Pop Quilt Blocks
Once your fabric is cut, it’s time to begin assembling your blocks. Each star block is made from four flying geese units, a center square, and corner background squares.
To make a flying geese unit:
-
Take one 4.5” x 4.5” print square and two 2.5” x 2.5” background squares.
-
Place a background square on one corner of the print square, right sides together, and draw a diagonal line.
-
Stitch on the drawn line, trim the excess, and press open.
-
Repeat on the opposite corner to form a completed flying geese unit.
Make four flying geese units for each star block. These form the points of the star. Use a consistent 1/4″ seam allowance for accuracy.
Next, assemble each star block:
-
Place the 4.5” center square in the middle.
-
Attach two flying geese units to either side of it.
-
Sew 4.5” background squares to the ends of the remaining flying geese units.
-
Join the rows to complete a star block.
Repeat this process until you have 20 star blocks. The consistent construction and crisp lines will give your finished quilt a polished and professional look.
Press your seams carefully at each step, either open or to the side depending on your preference. A well-pressed block will lay flat and make assembly much easier down the line.
Finally, trim each finished block to 12.5” square if needed to ensure consistency before moving on to quilt top assembly.
Assembling the Quilt Top
Once all of your blocks are complete, it’s time to lay out the quilt top. You can choose a traditional grid layout or alternate your blocks with solid sashing for a more open, airy design.
Start by arranging your blocks into a layout that’s 4 blocks wide by 5 blocks tall. Play with positioning to balance colors and values throughout the quilt top.
Sew your blocks into rows first, pressing seams in alternating directions to reduce bulk when joining rows together. Then join the rows into a completed quilt top.
Optional sashing: Add 2.5” wide sashing strips between blocks and rows for a more defined structure. You’ll need an additional yard of background fabric if you choose to add sashing.
Add a 2.5” to 3.5” wide border around the quilt top if you want a framed effect or to increase the final dimensions.
At this stage, give your quilt top a final press and square it up before layering it with batting and backing. A clean, even top is essential for smooth quilting later.
Now your Star Pop quilt pattern is coming to life, and you’re ready for quilting and finishing touches.
Quilting and Finishing the Star Pop Quilt
Layer your quilt top with batting and backing, then baste using your preferred method—spray basting, pins, or hand basting all work well. Be sure the layers are smooth and flat.
Choose your quilting method. Straight-line quilting accentuates the modern aesthetic of the Star Pop quilt, while free-motion quilting can add texture and personality.
A simple grid or echo quilting around the star shapes is a great beginner-friendly option. These designs emphasize the geometry of the blocks while keeping things manageable.
If you prefer hand quilting, use perle cotton and big stitches for a modern handmade touch. This works especially well if you used solid fabrics in your design.
Once quilting is complete, trim the excess batting and backing to match the quilt top. Bind the quilt using 2.5” binding strips cut from your binding fabric.
Fold the strips in half lengthwise and sew to the front of the quilt using a 1/4” seam. Fold over to the back and hand stitch in place for a clean finish.
Your Star Pop quilt is now complete—wash, dry, and enjoy the crinkled, cozy texture that makes every handmade quilt feel so special.
Final Thoughts on the Star Pop Quilt Pattern
The Star Pop quilt pattern is a joyful project full of vibrant stars and modern flair. Its accessible block construction makes it perfect for confident beginners while offering enough visual interest to captivate more advanced quilters.
Whether you’re using a curated fat quarter bundle or diving into your fabric stash, this quilt pattern offers endless color combinations and design possibilities.
It’s also an excellent project for gifting—think baby showers, birthdays, or even holiday décor. The star motif is timeless and universally loved.
Don’t be afraid to add your own twist to the pattern—play with negative space, incorporate metallic fabrics, or even change block sizes to create custom designs.
Because the Star Pop pattern is built around repeated blocks, it’s also a great option for group quilting projects or block swaps.
By following the step-by-step guide above and using high-quality materials, you can create a beautiful, durable quilt that reflects your unique style and creativity.


