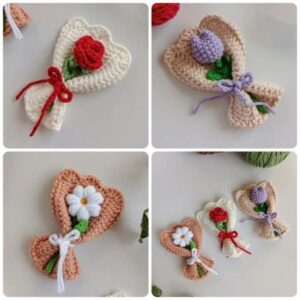
A Crochet Mini Bouquet is the perfect blend of creativity, charm, and handmade elegance. Whether you’re looking for a heartfelt gift, a whimsical home decor piece, or a portable project to practice your stitches, this project is sure to spark joy. Combining the beauty of flowers with the therapeutic nature of crochet, it’s an accessible and rewarding endeavor for crafters of all skill levels.
This delightful DIY project not only lets you play with color and texture, but also gives you an opportunity to explore different crochet patterns in one creation. From tiny tulips to dainty daisies, you can experiment with a range of floral shapes and sizes, all while building your confidence in the craft. It’s a compact, non-intimidating project that yields beautiful, decorative results.
In this article, we’ll guide you through a step-by-step tutorial on how to create your own Crochet Mini Bouquet using a combination of popular crochet patterns. You’ll learn how to make each type of flower, assemble them into a bouquet, and add finishing touches that make your creation truly unique. Whether you’re a beginner or a seasoned crocheter, you’ll love the process and the final result.

Choosing the Right Materials
When starting your Crochet Mini Bouquet, selecting the right materials is key to a beautiful and lasting creation. The first thing to consider is your choice of yarn. For detailed, delicate flowers, lightweight yarn such as cotton or acrylic in DK or sport weight is ideal. These fibers hold shape well and come in a variety of vibrant colors.
Next, choose your crochet hook based on the yarn’s recommended size. Typically, a 2.5mm to 3.5mm hook works well for small floral components. Using a smaller hook than suggested can result in tighter stitches, which is often desired for a neater flower structure.
You’ll also need a pair of sharp scissors and a yarn needle for weaving in ends and stitching your bouquet together. Optional materials include floral wire or pipe cleaners, which can be inserted into the stems for added support and positioning.
For flower centers and details like leaves or stems, you can use green and yellow yarns or even small beads and buttons. These elements add personality and texture to each flower, making your bouquet more realistic and artistic.
If you want your bouquet to stand up in a vase or be held together securely, consider using a small cone of floral foam or a tightly wrapped piece of felt as the bouquet base. Wrap the final creation with ribbon or lace for a beautiful finishing touch.
Always pre-cut your yarn into manageable lengths. For small flowers, 12-18 inches of yarn per color is often enough. Prepare at least 5–10 different colors to give your bouquet a vibrant, garden-fresh appearance.
Creating Your First Mini Flower
The foundation of your Crochet Mini Bouquet lies in the individual flowers. Let’s start by crocheting a simple five-petal daisy — one of the easiest and most versatile crochet patterns.
Start with a magic ring. Chain 1, then work 10 single crochets (sc) into the ring. Pull it tight and join with a slip stitch. This forms the flower center. Change color if desired for the petals.
For the petals: Chain 3, then work 2 double crochets (dc) into the same stitch. Chain 3 again and slip stitch into the next stitch. Repeat this sequence around the circle for a total of 5 petals.
Once all petals are complete, fasten off and leave a long tail for sewing. You can now weave in the ends or use the tail to attach the flower to a bouquet base later.
Repeat this basic flower design in various colors for a fun mix-and-match look. Consider using different petal shapes by changing the stitch height — like half double crochets (hdc) or treble crochets (tr) — to vary the bouquet.
You can also create tiny tulips by working in rounds and shaping the top of the flower with slip stitches. Roses can be made using a long strip of shell stitches that are rolled and sewn into shape. All these options bring variety to your bouquet.
Assembling the Mini Bouquet
Now that you have a collection of flowers, it’s time to assemble your Crochet Mini Bouquet. Begin by arranging your flowers flat on a table, grouping them by size and color. This helps you plan the layout before stitching or gluing them into place.
Attach each flower to a pipe cleaner or floral wire by sewing the back of the flower around the stem or gluing it carefully. You can also crochet small green leaves and attach them along the wire stem for added detail.
Gather 5 to 7 flowers to form a small cluster. Bind the stems together using green floral tape or yarn. This creates a stable, hand-held bouquet. If you prefer a vase-style arrangement, you can insert the stems into a foam cone or a narrow vase.
Add more layers by attaching small filler flowers or crochet leaves around the main blooms. Vary the height of the stems to create a natural, blooming effect. Use your creativity to balance color and texture.
Once your bouquet is shaped, wrap the stem area with a strip of lace or a crochet band to finish the look. Tie a ribbon around the bouquet for an added touch of elegance.
Consider attaching a small tag or note to your bouquet if you’re giving it as a gift. Personal touches like this make your crochet project even more special and memorable.
Customizing Your Bouquet for Different Occasions
One of the best parts of a Crochet Mini Bouquet is its versatility. You can tailor the flowers and colors to match holidays, celebrations, or personal style. For instance, choose red and pink tones for Valentine’s Day, or pastel shades for a baby shower.
For weddings, create a bouquet using the bride’s theme colors and add pearls or beads for an extra elegant touch. You can also attach a pin or brooch to the ribbon for a sentimental accent.
To make a bouquet suitable for home decor, match the yarn colors to your room’s palette. You can also create a set of mini bouquets and place them in jars or small vases around the house.
If you’re crafting for kids, use bright and playful colors. Add fun embellishments like googly eyes or smiley face buttons in the center of the flowers. It’s a cheerful, interactive project for the whole family.
Another great idea is to combine crochet patterns by adding small butterflies, bees, or ladybugs to your bouquet. These extra details enhance the bouquet’s theme and visual appeal.
No matter the occasion, your bouquet can be personalized with endless creativity. This makes each project not only a handmade craft but also a meaningful gift or decorative piece.
Final Thoughts and Creative Tips
Crafting a Crochet Mini Bouquet is a joyful way to explore your skills with crochet patterns while creating something meaningful. The project offers endless customization, making it perfect for gifts, decor, or relaxing craft time.
If you’re new to crochet, start small. Focus on mastering a single flower type and gradually build up your bouquet. As your skills grow, try more complex flower shapes or add detailed embellishments.
Don’t hesitate to mix in different textures and fibers. For example, adding a touch of metallic or glitter yarn can give your bouquet a whimsical or festive flair.
Take your time during assembly. The final presentation matters just as much as the individual flowers. Pay attention to balance, symmetry, and how the bouquet feels in your hand or looks in a vase.
This project is a wonderful opportunity to use leftover yarn. It’s eco-friendly and budget-conscious while still yielding beautiful results. Plus, it’s a great way to test out new crochet patterns without committing to a larger project.
In the end, your Crochet Mini Bouquet becomes more than just a craft—it becomes a piece of your heart made with love and creativity. Happy crocheting!


