The Ohio Star quilt block pattern is a timeless and beloved design that has captured the hearts of quilters for generations. Known for its striking geometric symmetry and classic look, the Ohio Star is a must-learn block for anyone who enjoys making a quilt or exploring traditional quilt patterns. Its simplicity and elegance make it an excellent choice for both beginners and experienced quilters alike.
Creating an Ohio Star quilt block pattern is more than just sewing together pieces of fabric—it’s about celebrating history, craftsmanship, and creativity. This pattern dates back to the early 1800s and was particularly popular in pioneer communities. Its eight-point star layout has stood the test of time, offering endless possibilities for color combinations and fabric choices that bring a unique flair to every finished quilt.
In this guide, you’ll find everything you need to make your own Ohio Star quilt block, including a step-by-step tutorial, fabric cutting instructions, and pro tips to ensure your block comes out beautifully. Whether you’re adding this to a larger quilt project or making a set of star blocks for a wall hanging, this tutorial will walk you through each part of the process with ease.
Understanding the Ohio Star Quilt Block
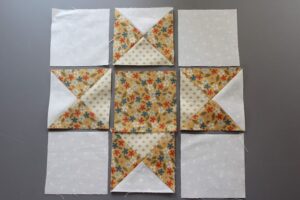
The Ohio Star quilt block pattern is based on a simple nine-patch grid, featuring a large central square, four corner squares, and four quarter-square triangle units. This layout offers a balanced and symmetrical design that’s pleasing to the eye.
The beauty of the Ohio Star lies in its flexibility. You can use bold, contrasting colors for a dramatic effect or soft, complementary hues for a vintage or subtle appearance. No matter what fabrics you choose, the star will always stand out thanks to its distinct design.
This block is typically made in sizes ranging from 6 inches to 12 inches. In this tutorial, we’ll focus on the popular 12-inch finished block size, which is perfect for a wide range of quilt patterns.
To create this block, you only need basic quilting tools like a rotary cutter, ruler, mat, and sewing machine. You’ll also need a selection of fabrics in coordinating colors. For the best result, use high-quality 100% cotton quilting fabric, which is easier to work with and offers better durability for your quilt.
The Ohio Star quilt block pattern helps build essential piecing skills, especially in making quarter-square triangles, which are a great technique to master for other classic quilt patterns as well.
Once you’ve learned the technique, you can reproduce this block in different sizes and incorporate it into your own custom quilt patterns—or even turn it into a pillow, tote bag, or table runner for a functional project with charm.
Fabric Requirements and Cutting Instructions
To make one 12-inch finished Ohio Star quilt block, you’ll need three different fabrics: a background fabric, a star fabric, and a center square fabric. Here’s what to cut:
-
Background Fabric (light):
-
(4) 4.5” x 4.5” squares for corners
-
(2) 5.25” x 5.25” squares for quarter-square triangles
-
-
Star Fabric (dark or contrasting):
-
(2) 5.25” x 5.25” squares for quarter-square triangles
-
-
Center Square Fabric (can match star or be a different print):
-
(1) 4.5” x 4.5” square for the center
-
Each piece plays a specific role in forming the distinct star shape of the Ohio Star quilt block pattern. Precision in cutting is key to getting neat seams and clean alignment.
Start by cutting all your fabric according to the sizes listed above. Use a rotary cutter and ruler on a self-healing mat to ensure accurate, clean cuts.
When choosing fabrics, consider using solids or small prints that won’t distract from the shape of the star. High-contrast fabrics will help the star design stand out more effectively.
Make sure to press your fabric well before cutting. Wrinkles can skew your measurements and affect your block’s accuracy.
Label each fabric piece with a sticky note or lay them out on a design board to keep everything organized during assembly.
Step-by-Step: Sewing the Ohio Star Quilt Block
Now that you’ve cut all your fabric pieces, it’s time to assemble your Ohio Star quilt block pattern. This process includes making quarter-square triangles and joining all the units into a finished 12-inch block.
-
Create Half-Square Triangles (HSTs):
Pair one 5.25” background square with one 5.25” star fabric square. Place right sides together, draw a diagonal line, and sew 1/4” on both sides of the line. Cut along the line and press open to make two HSTs. Repeat with the second pair. -
Make Quarter-Square Triangles (QSTs):
Take two HSTs (from different pairs), place them right sides together with seams aligned. Draw a diagonal line across the seams. Sew 1/4” on both sides, cut along the line, and press. You’ll have two QSTs. Repeat with the remaining HSTs for a total of four QST units. -
Trim QSTs to 4.5” x 4.5”:
This ensures all your units fit perfectly into the final layout. Use a square ruler to center the diagonal seams and trim each unit evenly. -
Lay Out the Block:
Arrange the pieces in a 3×3 grid: place the four background squares in each corner, the QST units on the sides with the star points pointing inward, and the 4.5” center square in the middle. -
Sew Rows Together:
Stitch each row together using a 1/4” seam. Press the seams in alternating directions (top row to the right, middle to the left, bottom to the right) to nest the seams. -
Join the Rows:
Match the seams carefully and sew the rows together. Press the final seams flat. Your Ohio Star quilt block should now measure 12.5” square (including seam allowances).
This step-by-step method ensures your block is crisp, aligned, and beautifully showcases the star design—perfect for any quilt.
Creative Ideas for Using the Ohio Star Block
One of the joys of quilting is how one block can lead to countless creative projects. The Ohio Star quilt block pattern is no exception, offering endless possibilities for crafting beautiful items.
You can use multiple Ohio Star blocks in a single quilt, repeating the design across rows and columns to form a cohesive pattern. Change the colors in each block for a scrappy, eye-catching effect.
Try alternating Ohio Star blocks with plain squares or sashing to create more negative space and let the stars shine. This technique works well in modern quilt patterns that mix traditional and contemporary styles.
Use the Ohio Star block as the focal point in smaller projects. Add borders to make a decorative pillow cover or a mini quilt. It also makes a lovely panel for tote bags or pouches.
For seasonal decor, consider making Ohio Star blocks in themed colors—red, white, and blue for patriotic quilts, or warm earth tones for fall-inspired pieces.
If you enjoy sampler quilts, the Ohio Star quilt block pattern is a great addition. It pairs well with other classic blocks like the Churn Dash, Log Cabin, or Flying Geese, offering contrast and balance.
Finally, try resizing the block! A 6-inch version makes an adorable mug rug or coaster, while a 15-inch block can be the centerpiece of a lap quilt or wall hanging. Adaptability is one of this block’s best features.
Tips for Success and Quilting Inspiration
Perfecting your Ohio Star quilt block takes a bit of practice, but these helpful tips will make your sewing experience smoother and more enjoyable.
Always double-check your fabric measurements before cutting. Accurate cuts are crucial to ensuring that all parts of your block fit together properly.
Use a consistent 1/4” seam allowance throughout. A quilting foot or seam guide can help maintain accuracy. Even slight variations in seam width can throw off your block’s symmetry.
Press seams carefully after each step. Pressing (not ironing) with steam or a hot dry iron will help keep your block flat and professional-looking.
If your QST units don’t come out perfectly square, take the time to trim them accurately. This small step makes a big difference in your final quilt block.
Keep a fabric stash with plenty of background, star, and accent fabrics in neutral and bright colors. This gives you flexibility to experiment with different quilt patterns and layouts.
Look for inspiration from vintage quilts, online galleries, or local quilt shows. Seeing how other quilters use the Ohio Star quilt block can spark new ideas and fuel your creativity.
By following this complete guide, you can confidently make your own Ohio Star quilt block pattern and incorporate it into your next quilting project. Whether you’re building a large quilt or experimenting with smaller quilt patterns, the Ohio Star is a versatile and rewarding block that you’ll love sewing again and again.
Ready to start stitching? Gather your fabrics, fire up your sewing machine, and let the magic of the Ohio Star shine in your next creation!


