Disappearing Windmill Quilt Blocks offer a fun and creative way to add movement and intrigue to your quilting projects. By starting with a simple windmill layout and making a few strategic cuts, quilters can create complex-looking designs that are surprisingly easy to achieve. This method has quickly gained popularity among both beginner and advanced quilters for its clever construction and dynamic results.
Whether you’re new to quilting or a seasoned expert, learning how to make Disappearing Windmill Quilt Blocks is a rewarding experience. These blocks use traditional techniques combined with a twist that gives them a modern flair. They’re perfect for those looking to experiment with fresh quilt patterns without having to master complicated techniques.
In this article, we’ll guide you through a step-by-step tutorial for making a Disappearing Windmill Quilt Block, provide cutting dimensions, and share tips for assembling a complete quilt using this pattern. You’ll also find helpful insights into color choices, fabric combinations, and finishing techniques to make your quilt stand out.
What Is a Disappearing Windmill Quilt Block?
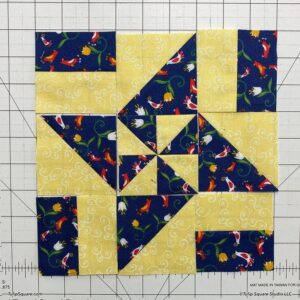
The Disappearing Windmill Quilt Block begins as a classic pinwheel or windmill design, but through precise cutting and rearranging, it transforms into a more intricate block. This transformation makes it look as if the windmill is disappearing or morphing into a different pattern altogether, which adds visual complexity to your quilt.
Unlike traditional blocks that are sewn and left as-is, the disappearing windmill technique involves an extra step: slicing the sewn block into smaller units and rotating or repositioning them. This clever trick gives the illusion of a more elaborate design without additional piecing.
Many quilt patterns featuring disappearing blocks are ideal for scrap fabrics or precut bundles like layer cakes and charm squares. This makes the Disappearing Windmill an excellent option for stash-busting projects or themed quilts that require a cohesive look using various prints.
These blocks can be used individually as part of a sampler or joined together to form the main focus of a large quilt. When repeated across a quilt top, the block creates a swirling, geometric aesthetic that’s both modern and timeless.
Choosing contrasting fabrics helps emphasize the design’s rotation and symmetry. Consider using bold prints for the background and solids or tonal blenders for the windmill blades to make your pattern pop.
The best part about this block is that it’s a low-risk way to try something new. If you make a mistake, the pieces are often salvageable, and the final look still tends to be beautiful, making it a forgiving and beginner-friendly quilt pattern.
How to Make a Disappearing Windmill Quilt Block
Creating a Disappearing Windmill Quilt Block is an enjoyable process that starts with basic squares and ends with a visually stunning design. Here’s a complete step-by-step guide along with all the fabric cuts and sizes needed.
Step 1: Gather Your Materials
You’ll need four 5” x 5” squares of fabric in contrasting colors. These will form the initial windmill shape. You’ll also need a rotary cutter, a cutting mat, a quilting ruler, and a sewing machine with a 1/4” foot for accurate seams.
Step 2: Create Half-Square Triangles (HSTs)
Pair each colored square with a contrasting one, right sides together. Draw a diagonal line on the back of one square, sew 1/4” on either side of the line, then cut along the line. Press open to create 8 HSTs that measure approximately 4.5” square after trimming.
Step 3: Lay Out Your Windmill
Arrange your HSTs into a windmill shape, ensuring the darker triangles form the “blades” and the lighter ones make up the background. Sew them together into four blocks of two, then join those into one 8.5” x 8.5” square.
Step 4: Cut the Block
Once your windmill block is sewn, use your ruler to measure 2.25” from each edge and cut vertically and horizontally. This will result in nine segments: four corners, four sides, and one center block.
Step 5: Rearrange and Rotate
Now comes the magic. Rotate the corner squares 180 degrees, so the windmill appears to “disappear.” Optionally, rotate the side blocks 90 degrees to enhance the swirling effect. Keep the center square in place.
Step 6: Sew the Final Block
Stitch the pieces back together row by row, then sew the rows into a completed 8” x 8” block (finished size). You now have a Disappearing Windmill Quilt Block ready to be used in your quilt project!
Tips for Planning Your Quilt with Disappearing Windmill Blocks
Planning your quilt design ahead of time will save you effort and fabric. With Disappearing Windmill Quilt Blocks, you can create visually interesting layouts by repeating the block across rows or rotating each block for a dynamic layout.
Using a design wall or digital design app helps visualize how your quilt top will look. Try arranging blocks in alternating directions to create a zigzag or spiral effect, which adds motion and depth to the overall design.
If you want a more cohesive look, stick to a consistent color palette throughout your quilt. Use shades from the same color family or select a fabric bundle designed for coordinating projects. This can be especially helpful for beginners trying to balance prints and solids.
For a more playful design, consider using novelty prints or themed fabrics. For example, floral, nautical, or seasonal fabrics can turn your Disappearing Windmill Quilt into a storybook creation or a holiday heirloom.
Sashing and borders can also make a big difference. Adding 2” to 3” sashing strips between each block can help frame each windmill and make the pattern easier to see. Borders help define the edge and give your quilt a finished look.
Don’t forget to test a sample block before cutting fabric for the entire quilt. This allows you to double-check your measurements and tweak your design if necessary. It’s always worth taking the time to make sure everything aligns before full production.
Quilting and Finishing Techniques for Disappearing Windmill Quilts
Once all your blocks are assembled, it’s time to think about quilting and finishing your masterpiece. This stage will bring your Disappearing Windmill Quilt to life and ensure it’s both beautiful and durable.
Start by arranging all your finished blocks into your desired layout. Double-check that the designs flow the way you intend. When everything looks good, start sewing the blocks together, row by row.
After sewing the quilt top, add batting and backing fabric to create the quilt sandwich. Use pins or basting spray to secure all layers together before quilting. Make sure everything is flat and wrinkle-free.
For quilting, consider echoing the windmill shapes with diagonal lines or swirls. This not only reinforces the design but also helps keep all layers secure. You can use free-motion quilting, walking foot quilting, or even hand-quilting depending on your skill and preference.
Once quilting is done, trim the edges and prepare your binding. A 2.5” wide binding strip folded in half works well. Attach it to the front of the quilt, then hand-stitch or machine-stitch it to the back to finish your quilt.
Labeling your quilt is the final touch. Add your name, date, and a special message or title. This is especially meaningful if you’re gifting your quilt or entering it into a show.
Proper care ensures your quilt lasts for years. Wash your finished quilt on a gentle cycle with cold water and air dry or tumble dry on low. Store in a breathable bag or cotton pillowcase to keep it fresh and protected.
Why You Should Try the Disappearing Windmill Quilt Pattern
The Disappearing Windmill Quilt Pattern offers a fantastic way to expand your quilting skills and experiment with movement and design. It’s a versatile pattern that’s easy to learn but yields impressive results, making it a favorite in the world of quilt patterns.
One of the main benefits of this pattern is how it transforms a simple block into something that looks far more complex. This transformation delights quilters who enjoy clever techniques with big visual payoffs.
Another reason to try this block is the creative freedom it offers. With so many possibilities for color placement and block orientation, no two Disappearing Windmill Quilts will ever look the same.
It’s also a fantastic pattern for using up fabric scraps or showcasing your favorite prints. Whether you’re making a baby quilt, lap quilt, or full-size bedspread, this block adapts to projects of any size.
The construction method is repetitive but never boring. Once you master the steps, you’ll find yourself making blocks quickly and confidently—perfect for quilting bees or weekend sew-a-thons.
Finally, the finished quilt is always a showstopper. Whether you keep it for yourself, gift it, or enter it into a competition, a Disappearing Windmill Quilt is sure to turn heads and earn compliments.
Conclusion
If you’re looking to create a bold, eye-catching quilt, the Disappearing Windmill Quilt Block is a must-try.
With easy-to-follow steps, creative flexibility, and stunning results, it’s no wonder this technique is becoming a favorite among those exploring new quilt patterns. Give it a try—you’ll be amazed by what you can create with just a few cuts and clever rearranging!


