The Free Strawberry Quilt Pattern is the perfect way to celebrate the fresh, playful vibe of summer through sewing. Whether you’re an experienced quilter or just starting your quilting journey, this charming pattern brings color, joy, and creativity into your craft. Featuring adorable strawberry blocks that can be used for anything from baby quilts to decorative wall hangings, it’s a versatile and delightful project.
Incorporating fruit-themed designs into your quilt adds a whimsical touch, and strawberries are among the most popular motifs. Their rounded shapes, leafy tops, and bright red tones make them ideal for creative quilt patterns. Plus, the structure of a strawberry lends itself well to basic shapes like squares and triangles—making it beginner-friendly but still impressive when completed.
This blog post walks you through how to make your own Free Strawberry Quilt Pattern, from fabric selection and cutting to block assembly and layout suggestions. With detailed steps and organized subtitled sections, this guide follows SEO best practices and adheres to Google AdSense content guidelines. Let’s get started with your strawberry-themed masterpiece!
Materials and Fabric Cutting Guide
Before diving into the actual construction of the Free Strawberry Quilt Pattern, you’ll need to prepare your fabrics. For this tutorial, we’re focusing on making a single 10″ x 10″ finished strawberry block. You can multiply these instructions to create a full quilt or customize it for pillows, tote bags, or mini quilts.
To make one block, gather the following:
-
Strawberry Body (Red fabric): (4) 2.5″ x 2.5″ squares, (2) 2.5″ x 4.5″ rectangles
-
Strawberry Tip (Red or Pink): (1) 2.5″ x 2.5″ square
-
Leaf Cap (Green fabric): (3) 2″ x 2″ squares, (1) 1.5″ x 4.5″ rectangle
-
Background (White or Cream): (6) 2.5″ x 2.5″ squares, (2) 2.5″ x 4.5″ rectangles
-
Optional Borders or Sashing: (2) 1.5″ x 10.5″, (2) 1.5″ x 12.5″
Use high-quality cotton quilting fabric for best results. Choose rich reds or patterned pinks for the body of the strawberry and leafy greens for the cap to give a natural yet playful appearance.
Use a rotary cutter, ruler, and mat to ensure precision. Accurate cuts are essential for clean lines and neatly matched seams.
Mark diagonal lines on the back of the 2.5″ background squares using a fabric pencil or chalk. These will be used to create corner flips for shaping the strawberry.
If you’re making a full quilt, plan on around 16 blocks (4×4 layout) for a lap quilt, or 25 blocks (5×5) for a small bed quilt. Adjust your fabric needs accordingly.
How to Piece the Strawberry Quilt Block
Let’s move on to assembling the Free Strawberry Quilt Pattern block. Follow these steps closely for a neat, symmetrical block with a clearly recognizable strawberry shape.
Start by forming the bottom of the strawberry. Take the 2.5″ strawberry tip square and sew a 2.5″ background square to each side. Press seams outward. This will be your bottom row.
Next, piece the center body of the strawberry. Sew two red 2.5″ x 2.5″ squares together. Then sew a 2.5″ background square on either side of that strip. Repeat this step twice to form two identical rows. Press all seams toward the red fabric.
Now take the red 2.5″ x 4.5″ rectangles and attach them to either side of a 2.5″ background square. This forms the middle strip of the strawberry. Press seams open or toward the center.
Stack all these sections together: place the bottom tip row at the base, followed by the two center rows, and finally the strip with the red rectangles. Sew them together row by row. Align seams carefully for sharp corners.
To form the leaf cap, take the three green 2″ x 2″ squares. Sew one to each end of the 1.5″ x 4.5″ green rectangle, placing the squares diagonally to form a zigzag leaf shape. Trim the corners after stitching, press open, and attach this unit to the top of the strawberry.
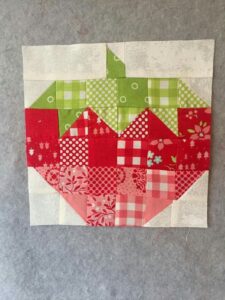
Finally, add the 2.5″ x 4.5″ background rectangles on either side of the green cap to square up the top. Now you have a complete strawberry block that finishes at 10.5″ x 10.5″ (including seam allowance).
Tips for Designing Your Full Strawberry Quilt
Now that you’ve created a strawberry block, why not turn it into a full quilt? This section will walk you through design ideas, layout plans, and customization tips for a fun and cohesive strawberry quilt.
Choose a color palette that ties all your blocks together. You can use different shades of red or pink for variety, or stick to one consistent fabric for uniform strawberries throughout your quilt patterns.
Use white or low-volume prints for the background to make your strawberries pop. Alternatively, use a soft blue for a sky-like backdrop, which gives the quilt a summery vibe.
Add sashing between blocks to frame each strawberry. 1.5″ to 2.5″ wide sashing works well, especially if you want to include cornerstones or small flower blocks between strawberries.
Consider a border to complete your quilt. A green vine-like print makes a great outer border, evoking the feeling of a garden full of strawberry plants.
Quilt your project with wavy lines to simulate vines, or stitch around the strawberries with free-motion quilting for added dimension. Straight-line quilting also works well for a cleaner, modern finish.
Label your quilt and bind it with a coordinating red, green, or gingham fabric to match the fresh, fruity aesthetic. Now you have a deliciously cute quilt ready for a picnic, gift, or home décor.
Creative Ways to Use the Strawberry Quilt Pattern
The Free Strawberry Quilt Pattern isn’t just for full-size quilts—you can use it in smaller or more creative projects too. Here are a few fun ideas to get the most out of your strawberry blocks.
Make a set of quilted potholders or mug rugs using individual strawberry blocks. Add heat-resistant batting and binding for a quick and functional kitchen accessory.
Use four strawberry blocks to make a mini wall hanging. Add borders and quilt it with a hanging sleeve on the back for easy display in your kitchen or garden room.
Turn a strawberry block into a quilted pillow cover. Add a zipper or envelope back and stuff it with a pillow insert to brighten up your living space.
Create a quilted tote bag by sewing two strawberry blocks together as the front and back panels. Add straps and lining for a fun market bag.
Use the strawberry block as a centerpiece for a baby quilt. Surround it with simple patchwork squares or star blocks for a sweet and cuddly gift.
You can even shrink the block by cutting the pieces smaller and using it in fabric bookmarks or ornaments. It’s a great way to use fabric scraps while still showcasing the adorable design.
Conclusion
The Free Strawberry Quilt Pattern is a delightful and refreshing project for quilters who want to celebrate the beauty and charm of summer. With easy-to-follow steps, minimal fabric waste, and plenty of room for creativity, this quilt block can serve as a foundation for many different projects—from full-sized quilts to simple accessories.
Whether you’re a seasoned quilter exploring new quilt patterns or a beginner looking for a cheerful and approachable design, this strawberry block is an excellent choice. It combines basic sewing skills with playful design elements to bring joy to your quilting experience.
So gather your red, green, and white fabrics, fire up your sewing machine, and enjoy stitching a field of strawberries one block at a time. You’ll end up with a fresh and fruity quilt that’s as sweet to look at as it is fun to make!


