The Bird Quilt Block Pattern is a charming and artistic choice for quilters looking to add a touch of nature and whimsy to their creations. Birds are a symbol of freedom, joy, and connection with nature, and incorporating them into a quilt brings both visual interest and personal meaning. Whether you’re creating a wall hanging, baby quilt, or a full-sized bedspread, bird blocks make your work sing—literally and figuratively.
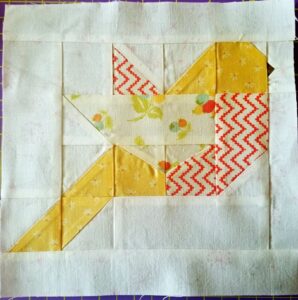
This delightful design uses simple shapes to build the outline and features of a bird. Using traditional quilt patterns, the bird block typically includes triangles, rectangles, and squares to shape the wings, body, and beak. With so many possibilities for color and fabric selection, each bird can look unique, offering endless creativity within a single repeating design.
In this tutorial, we’ll walk you through how to create your own bird quilt block pattern from start to finish. This step-by-step guide includes fabric choices, exact measurements, cutting instructions, and sewing tips—all structured under SEO-friendly headings to help you succeed in crafting and content. Let’s get started on your feathered masterpiece.
Materials and Fabric Cutting for Bird Quilt Block
Before sewing, it’s essential to gather your supplies and prepare your fabric pieces. For this bird quilt block pattern, we’re creating a 10” x 10” finished block. You can replicate it as many times as needed to build a full quilt or use individual blocks for smaller projects.
Here are the required fabric cuts for one bird block:
-
Bird Body (Main color):
(1) 4.5” x 6.5” rectangle
(1) 2.5” x 2.5” square
(1) 1.5” x 2.5” rectangle -
Bird Wing (Contrasting color):
(1) 3” x 3” square (cut once diagonally into 2 triangles)
(1) 2.5” x 3.5” rectangle -
Beak (Orange or Yellow):
(1) 1.5” x 1.5” square (cut once diagonally) -
Background (Light solid or low-volume print):
(4) 2.5” x 2.5” squares
(2) 1.5” x 1.5” squares
(2) 2.5” x 6.5” rectangles
(2) 1.5” x 10.5” strips (for optional sashing)
Choose high-quality cotton fabric to ensure durability and clean stitching. Pick a bright or patterned fabric for the bird’s body to make it stand out. Soft pastels or neutral tones work well for the background so the bird remains the focus.
Accurate cutting is essential. Use a rotary cutter and ruler for clean lines. Mark diagonal sewing lines on background squares where corner triangles will be flipped.
If you’re planning a whole quilt, multiply these fabric cuts by the number of blocks you want. A 4×4 layout creates a 40” x 40” quilt without sashing or borders.
Don’t forget to pre-wash and iron your fabric to avoid shrinkage or bleeding colors after quilting.
Assembling the Bird Quilt Block Pattern
Once your fabric is cut, it’s time to assemble the bird quilt block pattern. This section will walk you through sewing each component together to create the charming bird silhouette.
Begin with the bird body. Take the 4.5” x 6.5” rectangle and attach a 2.5” background square to one top corner using the “stitch and flip” method. Mark a diagonal line on the background square, stitch along it, trim excess, and press the corner open.
Next, sew the beak unit. Use one orange triangle and one 1.5” background triangle to create a small half-square triangle unit. Attach this to the side of the bird’s head (the 2.5” square of the main bird fabric), forming the face.
Now, make the wing. Sew the 3” triangle (from the wing fabric) onto the 2.5” x 3.5” background rectangle to form a right-pointing triangle. Make sure it aligns like a wing pointing outward. Attach this below the bird’s face section.
Combine the body and face sections. Align and sew the head/beak unit to the side of the main bird body rectangle. Press seams carefully to reduce bulk.
Add the background. Use the remaining 2.5” and 1.5” squares to fill in corners and the bottom area to create a square block. Attach the 2.5” x 6.5” background strips to the top and bottom to finish squaring up the block.
You now have a completed 10” x 10” bird quilt block! Press well and square off with a rotary cutter if needed to ensure uniformity when assembling multiple blocks.
Designing a Quilt with Bird Blocks
Once you’ve mastered the bird block, you can explore the many creative ways to use it in full quilt patterns. This section offers layout ideas and design suggestions to inspire your next quilting project.
Try alternating bird blocks with solid color blocks or floral prints to give the quilt breathing room and emphasize the birds. This layout keeps the quilt from feeling too busy and highlights each block’s details.
Use sashing between blocks to define each bird square. Consider using soft blues or greens to simulate a sky or forest environment. Add small cornerstone blocks in contrasting colors for a modern twist.
Arrange birds in different directions—some facing left, others right—to add movement and charm to your quilt. You can even mix in other animal or nature-themed blocks for a full garden or woodland quilt.
Make each bird a different color to reflect different species. A rainbow bird quilt can be especially delightful for children or nature lovers.
For borders, choose leafy prints or bird footprints to enhance the theme. A final binding in a bold, contrasting color will frame the quilt and draw the eye in.
Don’t forget to sign or label your quilt on the back. Include a stitched signature, date, or tag to commemorate your creative effort and make your quilt a treasured keepsake.
Creative Uses for Bird Quilt Blocks
You don’t have to make a full-size quilt to enjoy the bird quilt block pattern. These blocks are incredibly versatile and can be used in a variety of smaller, functional, or decorative projects.
Sew one block into a mini quilt or wall hanging. Add borders and a hanging sleeve to display it in a nursery, office, or garden shed for a cheerful decorative touch.
Turn a bird block into a throw pillow. Add a simple border, quilt the top, and attach a pillow back with a zipper or envelope-style closure for a lovely home accent.
Create a set of placemats using bird blocks. Combine with other nature-inspired blocks or strip piecing to complete a table setting that’s perfect for spring and summer.
Use leftover bird blocks in a tote bag. One bird block on each side makes a bold and artsy bag—perfect for carrying books, groceries, or quilting supplies.
Make a baby quilt using just four or six bird blocks surrounded by soft fabrics and flannel backing. It makes a thoughtful handmade gift for a baby shower.
If you’re into holiday decorating, create seasonal birds using Christmas fabrics or fall tones and turn the blocks into festive runners or holiday wall art.
Conclusion
The Bird Quilt Block Pattern is a delightful and meaningful addition to your sewing repertoire. Not only is it visually striking and symbolic, but it’s also simple enough for beginners and fun enough for advanced quilters. The block’s versatility allows you to explore various quilt patterns and creative layouts while keeping the design playful and nature-inspired.
From pillows and placemats to full-sized quilts, the possibilities are endless when working with the bird block. Whether you want to craft a nature-themed quilt, a modern art-inspired design, or a child-friendly piece full of color and charm, the bird quilt block is a solid foundation.
So grab your favorite fabrics, prep your pieces, and let your creativity take flight. With this pattern and a bit of imagination, your next quilt might just soar to new heights!


