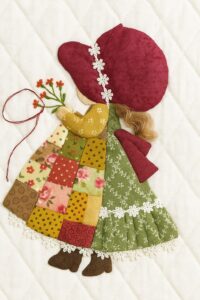
The Sunbonnet Sue quilt block pattern is one of the most beloved and enduring motifs in the world of quilting. This charming and nostalgic design features a sweet little girl wearing a wide-brimmed bonnet and often carrying flowers or a basket. Whether you are a beginner or an experienced quilter, creating your own Sunbonnet Sue block can be a delightful experience. With just a few fabric scraps and some basic sewing skills, you can craft a timeless piece that reflects both tradition and personality.
In this tutorial, we’ll walk you through how to make a Sunbonnet Sue quilt block pattern using clear, detailed instructions. This project is ideal for anyone interested in classic quilt patterns that hold both historical and sentimental value. We will explore the fabric requirements, measurements, and essential tools you’ll need.
By the end of this post, you’ll not only understand the step-by-step construction of the block, but you’ll also gain useful tips to enhance your overall quilting journey. Let’s get started with this heartwarming and creative process.
Choosing Fabrics and Cutting the Pieces
Choosing the right fabrics for your Sunbonnet Sue quilt block pattern sets the tone for your project. Since this is a character-driven quilt block, you can really have fun with prints, textures, and colors. Traditionally, Sunbonnet Sue’s bonnet and dress are made using floral or gingham fabrics.
Start by selecting 100% cotton quilting fabric. You’ll need the following:
- Bonnet: 5″ x 5″ square
- Face: 2″ x 2″ piece of light tan or beige fabric
- Dress: 6″ x 6″ piece
- Arm and hand: 2″ x 2″ scrap of the same fabric as the face
- Shoe: 1.5″ x 2″ piece of brown or black fabric
- Background block: 10.5″ x 10.5″ square (white or neutral background works well)
Before cutting your fabrics, press them flat to remove any wrinkles. Use sharp fabric scissors or a rotary cutter for clean edges. Trace your Sunbonnet Sue template pieces onto the fabrics with a fabric-safe marking pen.
Cut each component carefully following the traced lines. Double-check the orientation of your fabrics—especially directional prints—before making your cuts. Set the pieces aside in labeled sections to avoid confusion later during assembly.
Having all your fabric pieces prepared in advance saves time and keeps your project organized. This prep step also allows you to mix and match your selections until you’re happy with the look of your block. Once everything is ready, you can begin the assembly.
Assembling the Appliqué Pieces
The most recognizable part of the Sunbonnet Sue quilt block pattern is her appliqué silhouette. Now that your pieces are cut, it’s time to start laying them out and preparing for stitching.
Place the 10.5″ x 10.5″ background square on a flat surface. Arrange each Sunbonnet Sue component on top of the block to visualize the final layout. Make sure everything fits nicely within the background space, leaving at least a half-inch margin around the edges.
Begin with the dress at the center of the block. Then position the arm, bonnet, face, and shoes. You can use fusible web to lightly adhere each piece to the background fabric or pin them in place if you prefer traditional hand appliqué.
Once you’re satisfied with the placement, use a small iron to activate the fusible web and secure the pieces, or begin basting them in place using a needle and thread. This prevents shifting while you stitch them down permanently.
You can sew the pieces with a straight stitch, blanket stitch, or zigzag stitch. Choose a thread color that complements your fabric or a neutral tone for a cleaner look. Appliqué stitching is where the character of your block really shines through.
Take your time during this step. The neater and more secure your stitching, the more durable and polished your block will look. You’re now halfway to completing your Sunbonnet Sue block!
Adding Embellishments and Personality
One of the joys of making a Sunbonnet Sue quilt block pattern is personalizing it. Each block can reflect different seasons, hobbies, or even family members. Adding unique embellishments gives your quilt character.
Consider embroidering facial features, though traditionally, Sunbonnet Sue’s face is left blank. You can add small details like a flower bouquet, a basket, or even a pet. Use embroidery floss to outline her hat, dress hem, or to create tiny floral vines.
You can also add texture with lace trims, ric-rac, or tiny buttons sewn onto her dress or bonnet. These details make each Sunbonnet Sue truly one-of-a-kind and bring a tactile quality to your quilt pattern.
For a holiday-themed quilt, dress your Sue in seasonal fabrics—red and green for Christmas, orange for fall, or pastel florals for spring. Customizing each block is a fun way to stretch your creativity.
If you’re making a memory quilt, use fabric scraps from baby clothes, old dresses, or cherished household linens. This turns your quilt into a storybook of textures and colors.
Don’t be afraid to experiment. As long as you stick to the core silhouette, the extras are up to you. This flexibility is what has made Sunbonnet Sue so beloved through generations.
Stitching and Finishing the Block
With all the pieces stitched and embellishments in place, it’s time to finish your Sunbonnet Sue quilt block pattern and prepare it for quilt assembly.
Check all the appliqué pieces to ensure they are securely stitched and there are no loose threads. Press the block gently using a pressing cloth to avoid flattening any dimensional embellishments.
Trim the block to 10″ x 10″ square to remove any uneven edges. Always square up your quilt blocks before assembling them into a larger quilt top. This ensures a cleaner, more professional look.
If you’re planning to join several Sunbonnet Sue blocks, decide whether you want sashing between the blocks or a more traditional patchwork layout. Sashing strips are typically cut at 2.5″ x 10″ to frame each block neatly.
Use a 1/4″ seam allowance to join blocks together. After assembling the quilt top, add borders and batting, then choose a backing fabric to finish your quilt. You can quilt by hand or machine depending on your preference and skill level.
Bind the edges using a double-fold binding strip. This not only secures the edges but adds a polished frame to your finished project. Your Sunbonnet Sue quilt pattern is now a complete and beautiful keepsake.
Tips for Quilting Success and Beyond
To get the best results with your Sunbonnet Sue quilt block pattern, keep a few helpful tips in mind. Consistency and preparation are key to quilting success.
Always wash and press your fabrics before cutting. This helps prevent shrinking and color bleeding later. It also ensures that your pieces lie flat and sew together easily.
When cutting fabric, use a rotary cutter and self-healing mat for precision. Keep your blades sharp to avoid fraying or jagged edges. Accurate cutting leads to more uniform and professional-looking blocks.
Practice your appliqué stitching on scrap fabric before applying it to the final block. This gives you a feel for the stitch length and helps you develop confidence in your technique.
If making a full quilt, plan your color scheme and layout ahead of time. Create a mock-up using paper or software tools to help visualize the final result. This step saves time and avoids clashing patterns or colors.
Lastly, enjoy the process. Quilting is not only about creating something beautiful but also about the joy it brings during each step. From fabric selection to the final stitch, your quilt pattern becomes a story told through fabric.
Whether you’re making one block or a full quilt, the Sunbonnet Sue design remains a timeless favorite. Keep experimenting and making it your own—your creativity is the magic behind every stitch.


