The Alpine Stitch Crochet Pattern is a beautifully textured stitch that brings depth, dimension, and elegance to your handmade creations. If you’re a fan of cozy, stylish textures in your crochet patterns, this one is a must-add to your toolbox. Whether you’re making scarves, dishcloths, or home décor, the alpine stitch offers a versatile and eye-catching design that works across a range of projects.
At first glance, the alpine stitch looks like a complex, layered design, but it’s actually built from basic crochet techniques. Using a combination of front post and double crochet stitches, this pattern creates a woven, almost quilted texture that’s both functional and beautiful. The structure is solid yet flexible, making it perfect for items that need to be both soft and durable.
If you’re new to textured crochet patterns or simply looking to try something fresh, the Alpine Stitch is the perfect place to start. In this post, we’ll cover everything you need—from a beginner-friendly step-by-step tutorial to creative ways to use this stitch in real projects. We’ll also include fabric sizing tips for integrating crochet into sewn items. Let’s jump in!
Materials and Preparations for Alpine Stitch Projects
To start working with the Alpine Stitch Crochet Pattern, you’ll first need to gather a few basic materials. The beauty of this stitch lies in its compatibility with standard yarn and tools, so there’s no need for special supplies.
Begin with a worsted weight (category 4) yarn. Cotton is great for projects like dishcloths, while acrylic or wool blends work well for garments and blankets. The stitch definition is best seen with a solid, light-colored yarn—especially useful when practicing or creating your first alpine project.
Use a crochet hook appropriate for your chosen yarn. Typically, a 5.0 mm (H-8) hook is perfect for worsted weight yarn. However, always refer to your yarn label for precise guidance. Maintaining consistent tension will help preserve the stitch’s beautiful texture.
Other tools you’ll need include a pair of scissors, a yarn needle for weaving in ends, and optionally, a stitch marker to track row changes. These items help keep your work tidy and organized, especially during long rows of alpine stitching.
If you plan to combine your crochet panel with fabric (e.g., as part of a pillow or tote bag), make sure to cut your fabric panels at least ½ inch wider and taller than your finished crochet piece to account for seam allowances. For example, if your panel is 10″ x 10″, your fabric cuts should be 11″ x 11″.
When preparing your starting chain, always work in a multiple of 2 + 1. This will ensure the stitch repeats properly across the row. For a basic practice swatch, try chaining 33 (32 + 1), which gives you a neat 6-inch width.
Step-by-Step Instructions: How to Crochet the Alpine Stitch
Ready to learn the Alpine Stitch Crochet Pattern? Here’s a simplified step-by-step guide that even beginners can follow. This stitch is built over a four-row repeat, alternating texture and structure.
Row 1 (foundation): Start with a chain in a multiple of 2 + 1. For practice, chain 33. In the second chain from your hook, single crochet (sc), then sc in each stitch across. This row sets the stage for your textured pattern.
Row 2: Chain 2 and turn. Work one double crochet (dc) in each stitch across. These will serve as the base for the front post stitches in the next row. Finish the row, chain 1, and turn your work.
Row 3: Begin with a single crochet in the first stitch. Next, alternate between a front post double crochet (fpdc) around the dc two rows below, and a single crochet in the next stitch. Repeat across the row, ending with a single crochet. Chain 2 and turn.
Row 4: Work one double crochet in each stitch across. This returns the row to a flat surface, preparing it for the next textured layer. Chain 1 and turn at the end of the row.
Repeat: Continue alternating between Row 3 (fpdc row) and Row 4 (dc row) until you reach your desired length. End on a Row 4 for a flat top edge. Fasten off and weave in all ends using your yarn needle.
This four-row sequence creates a plush, almost quilted look. As you continue, the fabric gains depth and structure—perfect for many creative crochet patterns that demand texture and style.
Creative Uses for the Alpine Stitch Crochet Pattern
Once you’ve mastered the Alpine Stitch Crochet Pattern, you’ll find it easy to apply to a variety of stylish and practical crochet projects. Its versatility and eye-catching texture make it a favorite among experienced crafters.
The alpine stitch is perfect for cozy crochet blankets. Its thick, plush texture makes it ideal for snuggling under during cooler months. Use single-color yarns for a classic look or mix tones for a modern, gradient effect.
Crochet scarves and cowls also benefit from this textured stitch. It traps warmth beautifully while adding visual interest to otherwise simple accessories. Plus, the firm structure helps maintain the shape of the piece over time.
Create stunning crochet pillow covers using this pattern. When sewn together with fabric panels, it adds a luxurious handmade feel to any living room. Remember to cut fabric panels slightly larger than your finished crochet size to allow for stitching and hemming.
The Alpine Stitch also works wonderfully in crochet bags and pouches. Its tight weave and visual structure give these items both function and flair. Lining with fabric ensures durability and provides added strength for carrying items.
Make unique crochet dishcloths or hot pads. The raised texture makes cleaning more effective and offers great insulation when used as a trivet. Just be sure to use cotton yarn, which handles heat and moisture better than synthetic fibers.
Finally, consider using alpine stitch panels in mixed media projects like quilts, wall art, or clothing embellishments. In this case, always account for the crochet panel’s thickness and stretch when combining with fabric cuts.
Tips for Mastering and Customizing the Alpine Stitch
Even though the Alpine Stitch Crochet Pattern is beginner-friendly, a few expert tips will help you get the most out of your project. These suggestions can also make your work look even more polished and professional.
Keep your tension consistent. Because this pattern alternates between front post and regular stitches, uneven tension can cause puckering. Take your time on the first few rows and adjust your grip as needed.
Choose the right yarn. A solid, non-fuzzy yarn helps highlight the alpine texture. Variegated or speckled yarns may camouflage the details of the pattern, which is part of its charm.
Use stitch markers at the beginning of each row to help you keep track of your pattern, especially during longer projects. It’s easy to lose count of rows when you’re in the zone, so markers help you stay organized.
Don’t skip blocking. Gently steam-block your finished piece to relax the stitches and improve the overall look. Blocking is especially important if you plan to sew the panel into a larger item like a pillow or bag.
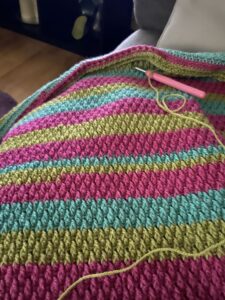
Try customizing the look by alternating yarn colors every two or four rows. This enhances the stitch definition and adds personality to your projects. Color changes work especially well in scarves or baby blankets.
If using your piece with fabric, be sure to pre-measure and cut all fabric components with seam allowances. Typically, adding ½ inch on each side of your fabric squares or rectangles is enough to allow for proper sewing and finishing.
Conclusion
The Alpine Stitch Crochet Pattern offers a perfect blend of texture, elegance, and simplicity. With just a few fundamental stitches—single crochet, double crochet, and front post double crochet—you can create a deeply textured fabric that enhances any project. Whether you’re designing a cozy blanket, a stylish scarf, or an eye-catching pillow cover, this stitch will bring your work to life.
For lovers of creative crochet patterns, the alpine stitch provides a welcome change from flat designs, adding visual interest and tactile charm. It’s easy to learn, adaptable for many uses, and enjoyable to work with. Once you get the hang of it, you’ll likely find yourself using this pattern again and again.
Take your time learning, and don’t be afraid to experiment. With each row you stitch, you’ll gain confidence and new ideas. So grab your yarn, hook, and favorite tea—your next favorite crochet project is waiting to take shape!


