If you’re looking to stay cozy while crafting something stylish and practical, then learning how to crochet slippers pattern is the perfect project. This enjoyable and fulfilling activity is not only great for beginners but also exciting for seasoned crocheters who want to try new crochet patterns. Making your own slippers allows you to personalize them with your favorite colors, yarn textures, and decorative flourishes.
The beauty of crochet is in its versatility. With just a hook and some yarn, you can create anything from accessories to clothing to functional home items like slippers. In this tutorial, we’ll explore the best techniques for creating your very own pair of handmade slippers using simple stitches and easy-to-follow steps.
In addition to the warmth and comfort they provide, these handmade slippers make fantastic gifts. They’re also a great way to use up leftover yarn from other crochet patterns, making them an eco-friendly choice for crafters who value sustainability. Let’s dive into the steps to create your own slippers from scratch!
Choosing the Right Yarn and Tools
To start any crochet project, selecting the right materials is essential. For slippers, you’ll want to choose yarn that is both soft and durable, providing both comfort and structure.
Thicker yarns such as worsted weight or bulky yarn work best for slippers. They offer better warmth and a firm texture, helping the slippers hold their shape. Opt for blends that include wool or acrylic for added durability.
A crochet hook that matches your yarn is also important. Typically, for worsted weight yarn, a 5mm to 6mm crochet hook is ideal. Be sure to check the yarn label for recommended hook sizes.
Other useful tools include stitch markers, scissors, and a yarn needle for weaving in ends. These small additions can make your project go smoother.
You’ll also want a measuring tape to ensure your slippers come out in the correct size. Slippers should fit snugly, so accuracy matters when determining the length and width of your base.
Before starting the actual project, consider making a gauge swatch. This small sample helps you check your stitch size and tension, ensuring the final slippers are a perfect fit.
Starting the Base of the Slipper
Now that your tools and yarn are ready, it’s time to begin the first part of your how to crochet slippers pattern—the sole. This part sets the foundation for the entire project.
Start with a slip knot on your hook and chain a length equal to the desired slipper length (usually around 20–25 chains for adults). This chain will become the base of your sole.
Using single crochet (sc) stitches, work down one side of the chain, and when you reach the end, continue around to the other side to create an oval shape. This allows the sole to grow symmetrically.
Continue crocheting in the round for several rows, increasing at the ends of the oval to shape the toe and heel. You’ll want the sole to be about the same size as your foot.
Once your sole is complete, fasten off and weave in the end. Repeat the same steps for the second slipper, making sure both soles are symmetrical in size and shape.
Adding a double sole (by repeating and stitching two soles together) gives extra thickness and comfort. This is especially useful if you plan to wear the slippers on hard floors.
Building Up the Slipper Sides
With the base completed, the next step in this crochet pattern is to build the sides of the slipper. This step determines the slipper’s height and fit.
Attach yarn to the sole with a slip stitch and start crocheting around the edge using single crochet stitches. This creates the side walls of the slipper.
Crochet in the round for about 4–6 rows to reach the desired height. You can adjust the number of rows based on whether you prefer a low-cut or high-top slipper style.
For the heel, you can leave an opening or work back and forth in rows to shape it to your liking. Decreasing stitches at the sides can help contour the heel.
As you reach the toe area, you may want to decrease slightly to shape the front of the slipper. This keeps it from looking boxy and helps with fit.
Continue adding rows and adjusting stitches until the slipper comfortably hugs your foot. Use stitch markers to keep your rounds even and consistent.
Once the sides are done, fasten off and weave in the ends. Try the slipper on and make any necessary adjustments to improve fit before starting the second one.
Adding Finishing Touches and Customization
One of the best parts of working with crochet patterns is the ability to personalize your project. Here’s where you can add style and flair to your slippers.
Consider adding a contrasting color trim around the top of the slippers. This simple detail can give your work a professional, polished look.
You might also want to attach a strap or button across the top for extra support and decorative value. This is especially helpful for slippers that feel a bit loose.
Embroidering simple shapes or flowers on the top can add charm. If you have some extra yarn, crochet small appliqués to sew onto the toe.
Another great option is to line the slippers with fleece or flannel for extra warmth. Simply cut fabric to the size of your slipper interior and sew it in with a yarn needle.
If you’re planning to use these slippers on hardwood or tile floors, consider adding a non-slip fabric or rubber dots to the soles for added safety.
Finally, repeat the full process for the second slipper, ensuring symmetry in size, shape, and decoration. Now you have a beautiful and functional pair of handmade slippers!
Tips for Perfecting Your Crochet Slippers
Here are some additional tips to help make your how to crochet slippers pattern project a success from start to finish.
Always measure your feet before you start. This ensures your slippers won’t be too tight or too loose.
Use high-quality yarn. Since slippers are worn frequently, a strong, washable yarn will extend their life and keep them looking new longer.
If you’re new to crochet, practice the stitches beforehand—especially single crochet, double crochet, and increasing/decreasing.
Use stitch markers to track your rounds or rows. They help prevent confusion and keep your work consistent.
Be sure to block your finished slippers. Wet them slightly, shape them, and let them dry flat. This process evens out stitches and improves overall shape.
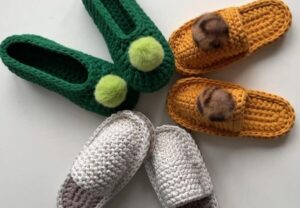
Don’t be afraid to get creative! Try different color combinations, add tassels or pom-poms, or even incorporate granny squares into your design.
With this detailed guide on how to crochet slippers pattern, you’re well on your way to making your very own cozy footwear. Not only is this a fun and fulfilling crochet project, but it also allows for endless personalization using various crochet patterns.
Whether for yourself or as a thoughtful handmade gift, these slippers are a warm and wonderful expression of your creativity. Happy crocheting!


