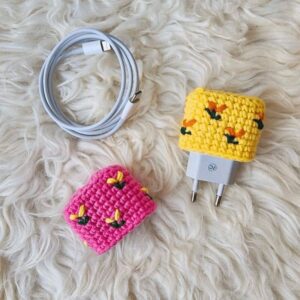
Looking for a way to add personality to your tech accessories? This Cute Charger Adapter Cover Crochet 🌷 pattern is the perfect combination of practicality and charm. With a few simple stitches and some leftover yarn, you can transform a plain charger into an adorable, personalized piece of art. Whether you’re a crochet beginner or a seasoned crafter, this small project offers a quick, satisfying win.
This crochet project is not only a fun way to express your creativity but also helps protect your charger adapter from dust and wear. The pattern uses basic crochet patterns and stitches, making it accessible to crafters of all levels. It’s also a great way to use up scrap yarn and make thoughtful handmade gifts.
In this tutorial, we’ll guide you step-by-step on how to make your very own Cute Charger Adapter Cover Crochet 🌷. We’ll cover everything from materials and measurements to stitches and finishing touches. By the end of this post, you’ll be ready to add a delightful handmade cover to every charger in your home!
Materials and Measurements
To get started with your Cute Charger Adapter Cover Crochet 🌷, gather the following materials:
- Worsted weight cotton yarn in 2 or more colors
- Crochet hook size 3.5 mm (E-4)
- Scissors
- Tapestry needle
- Measuring tape
- Stitch marker (optional)
For this project, you’ll need to measure your charger adapter. Most standard phone chargers measure about 2.5 inches (6.4 cm) tall, 1 inch (2.5 cm) wide, and 1 inch (2.5 cm) thick. Use these dimensions to adjust the pattern as needed. You want the cover to fit snugly but not tightly.
Using cotton yarn is ideal because it holds its shape well and is less likely to stretch out over time. Choose soft pastel colors or mix and match vibrant hues to make your design pop. If you prefer, you can also add embellishments like tiny bows, flowers, or eyes to give it a character-inspired look.
Be sure to have your tools on hand before beginning. A stitch marker will help keep track of your rounds if you’re working in the round. The tapestry needle is used for weaving in your yarn ends neatly at the end of the project.
Once your materials are ready and you’ve taken measurements, you can begin crocheting the main base for your adapter cover. The base is made with simple stitches that are easy to memorize and repeat.
Step-by-Step Instructions
Let’s begin with the base of the Cute Charger Adapter Cover Crochet 🌷. You’ll be working in rounds to form a sleeve that wraps around the adapter.
- Foundation Chain: Chain 10 stitches or enough to match the width of your charger. Join with a slip stitch to form a ring, being careful not to twist.
- Round 1: Chain 1, then single crochet (sc) into each chain stitch around. Slip stitch to join. You should have 10 stitches total or the same number you chained.
- Rounds 2-10: Repeat Round 1 until your piece reaches the desired height of your adapter (typically around 2.5 inches). Change colors halfway through if you want a striped look.
- Top Edge: Finish with a round of half double crochet (hdc) for a slightly sturdier edge. Fasten off and weave in the ends with your tapestry needle.
- Bottom Hole (for cord): To allow space for the charging cord, you can either leave a small gap at the base by skipping a stitch or work the piece in two halves and join them later, leaving a slit for the cord.
- Optional Embellishments: Add small crocheted flowers, hearts, or even a smiley face to personalize your cover. Stitch them on securely so they won’t fall off with use.
Customization Tips
Now that the base is done, here are some ideas to personalize your crochet adapter cover and make it even cuter. Customization is where the magic happens and turns a simple piece into a showstopper!
- Colors: Use ombre yarns or self-striping yarn to give your cover a beautiful color gradient. This adds visual interest without needing to switch yarns manually.
- Textures: Introduce texture by alternating rows of sc, hdc, and puff stitches. This not only makes the cover prettier but also adds grip when plugging and unplugging the adapter.
- Themes: Try making character-themed covers like animals (bunny, bear, frog), food (strawberry, donut), or even emojis. These make adorable gifts or fun additions to kids’ rooms.
- Accessories: Attach a small loop to the top so you can hang the charger on a hook or key rack. You can also add a snap button to the back for a tighter fit.
- Personalization: Use embroidery to stitch your initials, a tiny heart, or a lightning bolt on the cover. This adds a thoughtful handmade touch.
- Pair with Matching Items: Make a matching phone pouch, cable tie, or tech bag in the same color scheme. This creates a complete set that’s functional and stylish.
Benefits and Uses
Making your own crochet patterns like the Cute Charger Adapter Cover Crochet 🌷 offers many benefits beyond just aesthetics. It’s a small project with big results!
- Eco-Friendly: Instead of buying plastic or silicone accessories, use yarn scraps and make a sustainable alternative. This helps reduce waste while being creative.
- Great Gift Idea: Handmade items always feel special. These covers make fantastic stocking stuffers, back-to-school gifts, or thoughtful “just because” presents.
- Protective: The cover helps keep dust away from your charger and can prevent scratches or scuffs on both the charger and your surfaces.
- Teaches Basic Stitches: This pattern is an excellent learning tool for beginners. It teaches you to work in the round, change colors, and use basic stitches confidently.
- Fun and Fast: Because it’s a small project, you can finish one in under an hour. It’s perfect for a quick craft session or when you want instant gratification.
- Marketable Craft: If you sell handmade goods, these are great low-cost items to add to your inventory. They’re fast to make and appeal to a wide audience.
Final Thoughts and Finishing Tips
Before you wrap up your Cute Charger Adapter Cover Crochet 🌷, double-check your work for neatness and durability. This ensures your cover will last and look good over time.
- Secure Ends: Weave in all yarn tails firmly using a tapestry needle. This keeps the cover from unraveling with regular use.
- Check Fit: Slide the finished piece over your charger. It should fit snugly but not stretch too tightly. Adjust your stitch count if needed.
- Washability: If you’re using cotton yarn, your cover will be machine washable. Just place it in a mesh bag to protect the stitches.
- Avoid Obstruction: Ensure your cover doesn’t block any electrical ports or prongs. Always safety test your accessories before long-term use.
- Make Multiples: Once you’ve got the hang of the pattern, make different versions for all your chargers or to give away. Try seasonal colors or themed embellishments.
- Share Your Creations: Don’t forget to share your finished work on social media or crafting forums. Use hashtags like #crochetpatterns and #chargercover to inspire others.
- PATTERN HERE
This Cute Charger Adapter Cover Crochet 🌷 is more than just a small project—it’s a delightful expression of creativity and functionality. Whether you’re crafting for yourself or someone else, it’s a joyful way to put your crochet skills to use. Happy crocheting!


