If you’re looking for a fun and colorful project, the Easy-to-Make Crochet Queen Butterfly is the perfect pattern to try. Combining vibrant yarns and delicate stitches, this butterfly design is not only visually appealing but also simple enough for beginners to follow. Whether you’re adding to your collection of handmade decor or gifting it to someone special, this butterfly will surely stand out.
Crocheting butterflies is a great way to use up leftover yarn and practice new crochet patterns. This particular design is inspired by the majestic Queen Butterfly, known for its deep orange and black hues. With just a few basic crochet techniques, you can create a stunning piece that’s ideal for embellishments, wall hangings, or even brooches.
Before we dive into the step-by-step guide, let’s explore the materials and preparation needed for this project. You won’t need any fabric cuts for this project, but selecting the right yarn and hook size is crucial for a neat finish. Now, let’s get started on your very own crochet Queen Butterfly!
Materials and Preparation
To begin your Easy-to-Make Crochet Queen Butterfly, gather all the necessary supplies. Choose soft acrylic or cotton yarn in shades of orange, black, and white, which closely resemble the actual Queen Butterfly. You’ll also need a crochet hook, preferably size 3.5mm (E), for more defined stitches.
Prepare your space and ensure good lighting since you’ll be working with dark yarn for some portions. Make sure your yarn is not tangled and is wound into balls for easier handling. This will help you focus more on the stitching and less on sorting your materials.
You’ll also want a pair of sharp scissors and a yarn needle. These tools will help in weaving the ends neatly and ensuring your butterfly has a polished look. Don’t forget to have some stitch markers handy if you’re still new to tracking rounds.
This pattern doesn’t involve any fabric cuts, as it’s purely crochet based. However, precision in yarn usage and stitch placement is key to achieving symmetrical wings. You may also want a small amount of polyester fiberfill if you plan to lightly stuff the body.
Blocking your finished butterfly can help enhance its shape. To block, simply dampen your butterfly, pin it to a foam board in the desired shape, and let it dry completely. This extra step makes a big difference in how crisp and vibrant your crochet patterns appear.
Once you have all materials in place, you’re ready to begin. The instructions below will guide you through each part of the butterfly, ensuring your creation turns out both beautiful and durable.
Creating the Butterfly Body
Start with the body using black yarn. Chain 12 stitches and join with a slip stitch to form a ring. This ring will become the central part of your butterfly where the wings attach.
Work single crochet (sc) stitches around the ring. Aim for about 18 scs total to create a firm but flexible base. The tightness here is important, as this will be the anchor for your wings.
Once you’ve finished the round, continue crocheting in rows to build up the body. Alternate between single crochet and half-double crochet (hdc) for a textured appearance. This variation helps add depth and contrast.
After about 6 rows, start decreasing by skipping a stitch at the beginning and end of each row. This will taper the body naturally. Continue until only 3 stitches remain.
Fasten off and weave in the ends neatly using a yarn needle. The finished body should be about 3.5 inches long, which is proportional to the wings you’ll crochet next.
Optionally, you can lightly stuff the body with a bit of fiberfill to give it a plump look. This adds a bit of dimension and makes your butterfly more lifelike.
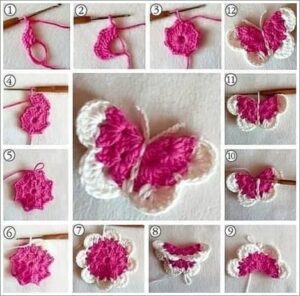
Making the Upper Wings
Switch to orange yarn to begin the upper wings. Chain 10 and turn. Work double crochet (dc) into the second chain from the hook and across the row.
Next, chain 3 and turn. Work 2 dc in each stitch across to widen the wing. This creates the distinct top curve of the Queen Butterfly’s upper wings.
In the following row, alternate between 1 dc and 2 dc in each stitch. This further flares out the top edge and adds volume. The wing should now begin to resemble a semi-oval shape.
Add a decorative edge by working single crochets around the entire wing shape. This neatens the edges and provides a good transition to the next color.
Now, change to black yarn and work a row of single crochets just on the outer edge. This mimics the black outline seen on real Queen Butterflies and enhances the visual appeal.
Repeat the entire process to create the second upper wing. Make sure to mirror the second wing so the curves face correctly when attached.
Crocheting the Lower Wings
Begin the lower wings with a chain of 8 using orange yarn. In the second chain from the hook, work 1 sc and continue across.
Turn your work, chain 2, and begin using half-double crochets (hdc) to increase the size. Add 2 hdc in the last stitch to start forming the rounded lower wing shape.
In the third row, work a combination of dc and treble crochets (tr) to give more length. This gives the wing that elegant, curved droop you see in Queen Butterflies.
Add some decorative elements like picot stitches on the outer edges. These mimic the delicate edging of real butterfly wings and add charm to your crochet project.
Switch to black yarn and crochet a thin outline around the entire wing. Make sure your tension is consistent to keep the outline smooth and symmetrical.
Repeat for the second lower wing, again mirroring the shape. Use stitch markers if needed to ensure they’re symmetrical before attaching.
Assembly and Final Touches
Lay out all four wings and position them around the butterfly body. Adjust spacing to make sure both sides are balanced. Pin them lightly in place using safety pins or stitch markers.
Attach each wing using a yarn needle and matching yarn. Use whipstitch or invisible stitch techniques to keep the joins neat. Take your time here—clean joins make the difference.
For the antennae, cut a 4-inch piece of black yarn and fold it in half. Attach it to the top of the butterfly’s head with a slip knot and secure with a tiny dab of glue if needed.
You can add tiny white dots on the wings using white yarn and French knot embroidery or fabric paint. These small details complete the look and echo the true Queen Butterfly’s pattern.
Once fully assembled, gently block the finished butterfly to even out the stitches and improve its shape. Let it dry overnight if necessary.
Your Easy-to-Make Crochet Queen Butterfly is now complete! You can use it as a decorative wall piece, brooch, or even frame it for a unique gift.
This project is a wonderful example of how versatile and creative crochet patterns can be. Not only do you get to enjoy the calming process of crocheting, but the end result is a beautiful handmade butterfly that’s rich in detail and color. Whether you’re new to crochet or looking to expand your skill set, this butterfly pattern is both rewarding and enjoyable. Happy crocheting!


