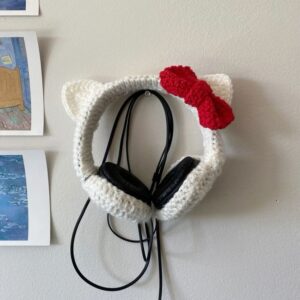
If you’re a fan of adorable accessories and love working with crochet, then you’ll absolutely adore creating your own Hello Kitty Crochet Headphone Covers. Not only are these a fun project, but they also serve as a cute way to protect and personalize your headphones. Perfect for kids, teens, and the young-at-heart, this project is both stylish and practical.
Crafting crochet patterns with a pop culture twist has become increasingly popular, and Hello Kitty is a timeless character that never goes out of style. Whether you’re making a gift or treating yourself, these headphone covers are a delightful project to add to your crafting list. Plus, it’s a great way to use up yarn scraps and experiment with different color combinations.
In this article, we’ll walk you through everything you need to know about how to make Hello Kitty Crochet Headphone Covers, from the materials and measurements to the detailed step-by-step instructions. Grab your crochet hook, and let’s get started!
Materials and Yarn Requirements
To begin your Hello Kitty crochet project, it’s essential to gather all the necessary materials. Having the right tools and yarn will make your work easier and help you achieve a neat and adorable finish.
Start with soft, medium-weight (worsted) yarn in classic Hello Kitty colors: white, pink, black, yellow, and red. Cotton yarn is recommended because it provides structure and is comfortable for headphone covers.
You will need a 3.5 mm (E) crochet hook to work these crochet patterns. This size allows for tight stitches that won’t stretch out over time.
Other essential tools include a yarn needle for weaving in ends, a pair of scissors, stitch markers, and safety eyes (optional, for the face). You may also want to have some polyester fiberfill if you choose to add dimension to the ear components.
Measurements are key. Before starting, measure your headphone earpieces. Most headphone earpads are around 3 to 4 inches in diameter. Adjust your pattern accordingly if needed.
Have a printed or digital image of Hello Kitty nearby for facial feature placement. This ensures you keep the character’s iconic style intact while following your crochet pattern.
Step-by-Step Instructions for the Base Cover
Let’s start with the base cover for the headphones. This will be the circular piece that wraps around the ear cups. Creating a snug fit is essential for function and aesthetic.
Begin with a magic ring and work 6 single crochets (sc) into it. Pull tight and join with a slip stitch (sl st). This is Round 1 of your base cover.
For Round 2, work 2 sc into each stitch (12). Continue increasing by 6 stitches in each round (Round 3: 18 sts, Round 4: 24 sts, etc.) until the circle matches the size of your headphone earpads.
Once you’ve reached the correct diameter, stop increasing. Work even rounds (1 sc in each stitch) to create a lip around the edge of the earpads. This will help the cover hug the headphones securely.
Make sure to crochet about 3 or 4 even rounds depending on the thickness of your headphones. You want the cover to wrap the edge slightly.
Finish off and leave a long tail to sew the ends around the headphone pads. Repeat this process for the second earcup.
Creating the Hello Kitty Features
Now that the base is complete, it’s time to add those iconic Hello Kitty details. These elements are what transform a basic crochet pattern into a character-inspired masterpiece.
To crochet the ears, start with white yarn and create a small triangle by chaining 5, then working single crochets back and forth, decreasing each row. Make two ears.
For the bow, use red yarn. Chain 10 and work 2 rows of single crochet. Fasten off and wrap a small piece of yarn around the center to cinch it into a bow shape. Secure tightly.
Hello Kitty’s eyes and whiskers can be embroidered with black yarn. Alternatively, use safety eyes for a polished look. Position them symmetrically and use a yarn needle to attach.
The nose is a tiny oval worked with yellow yarn. Chain 4, work single crochets around both sides of the chain to create an oval shape.
Attach all facial features to the front of each base cover. Make sure placement is consistent on both earcups. Stitch the bow to the upper left corner of one side to complete the character’s signature look.
Weave in all ends securely to prevent unraveling. This step is essential for durability, especially since these covers will be handled often.
Final Assembly and Adjustment Tips
With all your pieces complete, it’s time to put everything together and do any final shaping and adjustment to ensure a perfect fit.
Slide the covers over your headphone earpads gently. If you need extra security, you can stitch small elastic bands around the edge or add a drawstring for a snugger fit.
Make sure that the facial features are centered and properly aligned. If necessary, adjust your stitching by lightly tugging and realigning the covers.
If you chose to stuff the ears slightly with polyester fiberfill, make sure they are symmetrical and firm enough to hold their shape.
You can also personalize your Hello Kitty Crochet Headphone Covers by using different bow colors or even adding embellishments like small flowers or glitter yarn.
Always block your finished crochet patterns by lightly misting them with water and letting them dry flat. This helps set the shape and makes them look more polished.
Care instructions: hand wash gently in cold water and air dry. Avoid machine washing to preserve the integrity of your stitches and embellishments.
More Creative Ideas and Variations
Once you’ve mastered the Hello Kitty Crochet Headphone Covers, why not explore more ways to use this fun design technique? The possibilities are endless with a little imagination.
Try using the same base pattern to create other character headphone covers, like Pikachu, My Melody, or even a cute animal theme such as foxes or pandas.
You can also scale down the pattern and create matching crochet charms or keychains. These make wonderful gifts or additions to your personal accessories.
Incorporate glow-in-the-dark or metallic yarns to give your crochet project a fun twist. Kids will especially love these playful touches.
Make a full Hello Kitty accessory set with matching cable organizers, phone holders, or tablet sleeves, all following coordinated crochet patterns.
Join an online crochet community to share your creations, get feedback, and find inspiration from others who love working on themed accessories.
The key to successful character crochet patterns is having fun while paying attention to detail. Let your personality shine through your designs!
Conclusion
Making your own Hello Kitty Crochet Headphone Covers is not only an adorable project but also a highly rewarding one. It allows you to bring together creativity, function, and personal style in a fun and practical way. Whether you’re an experienced crafter or just starting with crochet, this pattern is approachable and satisfying.
These headphone covers make for the perfect gift, a charming way to upcycle old headphones, or a unique way to stand out in a crowd. With clear measurements, simple materials, and easy-to-follow crochet patterns, anyone can give their tech gear a kawaii makeover.
So grab your yarn, hook, and some crafting time, and get started on your very own Hello Kitty Crochet Headphone Covers today. Don’t forget to share your finished projects on social media and inspire others in the crochet community!


