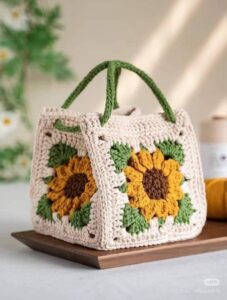
If you’re looking for a cheerful and functional accessory, this Sunflower Bag Crochet Tutorial is just what you need! With its vibrant yellow petals and earthy tones, this bag is perfect for summer outings, gifting, or simply showcasing your love for sunflowers. Whether you’re a seasoned crafter or just starting out, this easy-to-follow crochet pattern will brighten your day.
Crochet offers limitless creativity, and bags are one of the most practical projects you can make. The sunflower bag stands out because it combines beauty and functionality. It’s a piece you’ll love to carry around and show off wherever you go. Plus, working with floral designs always adds a touch of joy to your crochet time.
In this step-by-step sunflower bag crochet tutorial, you’ll learn how to make a stunning handbag using beginner-friendly crochet techniques. We’ll guide you through the process—from the sunflower motifs to the bag assembly—with a focus on clear instructions, ideal fabric cuts, and proper measurements. Let’s dive into this blooming project!
Materials and Measurements
To start this sunflower bag crochet pattern, it’s important to gather all the right materials. Preparation is key in every crochet project, especially for a structured item like a bag. This section covers yarn type, hooks, measurements, and optional additions to enhance your bag.
Start by choosing your yarn. For this bag, worsted weight cotton yarn is ideal because it’s sturdy, washable, and holds its shape. You’ll need yellow, brown, and green for the sunflower, and a neutral color like beige, tan, or white for the bag body.
The crochet hook size recommended for this yarn weight is 4.0 mm (G-6). Make sure to also have scissors, a yarn needle for weaving in ends, and a stitch marker if you prefer to keep your rounds neatly tracked.
Measurements and fabric cuts:
-
Each sunflower square: approx. 4” x 4” (10 cm x 10 cm)
-
Total number of squares: 13 (8 for the front and back, 5 for the sides and bottom)
-
Strap: 30” long (can be adjusted based on preference)
-
Optional: fabric lining (cut to the size of the bag once assembled)
These sunflower granny squares are made individually and later joined to form the bag. You can modify the number of squares based on how big or small you want your final bag to be.
Don’t forget to gather a zipper or magnetic snap if you want to add closure. And if you’re lining the bag, choose a light cotton fabric in a matching or contrasting shade.
How to Crochet the Sunflower Squares
Now comes the fun part—creating the eye-catching crochet sunflower squares. Each square consists of a circular sunflower motif in the center, framed by a simple border to form a square shape. These squares are later assembled into the final bag.
Start with a magic ring using the brown yarn. Round 1: Make 12 double crochets (DC) into the ring and join with a slip stitch. This forms the flower center.
Switch to yellow yarn. Round 2: Chain 2 (counts as 1 DC), then in the same stitch make 2 DC, chain 1. Repeat (3 DC, ch 1) in each stitch around. You should have 12 petal groups. Fasten off yellow yarn.
Join beige yarn to any chain space. Round 3: Begin squaring the motif. (1 DC, ch 2, 1 DC) in the same space (corner), 3 half double crochets (HDC) in next two spaces. Repeat this pattern around to form a square. Slip stitch to the beginning.
Make at least 13 squares. We recommend blocking them for evenness, especially if you’re working with cotton yarn which tends to shrink or twist slightly.
Once your squares are complete, weave in all ends using your yarn needle. This step helps maintain a clean look and strengthens your crochet work.
To give your square a polished finish, you can add a single crochet (SC) round around each square in your neutral yarn color.
Assembling the Sunflower Bag
With your sunflower crochet squares complete, it’s time to assemble the bag! This part can feel like a puzzle, but it’s also rewarding as you watch your project come together. Take your time and enjoy the process.
Lay out your squares in a cross shape:
-
3 squares vertically (center column)
-
2 squares on each side of the middle square in the center column (left and right)
-
3 more for the opposite side of the bag
Start joining the squares using the whip stitch method or single crochet join. Whip stitch gives a nearly invisible seam, while SC adds a decorative ridge.
After connecting the squares into the full bag shape, fold and sew the sides together. Make sure the sunflower motifs are all facing outward in the correct orientation.
Reinforce the bottom edges by adding a row of single crochet or slip stitches. This step adds durability to your bag.
Now, crochet the strap. Use the same color as your border for consistency. Chain the desired length (around 100–120 stitches), then work 3 rows of single crochet for a comfortable grip.
Sew the strap securely to both sides of the bag using a yarn needle and extra yarn. Test the strength by pulling gently—better safe than sorry.
Finishing Touches and Optional Add-Ons
At this stage, your sunflower bag crochet project is almost complete. Now, let’s take care of the final touches that give your bag a professional and polished look.
If you prefer your bag to be more structured, you can add a fabric lining. Cut the fabric to the exact shape of your bag, then hand sew it into the interior using a needle and thread.
Want your bag to close? Attach a zipper, button, or magnetic snap. This not only makes the bag more secure but also adds a finished, store-bought touch.
You can also embellish the strap with beads or tassels if you like. Use your creativity to personalize the sunflower bag and make it uniquely yours.
If your stitches are a little tight or the bag feels small, give the finished piece a gentle steam block. Just don’t overdo it with cotton yarn—it can lose shape if overstretched.
Lastly, don’t forget to snap a few photos of your gorgeous sunflower bag! Sharing your work online with fellow crafters is a great way to inspire and be inspired.
Tips for Beginners and Customization Ideas
This Sunflower Bag Crochet Tutorial is beginner-friendly, but here are some extra tips to help ensure success and give you confidence to customize.
Take your time with each square. Repetition helps you master the pattern, and consistency in size makes the final bag cleaner and more functional.
Choose colors you love. While sunflowers are traditionally yellow and brown, you can mix it up—try orange petals, a black center, or even rainbow squares for a whimsical twist.
You can adjust the bag’s size easily by adding or removing sunflower squares. For a larger tote, make 5×5 square panels. For a clutch, just use 2 large squares.
Consider lining the bag with interfacing if you want extra durability. This is especially useful if you plan to carry heavier items.
Join an online crochet community or follow a video tutorial if you’re more of a visual learner. Seeing each step can help if you’re new to crochet patterns.
Finally, don’t stress over perfection. Handmade items are meant to be unique, and slight variations add charm to your finished piece.
Final Thoughts
This Sunflower Bag Crochet Tutorial is not just a project—it’s a joyful journey into creativity, color, and craftsmanship. Whether you’re making it for yourself, a friend, or to sell, this bag is bound to bring smiles.
With just some yarn, a hook, and a bit of time, you can transform simple stitches into a vibrant, eye-catching accessory. It’s a great way to practice your crochet skills while creating something truly useful and beautiful.
Remember, the heart of crochet lies not just in the final product but in the peace and pride you feel during the making. So pick up your hook and start blooming—your sunflower bag is waiting!


