If you’re a fan of adorable accessories and functional fashion, learning how to crochet tote bag Hello Kitty’s Tote Bag is the perfect project for you. This DIY project combines the charm of Hello Kitty with the versatility of a handmade crochet tote. Whether you’re an experienced crafter or just starting out, this pattern is easy to follow and fun to create.
With just a few basic materials and a little time, you can make a crochet tote bag that reflects your personality and love for cute characters. This project uses well-known crochet patterns, which means even beginners can create something they’ll be proud to carry. Plus, it’s a wonderful gift idea for friends, family, or fans of Hello Kitty.
In this step-by-step guide, we’ll walk you through everything you need to know about making a Hello Kitty-themed crochet tote bag. From choosing the right yarn to stitching the perfect granny squares, this article will leave you inspired and ready to create.
Materials and Tools You’ll Need
To get started with your Hello Kitty tote bag crochet project, you’ll need some basic supplies. These are all easy to find in craft stores or online. Make sure you have everything prepared before beginning the pattern.
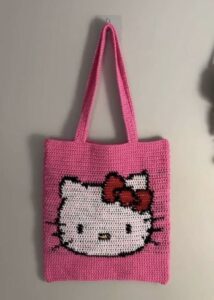
First, choose high-quality cotton yarn in the following colors: white, pink, red, yellow, and black. These shades will bring Hello Kitty’s classic look to life in your crochet patterns. You’ll also need a size 4.0 mm crochet hook for this project, which is ideal for tote bags.
You’ll need tapestry needles for sewing parts together and a pair of scissors. Optional tools include stitch markers to help you track your rounds, and a measuring tape to ensure even sizing.
The finished size of the bag will be approximately 12 inches by 14 inches, not including the handles. If you’d like a larger or smaller tote, simply adjust the number of squares used.
You’ll be making a series of granny squares that you will later join to create the tote. You can cut fabric lining for the interior of the bag, measuring 14 x 16 inches to allow seam allowance and give your tote more durability.
To add a secure closure to your tote, consider sewing in a magnetic snap or button. This step is optional but gives a more finished look and added functionality.
How to Make the Granny Squares
Granny squares are the foundation of this crochet tote bag. Each square is a mini artwork and will become part of the final design. For Hello Kitty’s look, we’ll create a basic square with a face motif.
Start by chaining 4 and joining to form a ring. Work 3 double crochets into the ring, chain 2, and repeat until you have four corners. This is your first round. Change colors in the second round for Hello Kitty’s face base using white yarn.
In the next round, work clusters of 3 double crochets in each side space with 2 chains in the corners. Keep the square even by turning your work. Continue this for 4 to 5 rounds, depending on the size you want.
To create Hello Kitty’s face, embroider the eyes, nose, and whiskers with black and yellow yarn. Use surface slip stitches or embroidery to add the details carefully.
Make 8 to 10 face-themed granny squares and 8 to 10 plain colored squares in pink or red. This will give a nice balanced layout for your tote bag. Lay out your squares to plan the final design.
Block each square to help them hold shape. Wet blocking works well—just pin them to a foam board, mist with water, and let them dry.
Joining the Squares and Creating the Bag Shape
Now that all your granny squares are ready, it’s time to join them and shape your crochet tote bag. This step brings all your hard work together.
Lay your squares in a 4 x 5 arrangement (4 across and 5 down). Make sure the Hello Kitty squares are spaced evenly for visual appeal. Begin joining with a slip stitch or whip stitch, working from the back side for a cleaner seam.
After connecting all squares into a flat panel, fold it in half, right sides together. Stitch up the sides to form the bag body. Leave the top open for now. Flip your bag right side out after joining.
Now it’s time to create the bottom of the bag. Use single crochet to stitch along the bottom edge, joining the front and back panels securely. Add a couple extra rows for a thicker base if needed.
Cut your fabric lining to 14 x 16 inches and sew the sides and bottom with a sewing machine or hand stitch. Insert it into the bag and sew along the top edge using a needle and thread.
For extra support, consider crocheting a base insert using double-stranded yarn in a neutral color and placing it inside the lining at the bottom of the bag.
Crocheting the Handles and Final Touches
Every great crochet tote bag needs strong and stylish handles. For this project, we’ll crochet sturdy straps and attach them securely to the bag.
Start by chaining 80 stitches (or more for longer straps) using your main color. Turn and work a row of single crochets. Repeat for 3 more rows to make the strap thicker.
Make two straps and attach them evenly on either side of the tote. Stitch them 2 inches down into the bag for reinforcement. You can crochet a square patch on top of the handle ends for extra security.
Add a cute red bow using a small crochet pattern and stitch it onto Hello Kitty’s ear on the square. This signature bow gives it a playful and finished look.
If you’d like, you can crochet small charms or accessories to hang from the handle, like a mini heart or star, using basic crochet patterns.
For a cleaner look, edge the entire bag’s opening with a round of single crochet in a contrasting color. This also strengthens the opening and gives your bag a polished look.
Styling and Gift Ideas
One of the best parts of making a crochet tote bag is styling it to match your own fashion. Hello Kitty’s theme makes it ideal for all ages.
This bag is perfect for casual outings, running errands, or taking books to the library. Pair it with jeans and a white tee for a playful touch. You can even match your tote with other crochet accessories.
For gift-giving, this project is a hit with kids, teens, and adults who love kawaii fashion. Package it in a cute box with tissue paper for a professional presentation.
If you sell handmade crafts, this bag is a great addition to your shop. Its universal appeal and recognizable character can attract many fans.
You can personalize the tote further by adding initials or changing the colors to match different outfits. Use crochet patterns creatively!
Another idea is to use the same granny square layout to make a matching coin purse or pencil case for a complete set.
This tote bag isn’t just a craft—it’s an expression of your creativity and love for characters like Hello Kitty. Enjoy every step of the process and share your creations online!
If you’re ready to get started, gather your materials, pick your yarn colors, and follow this guide to create your very own Hello Kitty crochet tote bag. Whether you’re a beginner or seasoned in crochet, this project is simple, satisfying, and full of charm.


