If you’re looking to add a vibrant, cozy touch to your living space, the Crochet DIY Ombre Rainbow Blanket is the perfect project. This beautiful blanket not only brings the joy of a rainbow into your home but also offers a soothing gradient effect that is both elegant and cheerful. Whether you’re a beginner or an experienced crocheter, this guide will walk you through each step with clarity and inspiration.
Crocheting blankets is a timeless hobby that allows crafters to create something both functional and beautiful. Using crochet patterns for gradient and rainbow effects has become increasingly popular in recent years, offering a modern twist on a classic craft. With just a few materials and a bit of time, you’ll have a blanket that not only warms the body but also delights the eye.
In this comprehensive tutorial, we’ll cover everything from choosing the right yarn and hook size to crafting the perfect stitch and assembling your blanket. Follow along for the complete guide to creating your own crochet DIY ombre rainbow blanket, optimized for both beginners and seasoned yarn enthusiasts.
Choosing the Right Yarn and Materials
Before starting your project, it’s essential to gather all the necessary materials. The success of your crochet DIY ombre rainbow blanket begins with thoughtful planning and quality supplies.
Start by selecting your yarn. For the best ombre effect, choose a yarn brand that offers long color changes or a coordinated set of yarns in gradient shades. Look for soft, worsted-weight yarn that feels comfortable against the skin. Acrylic or cotton blends are usually ideal for both durability and softness.
You’ll also need a crochet hook that matches the yarn weight. For worsted-weight yarn, a 5.0mm (H/8) hook is generally recommended. Always check the yarn label for guidance. A comfortable hook grip can also make long sessions of crocheting much more enjoyable.
In addition to yarn and a hook, prepare scissors, a yarn needle, and stitch markers. These simple tools are invaluable when it comes to finishing touches and keeping your pattern on track.
Lastly, consider a color plan. Decide whether you want to go from red to violet or reverse the sequence. A carefully planned gradient will enhance the beauty of your finished piece.
Measure the size you want your blanket to be. A good baby blanket size is 30 x 36 inches, while a throw might be 50 x 60 inches. This will determine how much yarn you’ll need for each color.
The Basic Crochet Pattern and Stitches
With your materials ready, it’s time to dive into the stitches that will bring your crochet DIY ombre rainbow blanket to life. We’ll use a simple yet effective stitch that highlights the color changes beautifully.
Start with a foundation chain. For a medium throw, chain about 120 stitches. You can adjust this number depending on your desired width. Remember to keep your tension consistent for a uniform look.
The primary stitch for this blanket will be the double crochet (dc). It creates a soft and airy texture that works well for both warmth and breathability. Begin your first row by double crocheting into the fourth chain from the hook and in each chain across.
Continue each row with double crochet stitches, turning your work at the end of each row. If you’re a beginner, it helps to count your stitches to ensure that you’re not accidentally increasing or decreasing the width of your blanket.
Change yarn colors at the end of a row to maintain clean transitions. To do this, yarn over with the new color during the last yarn-over of the final stitch in the row. This allows you to continue crocheting without a noticeable break in the gradient.
Repeat this pattern as you progress through your colors. Depending on your yarn choice, you may switch colors every few rows or use a self-striping yarn that changes automatically.
Use stitch markers to help track where color changes occur or to mark every 10 rows for easier counting. This is especially useful if you’re aiming for a symmetrical gradient.
Assembling the Ombre Rainbow Effect
Now that you have your pattern and colors in motion, it’s time to focus on assembling the blanket in a way that maximizes the ombre rainbow effect. This step is all about visual harmony and balance.
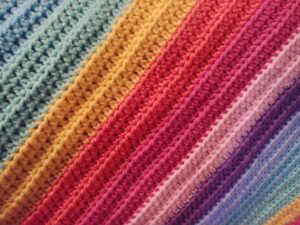
Begin by laying out your yarns in order of color transition before you start. This visual aid will help you plan and foresee how your blanket will look. Most people follow the ROYGBIV color scheme (Red, Orange, Yellow, Green, Blue, Indigo, Violet).
If you’re using yarn skeins that change colors gradually, pay attention to how the transitions happen. Make a note of where in the skein the next color starts, and align it with your project to avoid jarring shifts.
To emphasize the ombre effect, maintain a consistent number of rows per color. For example, you might do 12 rows per color to maintain even sections. Adjust based on your desired size and total number of colors.
When switching colors, be sure to weave in your ends immediately or secure them well to avoid unraveling. Use a yarn needle to sew in the ends for a neat finish.
If your blanket is larger, you might need more than one skein per color. In that case, match the color joins carefully, or allow for natural variation for a more artistic effect.
As you build up your rows, periodically hold the blanket up or lay it flat to evaluate the gradient. Adjust the row counts or color blending if needed to keep the ombre effect smooth.
Finishing Touches and Customization
Once your rows are complete and the rainbow beautifully assembled, the final steps involve finishing and customizing your crochet DIY ombre rainbow blanket. This is where you can add flair and polish.
Begin by ensuring all ends are securely woven in. Tidy up any loose strands and double-check that your color joins are secure. This step will keep your blanket looking neat and professional.
Add a border to enhance the structure and visual appeal of the blanket. A single crochet border in white or black often looks striking and helps frame the ombre colors nicely. Work one round of single crochet stitches evenly around the entire blanket.
You can get creative with the border by adding picot stitches, shell stitches, or puff stitches. Just make sure your border complements the simplicity and color focus of the main body.
For extra coziness, consider adding a lining made of soft fabric to the back of the blanket. This is optional but adds warmth and gives a polished look, especially if gifting.
Personalize your blanket with tags, initials, or appliqués. Little touches can make your crochet DIY ombre rainbow blanket feel truly one-of-a-kind and special.
Don’t forget to wash and block your blanket. This step evens out the stitches and sets the shape. Use a gentle detergent and lay flat to dry, adjusting the edges to make them straight.
With your project complete, take a moment to admire your creation. The crochet DIY ombre rainbow blanket not only showcases your skill but also brings a splash of color and warmth wherever it goes. Whether kept for yourself or given as a heartfelt gift, it’s a true testament to the power of yarn, color, and creativity.


