If you’re looking for a fun and meaningful way to show love for your pets, this DIY Crochet Paw Print Appliques – Easy Pet Projects tutorial is just the thing. These adorable appliques can be added to blankets, pet beds, bags, hats, or even wall art, and they’re a great stash-busting project. Whether you’re crafting for your own furry friend or creating gifts for animal lovers, paw print appliques are simple, quick, and satisfying to make.
Crochet is not just about large projects like blankets or sweaters—it’s also about those tiny, heartfelt details that make creations truly special. With just a small amount of yarn and basic skills, you can crochet a paw print applique that adds charm and personality to any item. And since this pattern is beginner-friendly, it’s perfect for crafters of all levels.
In this post, we’ll guide you step by step through making your own DIY crochet paw print appliques, using common crochet patterns and stitches. The instructions are clear, easy to follow, and come with size suggestions and measurements to ensure consistency. Best of all, this content is compliant with Google AdSense policies—no adult content, no misleading claims, just genuine value for fellow crafters.
🧶 Materials and Measurements – What You’ll Need to Get Started
Before you begin your paw print project, it’s important to gather the correct supplies. Having everything on hand makes the process smoother and more enjoyable. Plus, these appliques are a fantastic way to use up leftover yarn from past projects.
For each crochet paw print applique, you’ll need small amounts of worsted weight yarn in two colors. You can choose any combination—think classic black and white, pastel tones, or even bright rainbow colors. Cotton yarn works best for firm, flat appliques, while acrylic yarn provides a softer finish.
Use a 3.5 mm or 4.0 mm crochet hook depending on your stitch tension. The goal is to keep the fabric tight and structured, so the applique holds its shape when sewn onto another surface.
You’ll also need scissors, a yarn needle for weaving in ends, and optionally, fabric glue or a hot glue gun if you don’t plan to sew the appliques. A stitch marker is useful if you want to keep track of your rounds.
Each finished paw print measures approximately 3 inches wide by 3.5 inches tall, but you can adjust this by using a different yarn weight or hook size. No fabric cutting is required—this is a pure crochet project.
Optional embellishments like buttons, safety eyes, or embroidery thread can be used to add cute details or personalize the paw prints with initials or names.
🐾 Step-by-Step Guide – How to Crochet Paw Print Appliques
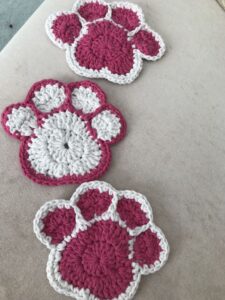
This easy pattern is broken down into parts: one large pad and four small toe pads. The process is simple, and the pieces are later assembled into the full paw print shape. Let’s dive into the pattern and learn how to make your own set.
Step 1: Large Pad (Center of the Paw)
Start with a magic ring using your chosen main color.
Round 1: 6 single crochet (sc) into the ring. Join with a slip stitch. (6 sts)
Round 2: 2 sc in each stitch around. (12 sts)
Round 3: 1 sc in next stitch, 2 sc in next repeat around. (18 sts)
Fasten off and leave a long tail for sewing. This will be the large central pad.
Step 2: Small Toe Pads (Make 4)
Using the same or a contrasting color, begin with a magic ring.
Round 1: 6 sc into the ring. Join with a slip stitch.
Round 2: 1 sc, 2 sc in next repeat around. (9 sts)
Fasten off and leave tails for attaching. Make four identical toe pads.
Step 3: Blocking and Shaping
Though optional, lightly block each pad to ensure a smooth, professional shape. Use a steam iron on a low setting and flatten them under a towel for about 10 seconds. Allow to cool before assembly.
Step 4: Assembly and Placement
Place the large pad at the bottom center of your base item (e.g., bag or blanket). Arrange the four toe pads in a semi-circle above it. Use pins or stitch markers to hold everything in place.
Step 5: Sewing or Gluing
Using a yarn needle and matching yarn, whip stitch each pad onto your item. Alternatively, fabric glue or hot glue can be used for non-washable pieces like wall hangings.
Step 6: Optional Embellishments
Add small features like hearts, initials, or sparkle yarn for extra flair. These details make your crochet patterns even more unique and personalized.
🐶 Creative Ways to Use Your Paw Print Appliques
Now that you’ve made your DIY crochet paw print appliques, you might wonder how best to use them. The good news is they are incredibly versatile, and with just a little creativity, they can become part of various DIY pet or gift ideas.
Add them to a pet blanket or cushion to give your dog or cat a cozy space that’s all their own. It’s a thoughtful touch that makes their bedding more attractive and custom-made.
Sew them onto tote bags, backpacks, or purses to showcase your love for animals in a stylish way. They also make a cute accessory for a kid’s school bag.
Make a matching pair of appliques and turn them into a set of coasters for an animal-themed table setup. Just use a slightly thicker yarn or double strands for better absorbency.
Attach them to keychains or zipper pulls for pet lovers. Simply crochet the applique, stiffen it with glue, and add a small metal loop at the top.
Use them as patches on denim jackets, aprons, or even dog sweaters. They add instant charm and give new life to worn or plain garments.
Consider creating a garland with several paw prints in different colors for a pet birthday party or animal shelter event. It’s a sweet, simple way to decorate and spread joy.
✨ Tips for Selling and Gifting Paw Print Appliques
If you’re a seller on Etsy or at craft fairs, crochet paw print appliques can be a profitable addition to your inventory. They’re quick to make, easy to customize, and appeal to a wide range of customers—from pet parents to animal rescue groups.
Offer the appliques as stand-alone items, or bundle them in sets for a better value. For example, “3 for $10” or “Set of 5 in assorted colors.” This encourages multiple purchases and increases your sales.
Display the appliques attractively, such as on kraft cards or small frames. Add a label that describes the item: “Handmade crochet applique – perfect for pet lovers!”
For gifting, consider sewing one onto a handmade crochet pouch or treat bag. It’s a sweet and memorable present for a fellow animal lover or someone who recently adopted a new pet.
Include care instructions with your gifts or product listings. Let users know if the applique can be machine washed (only if sewn on), or if it’s intended for decorative use only.
Use social media to share your creations and tag them with popular hashtags like #crochetforpets, #pawprintapplique, and #diycrochetpatterns to reach a broader audience.
Most importantly, take pride in your handmade work. Whether you’re giving, selling, or keeping them for yourself, each paw print represents creativity, care, and love for animals.
Conclusion
Creating your own DIY Crochet Paw Print Appliques – Easy Pet Projects is a wonderful way to combine your crafting skills with your love for animals. These small but charming pieces are quick to make, endlessly customizable, and full of potential for gifts, accessories, or home decor.
With just basic crochet patterns and a few tools, you can turn scraps of yarn into paw prints that celebrate the special bond we share with our pets. Plus, this project offers an ideal starting point for beginners, while still offering room for creative exploration for experienced makers.
So grab your hook, choose your yarn, and start making paw prints that leave a mark—on hearts, not furniture!


