If you’re just beginning your journey into the world of crochet, there’s no better place to start than with the classic granny square. In this tutorial, you will learn how to crochet the granny square using simple techniques and detailed steps. The granny square is one of the most iconic and versatile crochet patterns, perfect for everything from blankets to bags.
Not only is it beginner-friendly, but it’s also incredibly rewarding. As you gain confidence, you’ll be able to mix and match colors, textures, and even stitch variations. The crochet granny square is a timeless staple in the crafting community that never goes out of style.
Whether you’re making a cozy throw or just practicing your technique, this guide will walk you through everything you need to know, including materials, measurements, and a full breakdown of how to make your first granny square.
Materials and Tools You’ll Need
Before you learn how to crochet the granny square, let’s get your materials in order. Having the right tools makes a world of difference in both ease and final results.
You will need worsted weight yarn in one or multiple colors. Cotton or acrylic yarn is ideal for beginners as they are easier to manage.
Choose a crochet hook that matches your yarn weight. For worsted yarn, a 5.0 mm (H-8) hook works perfectly. Make sure your hook is comfortable for your hand.
You’ll also want a pair of scissors, a yarn needle for weaving in ends, and stitch markers if you want help keeping track of your rounds.
Unlike sewing or quilting projects, there are no fabric cuts or measurements in inches to worry about, which makes this project especially appealing to those new to crafting.
Still, if you’d like your squares uniform in size, aim for each finished square to measure approximately 4″ x 4″ depending on your tension.
Keep in mind that crochet patterns like this one are flexible. You can enlarge your square by continuing rounds in the same pattern.
How to Start Your First Granny Square
Now it’s time to dive in and learn how to crochet the granny square step by step. We’ll walk through each round so that your square builds evenly and neatly.
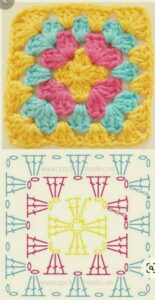
Start with a slip knot and chain 4. Slip stitch into the first chain to form a ring. This is the center of your granny square.
Chain 3 (counts as your first double crochet), then double crochet twice into the ring. Chain 2, then repeat 3 double crochets + chain 2 three more times. You should have four clusters.
Join to the top of the beginning chain 3 with a slip stitch to close the round. Your base square is now complete.
In round two, slip stitch into the next 2 stitches and into the corner space. Chain 3, work 2 double crochets, chain 2, 3 more double crochets all into the corner.
Chain 1, then move to the next corner and repeat the same cluster. Do this for all four corners.
Join the round with a slip stitch to the top of the chain 3. This round expands your square and begins forming the shape.
Expanding Your Granny Square
After you finish the first two rounds, the next rounds are simple repetitions with increases at each corner. This is where you can start playing with color changes and creative combinations.
Begin the round with a slip stitch into the corner space, then chain 3. Add 2 double crochets, chain 2, and 3 more double crochets into the same space.
Chain 1, and now you will place a 3 double crochet cluster into the space between clusters from the previous round.
Continue working 3 double crochets into each side space and the full corner cluster (3 DC, ch 2, 3 DC) into each corner space.
At the end of the round, join with a slip stitch to the chain 3. Your square will now have grown and taken a more defined shape.
You can add as many rounds as you like, depending on how big you want your square to be. Each round adds about 1″ to the width.
Don’t forget to weave in your ends with a yarn needle after your final round to secure your work and prevent unraveling.
Tips for Color Changes and Variations
One of the most exciting parts when you learn how to crochet the granny square is experimenting with color. You can use different yarn shades in each round for a rainbow effect or follow a color theme.
To change colors, simply fasten off your yarn at the end of the round and attach the new color into any corner with a slip stitch.
Continue the pattern as usual. The visual impact of color-blocking can elevate a simple granny square into a stunning piece.
You can also use textured yarn or add different stitches (like puff or popcorn) in future rounds to personalize your crochet patterns.
Remember to keep your tension consistent. Switching yarn types can alter your square’s dimensions if you’re not careful.
If creating a project with multiple squares, block each one using steam or water to make assembly easier later.
Joining Multiple Granny Squares
After you’ve mastered how to make a single granny square, the next step is to join them together to create larger projects like blankets, scarves, or bags.
There are many methods to join crochet squares: whip stitch, slip stitch, or the popular join-as-you-go technique.
The whip stitch is ideal for flat seams. Place two squares right sides together and sew through the outer loops.
For slip stitch joins, hold two squares together and work a slip stitch through the back loops across the seam.
Join-as-you-go works best when you want a continuous join while crocheting. Instead of fastening off, connect new squares during the final round.
Always make sure your squares are the same size before joining. Trimming or adding rounds can help align mismatched squares.
When finished, weave in all loose ends and gently block your finished project for a neat and professional look.
Final Thoughts
Now that you’ve completed this guide, you can confidently say you’ve learned how to crochet the granny square! This simple yet versatile pattern opens up a world of creative possibilities.
With just yarn, a hook, and a bit of patience, you’ve created a piece of textile art that can be built upon endlessly. Whether you make one square or one hundred, the skills you’ve gained are fundamental to many crochet patterns.
Don’t forget to experiment with textures, yarn types, and color sequences. The more you play, the more unique your projects become.
This project is also perfect for gifts, scrap yarn usage, or even meditation—many crocheters find peace and focus through the repetitive motion.
We hope you enjoyed this tutorial. For more crochet inspiration and detailed crochet patterns, check out our other posts and follow along for regular updates.
Happy Crocheting!


