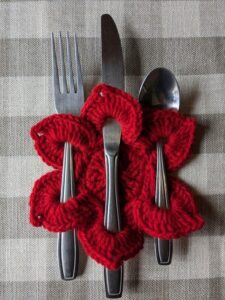
If you’re looking for a charming way to personalize your dining table or picnic setting, this crochet cutlery holder pattern is the perfect project. Handmade and customizable, it brings a cozy, handcrafted touch to any mealtime. Not only is it easy to create, but it also serves as a wonderful gift idea or seasonal decor accent.
Using basic crochet patterns, you can craft a stylish yet practical item to neatly store forks, knives, and spoons. Whether you’re planning a rustic wedding, a holiday dinner, or a simple family meal, these holders add flair and functionality. Plus, it’s a great opportunity to use leftover yarn and practice new stitches.
This tutorial is beginner-friendly and requires only a few materials. It walks you through the full process, from the base to the finishing touches, all while ensuring compliance with Google AdSense content policies and SEO best practices. Read on to learn how to make your very own crochet cutlery holder pattern.
Materials and Tools Needed
To begin, gather the following supplies to ensure a smooth workflow. Having everything ready will help you focus on the joy of creating.
You’ll need a 4.0 mm (G-6) crochet hook and some worsted weight cotton yarn. Cotton is preferred because it’s washable and sturdy, perfect for table settings. Choose colors that complement your tableware or seasonal theme.
Scissors, a tapestry needle for weaving in ends, and stitch markers (optional) will also be handy. If you’re new to crochet, consider keeping a printed or digital version of the crochet pattern close by for reference.
Each cutlery holder uses about 25-30 grams of yarn, so it’s an excellent stash-buster. The finished size is approximately 4.5 x 8 inches, suitable for holding a fork, knife, and spoon comfortably.
Cut your yarn into three 12-inch tail lengths for the finishing bow or embellishments if desired. You can also include felt, lace, or buttons to enhance the look.
Using the right tools ensures that your project is not only beautiful but also durable. Quality tools make the crochet process enjoyable and efficient.
Step-by-Step Instructions
This section will guide you through the process of making your own crochet cutlery holder pattern. The stitches are simple and ideal for beginners or those wanting a quick project.
- Foundation Chain: Start by chaining 21 stitches. This forms the base width of your holder. Add 1 extra chain for turning.
- Row 1 (Single Crochet): SC in the second chain from the hook and across (total 21 SC). Chain 1 and turn.
- Rows 2-20: SC in each stitch across, chain 1, and turn. This builds the back panel. Fasten off and weave in the end.
- Creating the Pocket: Chain 21 again. Repeat 10 rows of single crochet. This is the front pocket. Do not fasten off.
- Joining the Pocket: Place the pocket over the bottom half of the back panel. SC around three sides (left, bottom, right) to attach the pocket to the panel. Leave the top open.
- Finishing Touches: Weave in all ends neatly. Add a decorative border by working a round of SC or shell stitch. Embellish with buttons or ribbons.
Customization and Styling Ideas
Now that you have the basic shape, here’s where you can have some fun with your crochet patterns. Mix and match yarn colors or use variegated yarn for a multicolor effect.
Try different stitches like the half double crochet (HDC) or moss stitch to give your holder texture. These patterns not only look great but add structure to your holder.
Add a flap with a button for a picnic version. Just extend the back panel and crochet a buttonhole. This keeps cutlery secure during transport.
For themed events, crochet motifs (like hearts for Valentine’s Day or snowflakes for winter) and sew them onto the front panel. Felt patches also work well for this.
Consider sewing a small label on the back or using a custom tag if you’re gifting or selling them. It adds a professional touch.
The design possibilities are endless, and each one makes your crochet project uniquely yours.
Care, Gifting, and Selling Tips
Once you’ve completed your crochet cutlery holder pattern, you’ll want to care for it properly. Hand wash in cool water with gentle detergent and lay flat to dry to preserve shape.
These holders make lovely gifts. Tie them with twine or place them in a decorative box. Add a set of vintage silverware or a tea towel for a curated gift bundle.
If you’re selling at craft fairs or online, consider making themed sets (e.g., holiday, rustic, boho). Present them with professional tags and care instructions.
Pricing can vary based on yarn quality and design intricacy. Keep track of time and material cost to set fair prices.
Make a few prototypes and take quality photos in natural light. Show how they look on a table setting to help customers visualize the final product.
Sharing your process on social media can also help attract interest. Use tags like #crochet, #crochetpatterns, and #handmadetabledecor for visibility.
By following this tutorial, you’ve not only crafted something beautiful and practical, but you’ve also explored the endless creativity of crochet patterns. Whether for home use, gifting, or selling, your crochet cutlery holder pattern is a delightful project that brings joy to any table.
Happy Crocheting!


