If you’re looking to add a handmade accessory to your wardrobe, this Simple Crochet Shoulder Bag Tutorial is the perfect project for you. Ideal for beginners and seasoned crafters alike, this tutorial guides you through creating a chic, functional bag with basic stitches. The pattern is flexible, easy to follow, and an excellent introduction to crochet accessories.
Crafting a shoulder bag is not only practical but also a creative outlet. With just a few materials and your favorite yarn, you can make a personalized piece that matches your style. Whether you’re going for minimalist elegance or a vibrant boho vibe, this project will inspire your next crochet adventure.
Using beginner-friendly crochet patterns, you’ll be able to finish this bag over a weekend or even in a single day if you’re focused. Plus, this bag makes a thoughtful, handmade gift that shows off your skills and creativity. Let’s explore how to bring this stylish piece to life step by step.
Materials and Preparation
Before diving into the actual crochet work, let’s prepare all the materials you’ll need. This ensures a smooth crafting experience and helps you visualize the final result.
First, choose a yarn that suits the look you want. For a durable and structured bag, worsted weight cotton yarn works best. You’ll need approximately 300–350 yards of yarn. Neutral colors like beige, gray, or black are classic, while bold shades can add a fun, modern twist.
Pair your yarn with a 4.5mm or 5mm crochet hook. The hook size will slightly affect your tension and the final size of your bag, but both are suitable for the project. Also, keep a pair of scissors, a yarn needle, and stitch markers nearby for convenience.
To line your bag (optional), you’ll need a piece of fabric approximately 14″ x 28″. This step is great for adding structure and a polished interior, especially if you plan to carry heavier items.
You’ll also want to grab a magnetic snap or a button if you’d like to secure the bag shut. For the strap, you can crochet one, use a premade leather strap, or recycle one from an old bag.
Now that your tools and materials are ready, it’s time to begin crocheting the base of your shoulder bag. Let’s dive into the pattern!
Creating the Bag Base
The foundation of your crochet shoulder bag begins with a simple oval shape, which gives the bag structure and depth. This part is essential to get right, as it affects the overall size and capacity.
Start by chaining 31 stitches. This will give you a base length of approximately 10 inches. Adjust this count if you want a larger or smaller bag. Single crochet (SC) into the second chain from the hook and continue across the chain. When you reach the end, work 3 SC into the last chain to turn the corner.
Now, working down the opposite side of the chain, continue to SC into each stitch. When you reach the first stitch of the round, work 2 SC to turn that corner as well. You should now have an oval shape.
For the next 5–7 rounds, continue to SC in each stitch around, increasing evenly at the ends to maintain the oval shape. This creates a flat, sturdy base that will support the sides of your bag.
Use stitch markers at each end to track where your increases happen. This helps maintain symmetry and avoids a lopsided base.
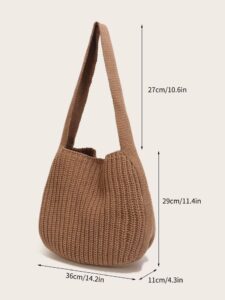
Once your base reaches approximately 3.5″ x 10″, stop increasing and prepare to build the sides of the bag. The flat base ensures the bag sits well and holds shape when items are placed inside.
Building the Body of the Bag
With the base complete, it’s time to crochet the body of your bag. This is the largest section and where you’ll start seeing your bag take shape.
Begin working in continuous rounds using single crochet stitches. Avoid increasing; instead, work evenly around the base to form the bag’s sides. This will naturally cause the edges to curve upward and create a bucket-style structure.
Continue crocheting in SC for about 25 rounds or until the body reaches 9″–10″ high. Keep your tension even to avoid any warping or bulging.
If you want to add visual interest, you can switch yarn colors or incorporate a textured stitch pattern like the half double crochet (HDC) or moss stitch. This is also a fun place to experiment with stripes or color blocks.
Don’t forget to try the bag on your shoulder occasionally to check its proportions. If it feels too short or too deep, adjust by adding or reducing a few rounds accordingly.
Once the body reaches your desired height, fasten off and weave in the ends. It’s now time to move on to the finishing touches that give your bag style and function.
Adding the Strap and Finishing Touches
Your crochet shoulder bag is almost complete! All that’s left are the strap and closure. These final touches will turn your bag from a simple pouch into a polished accessory.
For a crocheted strap, chain about 90–100 stitches (or until it reaches your preferred length). SC into each chain, then turn and repeat for a few rows to add thickness. Attach each end securely to the sides of the bag.
If using a premade or leather strap, use a yarn needle or strong sewing thread to stitch the strap ends to the top edges of the bag. Reinforce the stitching to ensure the strap holds up to daily use.
To add a closure, sew a magnetic snap inside the top of the bag, or attach a button and loop. This not only secures your belongings but also gives the bag a professional look.
If you’re lining the bag, do it before attaching the strap. Sew your fabric piece into a cylinder, then stitch it into the inside of the bag using a simple running stitch.
Add personal flair with optional embellishments like tassels, pom-poms, or small appliques. These give your crochet bag a unique touch and make it truly your own.
Final Thoughts and Styling Ideas
Congratulations — you’ve completed your Simple Crochet Shoulder Bag! Whether you use it for errands, outings, or everyday wear, this handmade piece is as stylish as it is functional.
The beauty of this crochet pattern lies in its versatility. By changing colors, adding pockets, or adjusting dimensions, you can make multiple variations for different occasions.
This bag also makes a great gift for birthdays, holidays, or craft fairs. It’s quick to make, uses minimal materials, and showcases your skill in a practical way.
If you loved this pattern, consider exploring more crochet patterns for accessories like clutches, crossbody bags, or backpacks. There’s a whole world of bag-making to enjoy.
Don’t forget to share your finished project on social media or with your local crafting group. You might inspire someone else to pick up their hook and create something beautiful.
With just yarn, a hook, and a few hours of dedication, you’ve created a piece you can wear with pride. Happy crocheting!


