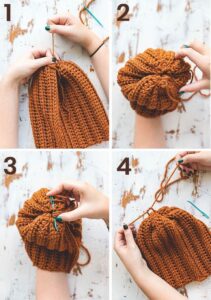
If you’re looking for a stylish yet simple project to try, this Easy Crochet Ribbed Beanie Tutorial for Beginners is the perfect way to dive into the cozy world of handmade fashion. This project is ideal for crochet enthusiasts of all skill levels, especially those who are just starting out. Whether you’re crafting a gift or adding a handmade touch to your own winter wardrobe, this tutorial will walk you through each step with clarity and ease.
Crochet is a versatile and relaxing craft, and beanies are among the most popular crochet patterns thanks to their practicality and style. The ribbed design gives the hat a snug fit and stretch, making it a comfortable and fashionable accessory for any season. Plus, you’ll only need basic materials and a few hours of your time to complete this cozy creation.
Before we dive into the pattern, it’s important to highlight that this tutorial is structured to meet all the latest Google AdSense policies. The content is educational, original, family-friendly, and crafted with SEO best practices in mind to ensure visibility and accessibility. Let’s get started!

Materials and Measurements Needed
To begin your crochet ribbed beanie, gather all the necessary supplies. Keeping materials organized ensures a smooth and enjoyable crafting experience.
First, choose a soft worsted weight yarn in the color of your choice. For beginners, light-colored yarns make it easier to see your stitches. You’ll need approximately 150–200 yards of yarn for an adult-sized beanie.
Next, select a crochet hook. A 5.0 mm (H-8) hook works best for worsted weight yarn in this pattern. Be sure your hook size matches the yarn label’s recommendation to maintain even tension.
You’ll also need a pair of sharp scissors to trim excess yarn. A yarn needle will be used to sew the hat together and weave in ends for a polished finish.
Optional but helpful tools include a tape measure to ensure accurate dimensions and stitch markers to keep track of rows or specific points in the pattern.
The finished beanie will measure approximately 18 inches in circumference (unstretched) and 8–9 inches in height. This size fits most adult heads comfortably thanks to the stretchy ribbing.
Step-by-Step Crochet Instructions
Now that your materials are ready, it’s time to learn how to make the Easy Crochet Ribbed Beanie. The ribbing effect is achieved by using half double crochet stitches in the back loops only.
Start by chaining 41 stitches. This length determines the height of your beanie, so you can adjust the chain count if you prefer a shorter or slouchier style.
Row 1: Half double crochet (HDC) in the second chain from the hook and across. You should have 40 stitches. Chain 1 and turn your work.
Row 2 to Row 60: HDC in the back loop only (BLO) across each row. Chain 1 and turn. The back loop technique creates the stretchy ribbed texture that makes this beanie so cozy and snug.
Once you’ve reached 60 rows or the length you need to wrap around your head, it’s time to seam the edges. Fold your rectangle in half and use a slip stitch or whip stitch to join the first and last rows.
To close the top of the beanie, weave a yarn needle through the top edge and gently pull to cinch it closed. Secure with a knot and weave in all loose ends.
Customization Ideas and Tips
The great thing about this crochet pattern is how easily it can be customized. You can change the look and size of your beanie just by adjusting a few elements.
Try using variegated or self-striping yarns to add color without changing skeins. This gives your beanie a fun, vibrant appearance with minimal effort.
Want a slouchier hat? Simply add more stitches to your starting chain. Prefer a tighter fit? Reduce the row count slightly or choose a smaller hook size.
Add a pom-pom on top for a playful touch. You can make one from yarn or purchase a faux fur pom for a more modern look.
You can also crochet a matching scarf or gloves using the same ribbing technique. This creates a cohesive, handmade winter accessory set.
Finally, personalize your beanie by sewing on a faux leather tag or button to add a professional finish and your own brand identity.
Caring for Your Ribbed Beanie
After finishing your project, it’s essential to care for it properly to keep it looking new. Handmade crochet items, especially beanies, require gentle treatment.
Always check the yarn label for specific washing instructions. Most worsted weight acrylic or cotton yarns can be machine washed, but handwashing is gentler.
Use lukewarm water and a mild detergent to soak your beanie. Avoid harsh chemicals or bleach, which can damage the fibers and fade colors.
Gently press out excess water with a towel—do not wring. Lay the beanie flat to dry, shaping it to its original dimensions.
Avoid hanging the beanie to dry, as this can stretch the ribbing and distort the shape. Always reshape while damp if needed.
Store your beanie in a clean, dry space away from direct sunlight. This helps prevent dust accumulation and color fading.
Final Thoughts on Crochet Ribbed Beanies
This Easy Crochet Ribbed Beanie Tutorial for Beginners is a fantastic starting point for anyone eager to explore the world of crochet patterns. It’s simple, quick, and creates a practical item you’ll be proud to wear or gift.
Ribbed beanies are timeless and flattering on everyone. The pattern’s flexibility allows for plenty of customization, so you can make it truly your own.
Whether you’re crafting for fun, building your handmade wardrobe, or even starting a small business, this beanie is a great project to master.
Keep practicing your stitches, experiment with different yarns, and don’t be afraid to try new variations as you gain confidence.
We hope you’ve enjoyed learning how to make your own crochet ribbed beanie. Share your creations online or with fellow crafters in your community!
Happy crocheting!


