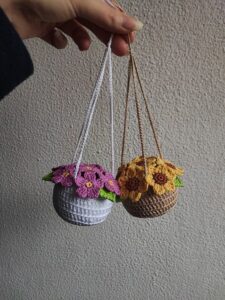
If you love combining nature with handmade décor, this How To Crochet a Flower Pot | Crochet Hanging Plant tutorial is the perfect DIY project for you! This charming crochet project adds a touch of greenery and whimsy to any room and makes a unique handmade gift. Even if you’re a beginner, this guide will walk you through each step of making your own hanging crochet plant pot using your favorite crochet patterns.
Whether you’re crafting for fun, looking to decorate a space, or want to create eco-friendly gifts, the crochet flower pot is a delightful and relaxing activity. With just a few stitches and basic materials, you can transform yarn into a functional, stylish, and vibrant plant holder. Let’s explore how to bring this idea to life while diving into the world of crochet.
In this article, we’ll break down every step in detail, ensuring it’s accessible for both beginners and seasoned crocheters. We’ll also highlight essential materials, helpful tips, and creative variations to make this project your own. Keep reading for a full tutorial packed with inspiration and practical advice.
🧵 Materials & Tools Needed
Before diving into the crafting process, it’s essential to gather all the tools and supplies for this crochet hanging plant pot. Choosing the right materials ensures the final piece is durable and visually appealing.
Start by selecting a medium-weight yarn in your favorite colors. Cotton yarn works best for plant hangers due to its strength and washability. You’ll need approximately 50–100 grams depending on the pot size and complexity of your chosen crochet pattern.
For this project, a 4.0 mm (G/6) crochet hook is ideal. You’ll also need scissors, a yarn needle for weaving in ends, and a stitch marker. To hang the pot, grab a wooden ring or a metal hoop, which will serve as the base of your hanging loop.
Optional but recommended: a plastic or terracotta plant pot to place inside your crochet holder. Make sure to measure this first. You can also crochet a custom insert for a fully handmade look if you prefer.
Don’t forget a tape measure! It’s crucial to get the cuts and measurements correct so that the pot fits snugly. Always keep your plant’s weight in mind to ensure safety when hanging.
🪴 Step-by-Step Instructions: Crochet the Base and Sides
Creating the base and sides is the heart of this How To Crochet a Flower Pot | Crochet Hanging Plant tutorial. We’ll begin by crocheting a flat circle for the bottom and build up the sides with sturdy stitches.
Step 1: Create a Magic Ring.
Start with a magic ring and work 6 single crochet (sc) into the center. Pull it tight and slip stitch to the first sc. This forms your base’s foundation.
Step 2: Expand the Base.
Continue working in the round. In round 2, make 2 sc in each stitch (12 total). In round 3, sc in next stitch, 2 sc in next (18 total). Keep increasing evenly until the base diameter matches your pot’s bottom (typically 4–5 inches).
Step 3: Build the Walls.
Once your base is wide enough, stop increasing. Work one single crochet in each stitch around for the next 8–10 rounds. This builds the cylindrical wall of your crochet pot.
Step 4: Add Texture with Stitches.
Use a mix of half double crochet (hdc) and single crochet (sc) in alternating rows to create a ribbed texture. This helps support the pot while adding design flair.
Step 5: Test for Fit.
Periodically insert your plant pot to ensure it fits securely. If it’s too tight, add a round with increases. If too loose, use a smaller hook or reduce stitch count.
Step 6: Finalize the Top.
When the sides are tall enough (approx. 5–6 inches), finish with a round of slip stitches to give a clean edge. Leave a long tail for sewing if needed.
🌿 Create the Hanging Straps
This next section of the crochet pattern focuses on the functional and decorative hanging portion. Straps should be evenly spaced and securely attached to prevent any imbalance when the pot hangs.
Step 1: Mark Strap Points.
Use stitch markers to divide the top edge into three or four equal points, depending on how many hanging straps you want.
Step 2: Chain the Straps.
Attach yarn to a marked point and chain 40–50 (or your desired length). The longer the chain, the lower it will hang. Repeat this for each strap point.
Step 3: Reinforce with Slip Stitch.
After chaining, slip stitch back down the chain to reinforce the strap. Then secure it to the pot by slip stitching into the same stitch you started from.
Step 4: Gather the Straps.
Bring all straps together at the top and tie or crochet them into a ring or directly onto a hanging loop or ring.
Step 5: Secure the Ring.
Use the yarn needle to sew the straps tightly to the wooden or metal ring. Weave in any loose ends to prevent fraying.
Step 6: Test Strength.
Hang the pot from a hook and add the plant to test if the straps distribute the weight evenly. Reinforce as needed.
🌈 Customizing Your Crochet Hanging Pot
Now that you have the basic structure, let’s talk about how to customize your crochet flower pot for added style, function, or personal flair.
Color Play:
Choose ombré yarn or change colors each round for a vibrant striped effect. A rainbow palette adds charm to any corner.
Stitch Variation:
Instead of basic stitches, try puff stitch, bobble stitch, or shell stitch to add texture and depth. Each technique enhances the uniqueness of your crochet pattern.
Add Appliqués:
Decorate your hanging pot with small crochet flowers, leaves, or even animals for a nature-inspired look. These can be sewn onto the exterior after the base is complete.
Lining the Inside:
Add a fabric or waterproof lining to protect the yarn from moisture if you plan to use it with real plants. Measure the base and height to cut the lining fabric accurately.
Adjusting for Size:
You can scale this project up or down depending on your plant size. Increase the base rounds or decrease stitch height to match small succulent pots or larger baskets.
Seasonal Themes:
Switch up colors and motifs to match seasons—pastel for spring, warm tones for autumn, or red and green for festive holidays.
🧶 Final Tips and Safety Notes
Completing your How To Crochet a Flower Pot | Crochet Hanging Plant project is a rewarding and satisfying experience. But here are a few last-minute reminders to help your project shine.
Weight Matters:
Always consider the weight of the plant and soil when choosing yarn and designing straps. Cotton or rope yarn is the best option for strength.
Use Strong Anchors:
Ensure you hang your pot from a ceiling hook that’s drilled into a stud or secure beam. Avoid hanging from weak surfaces.
Yarn Care:
Use washable yarn if you’re planning to place live plants inside. If your pot gets wet, air dry thoroughly to prevent mold.
Gifting Ideas:
This makes a wonderful handmade gift. Wrap with a tag and care instructions or pair it with a potted plant for the perfect housewarming or birthday surprise.
Join the Community:
Explore online crochet patterns forums or social media groups where other crafters share tips, variations, and photos of their own hanging pots.
Keep Crocheting:
Now that you’ve mastered this DIY hanging plant pot, try making matching coasters, baskets, or wall hangings. Let your crochet journey grow naturally!
By following this crochet pattern, you’ve created not just a beautiful piece of home décor, but a functional art object made with your own two hands. Whether for your home or as a thoughtful handmade gift, this Crochet Hanging Plant Pot is a beginner-friendly project full of color, creativity, and charm.


