Adding a bit of handmade charm to your keyring or gifting a touch of luck to a friend is easier than ever with this delightful crochet clover keychain. If you love crafting small accessories, this beginner-friendly project is perfect for you. Whether you’re an expert or new to crochet patterns, you’ll enjoy creating this quick, adorable item. With minimal yarn and simple techniques, this little four-leaf clover becomes a symbol of good luck you can carry anywhere.
This pattern is also a great stash buster. You can create multiple crochet clover keychains in a short amount of time, using leftover yarn from larger projects. It’s a budget-friendly, creative way to use what you have while producing something both functional and meaningful.
In this tutorial, we’ll walk you through how to make a crochet clover keychain, step by step. You’ll find detailed instructions, essential materials, and tips to help ensure your finished keychain is as cute as it is lucky. Let’s get started crafting your very own lucky charm!
Materials and Tools Needed
To begin your crochet clover keychain, gather your materials and tools. This project is great because it doesn’t require much—just a few items you likely already have on hand if you enjoy crocheting.
Choose a yarn that is medium weight or worsted (#4) in a green tone. You can go with traditional dark green or even experiment with bright lime or variegated shades to give your clover a unique look. Cotton yarn works especially well because it gives a nice clean stitch definition.
Next, you’ll need a 3.5 mm (E) crochet hook. This size helps keep the stitches tight so your clover retains its shape. Loose stitches could cause the clover leaves to look floppy, so tension is important here.
You’ll also need a yarn needle for weaving in ends and a pair of scissors for clean cutting. A metal keyring or lobster clasp will complete your piece, allowing you to attach the clover to your keys or bag.
Optional materials include a small amount of fiberfill if you want to lightly stuff the leaves for extra dimension, and a stitch marker if you want to keep track of your rounds easily.
All in all, the supply list is small but mighty—perfect for a quick, portable crochet project that delivers big charm.
How to Crochet the Clover Leaves
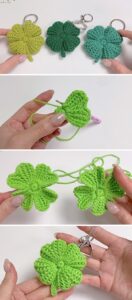
Now that you have your materials ready, let’s get started on the heart of the project: the leaves. Each crochet clover keychain is made up of four heart-shaped leaves, joined together to form a lucky four-leaf clover.
To begin, create a magic ring and chain 2 (counts as your first half-double crochet). Then, work 3 double crochets, 1 treble crochet, 3 double crochets, and 1 half-double crochet into the ring. This sequence forms one petal or leaf of the clover.
Slip stitch into the magic ring to finish the leaf. Repeat the entire process three more times, all in the same ring. As you go, shape each leaf gently with your fingers to define the heart-like curves.
After completing four leaves, pull the tail of the magic ring tightly to close the center. You can secure the leaves with additional slip stitches between them if desired. Make sure each leaf is neatly defined and consistent in size.
You can lightly steam block the clover to make it lie flat if needed, but this is optional. If you use cotton yarn, your leaves should naturally hold their shape quite well without blocking.
Once your clover base is complete, weave in any loose ends with your yarn needle. This is a great moment to check your symmetry and adjust the leaves slightly if needed.
Creating and Attaching the Stem
The stem adds the final touch of realism and functionality to your crochet clover keychain. It’s also what you’ll use to attach your keyring or clasp, so durability is key.
Start by attaching your yarn to the bottom center of the clover using a slip knot and chain 10–15, depending on how long you’d like the stem to be. Once your chain is complete, slip stitch back down the chain to reinforce it.
You can finish the stem by fastening off the yarn and weaving in the end, or continue crocheting a second row for added thickness. A double row will create a more durable stem, especially if it will be tugged frequently.
Now, using your yarn needle or crochet hook, loop the free end of the stem through a small metal ring or lobster clasp. Pull through about 1 inch of the stem and stitch it securely back onto itself to form a loop around the clasp.
Be sure to stitch firmly so the stem won’t unravel with use. You might want to add a few stitches along the side of the stem for reinforcement, especially if you’re gifting the keychain to someone who will use it daily.
At this point, your crochet clover keychain is almost complete! You can add a small bead or button in the center for decoration if desired, but it’s perfectly adorable left simple and classic.
Finishing Touches and Tips for Beginners
Finishing your crochet clover keychain is quick and satisfying. But to make it truly shine, let’s go over a few tips and tricks to help beginners get the best result possible.
Firstly, practice your magic ring technique before starting. This is the base of your clover, and making it tight and secure will ensure your keychain stays intact. You can also substitute a chain ring if you prefer.
For consistent leaves, count your stitches carefully and maintain even tension. Don’t rush—especially on the first few rounds—so that each petal matches in size and shape.
Blocking is optional but can help refine the shape, especially if your yarn has a lot of bounce. Light steam and pinning can help your clover lay flat and display nicely.
If you’re using this crochet pattern as a gift idea, consider making a set in different shades of green or even fun pastel tones for spring. You can attach them to a handmade card or include them as a tag on gift wrap.
Keep your workspace organized to avoid misplacing small materials like keyrings and needles. This is especially helpful when working on small-scale crochet projects like keychains or appliqués.
Lastly, take your time to enjoy the process. The crochet clover keychain is a sweet, meaningful project that you can personalize and perfect with practice. Don’t worry if your first one isn’t perfect—each clover you make will improve as you go.
Final Thoughts: A Lucky Touch of Handmade Charm
The crochet clover keychain is a charming, easy-to-make project that adds a handmade touch to your everyday accessories. Whether you’re gifting it to someone special or keeping it for yourself, it brings a bit of whimsy and luck wherever it goes.
With just a little yarn and a few simple tools, you can create something heartfelt and functional. This is also an excellent choice for craft fairs, classroom gifts, or party favors—especially for occasions like St. Patrick’s Day or graduation.
Thanks to its simplicity, this crochet pattern is ideal for beginners while still offering experienced crafters a quick and satisfying make. Plus, it gives you a perfect opportunity to explore small-scale projects without a big time commitment.
As you explore more crochet patterns, consider incorporating this clover design into other pieces—bags, wall hangings, or even garlands. Its versatility makes it a go-to motif for many creative ideas.
If you’re new to crochet, this is a fantastic way to build your confidence and improve your skills. The pattern offers repetition, stitch variety, and shaping practice—all wrapped up in a tiny lucky charm.
So grab your hook, find your favorite green yarn, and start your journey with this delightful crochet clover keychain. You might just find yourself making a whole field of them in no time!


