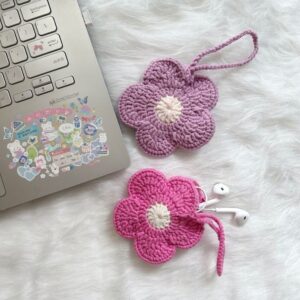
If you’re looking for a charming and practical way to protect your wireless earbuds, the mini crochet bag for AirPods is the perfect project for you. Compact, stylish, and beginner-friendly, this tiny accessory not only safeguards your tech but also lets your personality shine through handmade design. In this tutorial, we’ll walk you through the steps to create a durable, snug-fitting AirPods bag that fits easily into your purse or attaches to your keys.
This project is ideal for anyone who loves crafting with crochet patterns and wants to explore small-scale items. Whether you’re making it as a gift or for personal use, a crochet mini bag is a thoughtful way to blend practicality with creativity. Plus, it’s a great way to use up leftover yarn while crafting something that will get used daily.
In the following sections, we’ll guide you through the process of making a mini crochet bag for AirPods from start to finish. You’ll find information on materials, stitches, customization options, and more. Let’s get started and create something both adorable and useful!
Materials and Tools You’ll Need
To begin your mini crochet bag for AirPods, you’ll need just a few simple supplies. This project is lightweight, portable, and affordable—perfect for any level of crocheter.
Start by choosing a soft but sturdy crochet yarn. Cotton yarn is a great choice due to its durability and ability to hold shape. Worsted weight or DK weight yarn is best for this project. Stick to a solid color or have fun with variegated yarns for a more playful design.
Next, grab a 3.5 mm or 4 mm crochet hook. These sizes help create tight, uniform stitches, which are crucial to keeping your AirPods securely inside. A smaller hook will also help maintain the compact structure of your mini bag.
You’ll also need a stitch marker to keep track of your rounds, especially when working in a continuous spiral. Scissors and a yarn needle will help with finishing touches and weaving in ends neatly.
For the closure, you can use a small button, snap, or drawstring. If you want to hang your AirPods case, add a lobster clasp or keyring. This allows the mini bag to double as a keychain or backpack charm.
Lastly, consider using a small lining fabric or felt if you’d like extra protection for your AirPods, although the crochet structure alone is typically sufficient.
Step-by-Step Pattern Instructions
Creating the mini crochet bag for AirPods involves simple rounds and basic stitches, making it accessible even for beginners. We’ll start from the base and work upward to shape the pouch.
1. Crochet the base:
-
Begin with a magic ring.
-
Chain 1 and make 6 single crochets into the ring.
-
Pull tight and join with a slip stitch.
-
Round 2: Make 2 single crochets in each stitch (12 stitches).
-
Round 3: 1 single crochet in next stitch, 2 in next—repeat around (18 stitches).
-
Your base should now be a small, flat circle about 1.5″ in diameter.
2. Build the sides:
-
From round 4, work in continuous spirals with no joins.
-
Make 1 single crochet in each stitch around.
-
Repeat this round for 12–14 rounds, depending on the height of your AirPods case.
-
The mini bag should now measure approximately 2.5″ tall.
3. Form the flap:
-
After finishing the sides, stop spiral work.
-
Chain 1, turn, and single crochet across half the stitches (about 9).
-
Continue working rows back and forth for 4–6 rows to form a rectangular flap.
-
You can shape the flap by tapering it: decrease one stitch at each end every row.
4. Add closure:
-
Add a buttonhole by chaining 1 and skipping one stitch in the last row.
-
Alternatively, sew on a snap or magnetic clasp.
-
Fasten off and weave in all ends with your yarn needle.
5. Final touches:
-
Sew a small button to the front of the bag aligned with your flap’s hole.
-
Add your keyring or lobster clasp to one side for easy carrying.
Your crochet mini bag is now ready to use! Test the fit with your AirPods to ensure it’s snug but not too tight.
Customization Tips and Design Variations
Once you’ve mastered the basic crochet pattern, it’s easy to personalize your mini crochet bag for AirPods with color, texture, and added details. Let’s explore some creative options.
1. Color blocking:
Try using two or three colors to create stripes. Switch yarn colors every few rounds to add a modern, colorful twist. Make sure to carry the yarn neatly inside to maintain a clean look.
2. Decorative stitches:
Instead of plain single crochet, use a textured stitch like the puff stitch or moss stitch. These crochet patterns add visual interest and a thicker texture that offers extra padding.
3. Add a drawstring:
Instead of a flap closure, you can finish the top edge with a round of eyelets (chain 1, skip 1 stitch, single crochet). Then thread a chain cord through the holes to cinch it shut.
4. Embellishments:
Sew on tiny flowers, smiley faces, or appliqués. You could also embroider initials or shapes onto the front for a truly personal touch.
5. Lining your bag:
If you want added protection from dust or scratches, cut a small piece of felt or fabric (approx. 3″x6″), fold it in half, and hand-stitch it to the inside before adding the flap.
6. Make a matching strap:
Create a crochet strap by chaining 40–50, then single crocheting across. Attach both ends to the top sides of the bag to wear it as a wristlet or mini crossbody.
These ideas make each mini crochet bag unique and help you turn a simple accessory into a fun fashion statement.
Why This Pattern Is Perfect for Beginners
This mini crochet bag for AirPods isn’t just adorable—it’s also an excellent introduction to the art of crochet. Here’s why this is the perfect beginner-friendly project.
1. Small size = quick results:
You can finish this project in under an hour. That’s ideal if you’re new to crochet and want a fast win that motivates you to keep learning.
2. Practice basic stitches:
You’ll use foundational stitches like single crochet, slip stitch, and chaining. These basics are the building blocks of most crochet patterns.
3. Learn shaping techniques:
Working in the round, increasing, and decreasing are all key crochet skills. This pattern introduces them in a simple, manageable way.
4. Portable and stash-friendly:
Since it only uses a small amount of yarn, you can take it anywhere. It’s a great project for traveling, commuting, or crafting during a lunch break.
5. Functional and giftable:
You’re not just making a practice piece—you’re making something you can use every day or gift to someone else. That adds value to your effort and encourages creativity.
6. Confidence booster:
Finishing your first functional project gives you the confidence to try bigger or more advanced patterns. It’s a great stepping stone toward making bags, garments, and home accessories.
Whether you’re new to crochet or teaching someone else, the mini crochet bag for AirPods is a fantastic way to start.
Final Thoughts: The Charm of Crocheting Small Accessories
The mini crochet bag for AirPods is a delightful blend of creativity, practicality, and personalization. It’s small enough to make in a single sitting, yet detailed enough to teach valuable crochet skills. Plus, it results in a usable item that adds a bit of style to your everyday routine.
Crocheting your own accessories like this not only helps you save money but also reduces waste—making it a sustainable crafting option. You can upcycle old yarn, use scraps, and even repurpose buttons and fabric for linings.
As you explore more crochet patterns, don’t be afraid to experiment. Once you’ve made a few AirPods bags, you can use similar techniques to create coin purses, lip balm holders, or keychain wallets.
This project also makes a perfect handmade gift. Add it to a care package, sell them at craft fairs, or give them as party favors. Each mini crochet bag you make is a tiny piece of art with real value and function.
So grab your hook, find your favorite yarn, and dive into making your first crochet mini bag for AirPods. It’s a rewarding, beginner-friendly project that you’ll love from start to finish.


