If you’re searching for a cheerful and functional project, this guide on how to make a simple crochet sunflower backpack is exactly what you need. This charming backpack design brings together the rustic appeal of sunflowers and the practicality of a crocheted bag. Whether you’re a beginner exploring new crochet patterns, or an experienced maker looking for your next creative challenge, this pattern is beginner-friendly and fun to follow.
This backpack isn’t just cute—it’s also highly usable. Perfect for carrying essentials on a casual outing, a summer walk, or even as a gift for a child or teen. And the best part? You’ll be using basic crochet techniques, so anyone with a little patience can complete this project.
In this tutorial, we’ll walk through the exact materials you need, provide fabric and yarn measurements, and explain each stitch involved. By the end of this article, you’ll feel confident about creating your very own crochet sunflower backpack from start to finish!
Materials and Measurements for the Sunflower Backpack
Before diving into the stitches, it’s essential to gather all the materials and know the sizes of your pieces. This ensures your crochet project turns out just as beautiful as the images you’ve seen on Pinterest or Instagram.
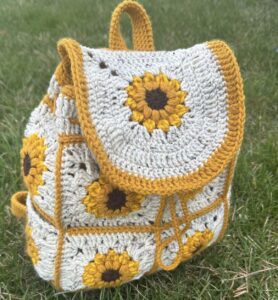
You’ll need medium-weight cotton yarn in three main colors: yellow (for petals), brown (for the sunflower center), and green or beige (for the bag body and straps). Choose high-quality yarn to provide durability and shape retention. Cotton is ideal for its structure and comfort.
In addition, have a 4.0 mm crochet hook, stitch markers, a yarn needle, and scissors ready. You may also want a button or toggle clasp to secure the flap of the backpack. These extras give the final bag a more polished finish.
As for the measurements, your finished backpack will be around 10 inches tall and 9 inches wide—perfect for kids, teens, or even light adult use. Each sunflower motif will measure approximately 4 inches in diameter.
You will need to crochet five sunflower squares for the front and back panels and two sunflower squares for the side gussets. A long rectangle in single crochet will form the base of the bag and the flap.
Don’t forget the straps! Make two straps each measuring 30 inches long and 1.5 inches wide. These are worked using basic crochet stitches and then sewn securely to the backpack.
Step 1: Crocheting the Sunflower Squares
The sunflower is the heart of this backpack design. Using the crochet patterns provided, you’ll start by working a circle for the center of the flower and then add layered petals using shell stitches.
Begin by creating a magic ring using brown yarn. Work 12 double crochets into the ring and slip stitch to join. Switch to yellow yarn and use shell stitches (5 double crochets in one stitch) spaced evenly around the circle to create the petal effect.
After you complete the petals, you’ll turn the circular flower into a square motif by adding rounds of single crochet and chain spaces. These additional rounds help the flower fit into the square base structure of the bag.
Once you’ve made one sunflower square, repeat the process until you have seven identical ones. These will be used to form the front, back, and sides of the backpack.
Make sure your tension is consistent throughout. If needed, block the squares after completion so that each one measures the same size.
Weave in any loose ends and trim excess yarn before moving to the next section. Keeping your work clean during each phase will result in a polished final product.
Step 2: Assembling the Bag Panels
With your sunflower squares completed, it’s time to arrange and join them to form the body of the backpack. Lay out five squares in a cross shape: one in the center, and one above, below, left, and right of it. This will be the front and back section.
Use slip stitches or whipstitch to seam the squares together. Work on the wrong side so the joins remain invisible. Make sure to align the motifs so the petals face outward in a consistent direction.
For the side panels, take one square and join it vertically between the left and right squares of the front panel. Repeat for the back panel. You’ll now have a three-dimensional shell of a bag.
Next, create a base rectangle in single crochet using beige or green yarn. Chain 18 and work 40 rows of single crochet to get a 9×4 inch panel. Sew this piece to the bottom of the assembled sunflower block, forming a sturdy base.
At this stage, your backpack will start taking shape. Reinforce all seams by double-stitching if the bag will carry heavier items.
Remember to leave the top open and start preparing for the flap closure and straps in the next step.
Step 3: Creating and Attaching the Flap and Straps
Now it’s time to add the functional elements: a secure flap and adjustable straps. This step completes the structure of your crochet sunflower backpack and makes it wearable.
To make the flap, chain 30 and work rows of half double crochet until your piece measures about 6 inches long. Round the edges slightly by decreasing at each side over the last two rows. This gives it a clean, professional look.
Sew the flap to the back panel just above the sunflower square. Make sure it overlaps enough to cover the bag’s opening. Add a buttonhole in the center of the flap and attach a button to the front square to secure it.
For the straps, you’ll crochet two long strips using single or half double crochet. Each strip should be 30 inches long and 1.5 inches wide. You can also add a touch of style by crocheting a thin border in a contrasting color.
Attach the top of the straps to the back upper corners of the bag. The bottom ends should be sewn near the base, slightly inward to support balance when worn.
If you want a drawstring closure in addition to the flap, crochet a long chain cord and weave it through the top row of the bag panels before securing the flap.
Try the bag on and adjust strap placement if needed. Comfort and symmetry are essential for a wearable crochet pattern like this.
Step 4: Final Touches and Customization Ideas
The basic structure of your backpack is now complete. This final section offers suggestions for personalization and enhancing your crochet sunflower backpack.
Add lining fabric to the interior of your bag for extra strength. Cut a piece of cotton or canvas fabric matching the shape of your bag, then hand-stitch or machine-sew it inside using invisible thread.
Want pockets? Crochet a small rectangle (e.g., 4×4 inches) and sew it inside the back panel before attaching the lining. This can store keys or lip balm.
Decorative touches go a long way. Consider adding leaves around the sunflower motif using green yarn, or attach a small flower charm to the zipper if you’re adding one.
This project also works great with color variations. Try alternating pastel petals or even rainbow color palettes. The same pattern can give a completely new vibe with color swaps.
Don’t forget to block your final bag gently to shape it and smooth out the edges. Steam blocking is often ideal for cotton yarn.
Finally, take some beautiful photos of your finished piece and share it online! There’s a large community of crafters who love discovering new crochet patterns, and your sunflower backpack is sure to inspire.
Conclusion
This guide on how to make a simple crochet sunflower backpack gives you everything you need—from material lists and measurements to stitch-by-stitch assembly and creative customization tips. With basic crochet skills, you can craft a stunning and functional bag that captures the warmth of sunflowers and the charm of handmade fashion.
If you’re looking for more beginner-friendly crochet patterns, be sure to explore our other tutorials and free patterns. Happy crocheting!


