If you’ve been exploring new ways to expand your crochet skills or are simply looking for unique crochet patterns, the crochet clover stitch is a perfect choice. With its charming texture and floral-like clusters, it’s a great way to bring dimension and style to scarves, blankets, washcloths, and even clothing items.
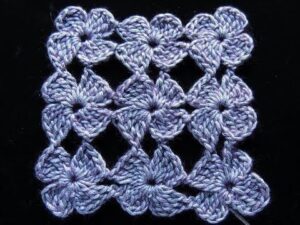
The crochet clover stitch is known for its simplicity and its stunning finished look. Often compared to puff or shell stitches, it uses a sequence of double crochet clusters to create petal-like effects. The stitch pattern resembles clovers or small flowers arranged in neat rows, which adds both texture and visual interest to any project.
In this tutorial, you’ll not only learn how to crochet the clover stitch, but you’ll also find tips for incorporating it into different projects, a list of needed materials, and fabric measurements. Whether you’re a beginner or someone more advanced looking for a fresh stitch to try, this step-by-step guide will be both enjoyable and easy to follow.
What You Need to Start the Crochet Clover Stitch
Before diving into the actual crochet clover stitch pattern, it’s essential to have the right tools and materials. Choosing the correct yarn and hook will help you get the most out of this stitch, especially if you’re trying it for the first time.
The best type of yarn for this stitch is DK (double knit) or worsted-weight yarn. These provide enough thickness for the stitch pattern to stand out but are still manageable for beginners. Cotton yarn is great for dishcloths or coasters, while acrylic yarn works well for scarves and blankets.
You will need a 5.0 mm crochet hook for worsted weight or a 4.0 mm hook for DK weight. However, feel free to experiment with different sizes to achieve the texture you want. Just keep your tension consistent.
As for other tools, keep a pair of sharp scissors handy, a tapestry needle for weaving in ends, and a stitch marker if you plan to work in the round or larger rows.
For practice, it’s recommended to start with a small swatch of about 6 x 6 inches (15 x 15 cm). To achieve this size, prepare approximately 40 yards of yarn. Once you’re comfortable, you can scale up for larger projects like table runners or throws.
One important note: the crochet clover stitch pattern is usually worked in multiples of 4 + 2. That means your starting chain should be divisible by 4, plus 2 additional chains. For example, 18, 22, 26, and so on.
Step-by-Step: How to Crochet the Clover Stitch
Now that you’re prepared, let’s walk through how to crochet the clover stitch step by step. This stitch is a combination of double crochets and chains that create a cluster pattern resembling tiny clovers.
-
Foundation Chain: Begin with a chain in multiples of 4 + 2. For practice, chain 26 stitches. This will give you 6 clover clusters and 2 turning stitches.
-
Row 1 (Foundation Row): In the third chain from the hook, make a single crochet. Skip one chain, then make a cluster of 3 double crochets into the next stitch, all worked into the same space. Skip one chain, then single crochet into the next. Repeat from * to the end of the row. You should end with a single crochet.
-
Row 2: Chain 3 (counts as the first double crochet). Turn your work. In the same stitch, make 2 more double crochets. Skip the cluster, single crochet into the next single crochet, then make 3 double crochets into that same stitch. Repeat across, ending with a single crochet in the last stitch.
-
Repeat Row 2 for the rest of your piece. As you build upward, you’ll see the clover shapes form naturally between the rows of clusters and single crochets.
-
Finishing: Once your swatch is at the desired height, fasten off and weave in your ends neatly with a yarn needle. Gently block your piece to even out the stitches and set the shape.
-
Tips: For a tighter texture, use a smaller hook. For a looser, more open fabric, go up a hook size. Always keep your starting chains loose to avoid a tight bottom edge.
The crochet clover stitch is a repetitive, meditative pattern that becomes easier with each row. It’s a favorite among those looking for a floral yet geometric crochet pattern.
Creative Ways to Use the Clover Stitch
Once you’ve mastered the crochet clover stitch, there are countless ways to apply it to your crafting projects. Its versatility makes it ideal for both decorative and functional items.
One of the most popular uses is for baby blankets. The soft, textured finish makes it perfect for snuggling while the delicate design adds visual charm. Choose pastel colors for a classic baby gift or bold tones for something more modern.
The clover stitch also works well in scarves and wraps. Since the pattern is reversible, you don’t have to worry about which side shows. Try using variegated yarn for a multicolor, flower-field effect.
You can also incorporate this stitch into table runners, placemats, and dishcloths. The texture makes it great for absorbency while the stitch design adds a decorative touch. Cotton yarn is best for these types of household items.
Looking to make a unique crochet bag? Use the clover stitch as a decorative panel or border. The floral cluster look adds an elegant detail without being too delicate or hard to manage.
Don’t forget garments! Add a panel of clover stitch to summer tops or boho-style vests. With light yarn, the stitch adds just the right amount of airy texture for wearable pieces.
For those who sell finished items, using the clover stitch in your crochet patterns adds unique appeal. It helps your items stand out in a saturated market, and the finished results photograph beautifully for online shops or social media posts.
Troubleshooting & Stitch Adjustments
As with any crochet pattern, the clover stitch may require a bit of adjustment and practice. Here are a few common troubleshooting tips and techniques to help you perfect it.
Stitch Counting: One of the most frequent challenges is maintaining the correct stitch count. Since this pattern uses a repeat sequence, make sure to double-check your chain count and repeats at the start of each row.
Tension Issues: Inconsistent tension can lead to uneven clovers or curling edges. Make a small swatch first and adjust your hook size if needed. Blocking can also help smooth out minor inconsistencies.
Starting Chains: If your foundation chain is too tight, the bottom edge may curl. To avoid this, use a hook one size larger when chaining, then switch back to your original hook for the rest of the pattern.
Yarn Selection: While the clover stitch works with most yarns, some fuzzier yarns can hide the beautiful detail of the cluster stitches. Stick to smooth cotton or acrylic for the clearest stitch definition.
Color Changes: Want to add a twist? Alternate colors every two rows for a striped effect, or use an ombre yarn that transitions naturally. Color placement can dramatically change how the clover shapes appear.
Pattern Modification: For a denser texture, you can reduce the number of chains between clusters or double up on the center stitches. For a more lace-like finish, add an extra chain space between clovers.
With these adjustments, you can personalize the crochet clover stitch pattern to fit your project’s size, style, and function. The more you practice, the more confidence you’ll gain in customizing this versatile stitch.
Final Thoughts: Clover Stitch is a Blooming Success
The crochet clover stitch is a delightful addition to any crocheter’s stitch library. With its floral-inspired design and easy-to-learn repeat, it strikes a beautiful balance between decorative flair and functional durability.
Whether you’re adding texture to a blanket, charm to a scarf, or detail to a dishcloth, this stitch offers endless versatility. It’s also a perfect project for beginners to practice clusters and stitch placement, making it a great stepping stone for more complex crochet patterns.
Remember, the key to mastering any crochet stitch is patience and practice. Start with a small swatch, experiment with yarn types and colors, and most importantly—enjoy the process.
If you’re ready to bring your next project to life with a fresh, textured look, give the crochet clover stitch a try. It’s a blooming success every time. 🌸


