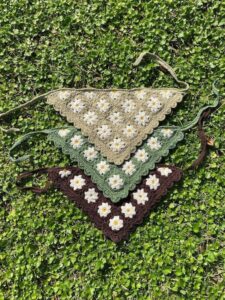
If you’ve ever dreamed of making your own boho-inspired accessories, learning how to crochet a flower granny square bandana is a fantastic place to start. Combining the timeless charm of granny squares with the delicate elegance of crochet flowers, this handmade bandana is a stylish addition to any outfit. Whether you’re heading to a festival, enjoying a sunny day at the beach, or just want to keep your hair in place in a fashionable way, this project is both functional and beautiful.
This beginner-friendly tutorial is designed for crocheters who are familiar with basic stitches and want to take their skills a step further. The best part? You can customize it endlessly. Play with colors, flower shapes, and yarn textures to match your personal style. Using common crochet techniques and classic crochet patterns, this bandana can be made with just a few materials and a bit of your creative energy.
In this article, we’ll walk you through everything you need to create your own crochet flower granny square bandana. From choosing the right materials to step-by-step instructions on assembling your squares and forming the triangle shape, we’ve got it all covered. Let’s dive into this cozy, colorful project!
Choosing the Right Yarn and Tools
Before beginning your crochet flower granny square bandana, it’s important to select materials that are both comfortable and functional. The right yarn and tools will ensure your bandana is wearable, breathable, and stylish.
-
Yarn Selection: For the best results, use 100% cotton or a lightweight cotton-acrylic blend. Cotton is breathable and soft, perfect for a headwear accessory. Choose DK (light worsted) or sport-weight yarn to keep the bandana light.
-
Color Choices: The beauty of this project is in the creative freedom. Use pastel tones for a soft, floral look, or bold, contrasting colors for a more modern boho aesthetic. You’ll need at least two colors—one for the flowers and another for the square background—but you can use more for added vibrancy.
-
Hook Size: A 3.5mm to 4.0mm hook works well with DK or sport-weight yarn. Make sure your hook matches your yarn for the best stitch definition.
-
Scissors and Yarn Needle: Have a sharp pair of scissors and a yarn needle ready to cut and weave in ends. You’ll also need blocking supplies (like pins and a mat) for a professional finish.
-
Square Dimensions: Each granny square should measure approximately 4 inches by 4 inches (10cm x 10cm). You’ll need around 6 to 10 squares depending on the desired size of your bandana.
-
Final Shape: Once the squares are joined into a triangle shape, the final bandana should be about 16–18 inches wide at the base and 8–9 inches high to comfortably tie around your head.
Step-by-Step Guide: How to Crochet a Flower Granny Square
The heart of this project lies in the flower granny squares. These small, square motifs start with a floral center and are framed with rounds of crochet to form a square.
-
Round 1 – Center of Flower: Start with a magic ring. Chain 1 and work 8 single crochets (sc) into the ring. Slip stitch (sl st) into the first sc to close the round. Fasten off.
-
Round 2 – Petals: Join the flower color. In each stitch around, chain 2, make 2 double crochets (dc), chain 2, and slip stitch in the same stitch. Repeat this pattern for all 8 stitches to create 8 petals.
-
Round 3 – Transition to Square: Change to the background yarn color. Start in any space between petals. Chain 3 (counts as a dc), work 2 more dc in the same space, chain 1. In the next space, work 3 dc, chain 1. For corners, work 3 dc, chain 2, 3 dc in the same space. Continue around, forming four corners and four sides.
-
Round 4 – Frame the Square: Continue working 3 dc clusters into each chain space along the sides and 3 dc, chain 2, 3 dc in each corner. Join with a slip stitch and fasten off.
-
Blocking the Squares: Lightly block each square to ensure even sizing. This helps when joining the squares and improves the overall look of the finished piece.
-
Repeating: Make 6 to 10 squares, depending on how large you want the bandana. Arrange them in a triangle layout before joining.
Joining the Squares to Form the Bandana
Once your flower granny squares are ready, it’s time to assemble them into a triangular shape that fits comfortably on your head.
-
Layout: Arrange the squares in rows—3 on the base, 2 in the middle, and 1 at the top for a classic triangle. Lay them flat before joining to check balance and symmetry.
-
Joining Method: You can use slip stitch join or whip stitch. For a decorative look, try the join-as-you-go method, which connects squares on the final round with chain stitches.
-
Slip Stitch Join: With right sides facing, slip stitch through the back loops of adjacent squares. Work slowly to keep seams neat and invisible.
-
Joining Rows: Start by joining the bottom row squares, then add the second row by joining to the center of two bottom-row squares, and finally add the top square.
-
Reinforce Joins: Use a yarn needle to secure loose ends and reinforce any joins that feel loose. Trim excess yarn carefully.
-
Steam Blocking: After assembling, block the full bandana with gentle steam or wet blocking. This helps soften the yarn and align the final shape.
Adding the Edging and Ties
To complete your crochet flower granny square bandana, add a clean border and tie straps. This not only polishes the look but ensures a secure and comfortable fit.
-
Edging Setup: Starting at one corner of the triangle, attach yarn and chain 1. Work single crochets evenly along the edge, placing 2 sc in each dc cluster and 1 sc in each chain space.
-
Corners: At each corner of the triangle, work 3 sc into the same stitch to turn the edge smoothly. This keeps the bandana from curling.
-
Border Round 2 (Optional): For a more decorative border, consider a second round of picot stitches (sc, chain 3, sl st into the first chain) or scallops (5 dc in one stitch, skip one, sc in next).
-
Making the Ties: To make ties, chain 60–80 stitches from each side of the bottom row. Slip stitch back along the chain to strengthen. You can also braid strands of yarn for a bohemian look.
-
Weaving Ends: Use your yarn needle to carefully weave in all loose ends along the edges and ties. Trim any yarn tails for a neat finish.
-
Fit and Style Test: Try on your bandana and adjust the ties for the perfect fit. Add beads or tassels to the tie ends for extra personality.
Final Thoughts and Styling Ideas
The crochet flower granny square bandana is not only a fun and satisfying project, but it’s also a beautiful expression of personal style. Whether you wear it casually or dress it up, it’s a piece that turns heads.
-
Gift Idea: These bandanas make thoughtful handmade gifts. They’re trendy, useful, and easy to personalize with favorite colors or flower types.
-
Upcycling: Use leftover yarn scraps from other crochet patterns to reduce waste and add variation. Each square can tell its own color story.
-
Customization: Add buttons, lace, or even embroidery to make your bandana unique. The flower motif invites creativity.
-
Matching Accessories: Crochet a matching flower pouch, earrings, or necklace using the same color theme. This can create a beautiful boho set.
-
Skill Development: This project helps strengthen your joining techniques, color changes, and blocking skills—important aspects of advanced crochet work.
-
Online Shop Item: If you sell crochet items, this bandana is lightweight, easy to ship, and highly appealing to a wide range of customers. Plus, it’s quick to make and yields great results.
Conclusion
Learning how to crochet a flower granny square bandana is a creative and rewarding journey. This project blends traditional techniques with a modern boho flair, and it’s perfect for anyone wanting to expand their handmade wardrobe. With just a few tools, some yarn, and your imagination, you can create a wearable piece of art that’s perfect for festivals, beach days, or every day in between.
Whether you’re new to crochet or have years of experience, this project is sure to bring joy and pride in your crafting journey. So grab your yarn, pick your colors, and start creating your own crochet patterns masterpiece—one flower at a time.


