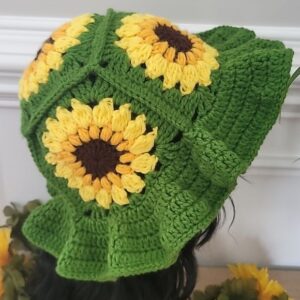
The Crochet Sunflower Bucket Hat Tutorial is the perfect guide for anyone looking to create a cheerful and stylish handmade accessory. Whether you’re heading to a summer picnic, a music festival, or simply want to add a vibrant flair to your wardrobe, this crochet project is a beautiful and functional choice. With the charm of sunflowers and the classic shape of a bucket hat, this pattern combines fashion and creativity in the best way possible.
For both beginners and seasoned crafters, sunflower motifs are a delightful way to explore color, texture, and technique. The crochet patterns used in this tutorial are easy to follow, yet result in an impressive finished product. You’ll be amazed at how quickly the pieces come together, and how versatile this project is — you can use different color schemes or yarn types to make it uniquely yours.
In this article, you’ll learn how to make your own Crochet Sunflower Bucket Hat from start to finish. We’ll walk you through the necessary materials, individual components, and assembly, using straightforward instructions. Let’s dive into the sunshine!
Materials and Yarn Selection for the Crochet Sunflower Hat
Before you pick up your hook, it’s important to gather the right materials. Having everything ready will make your crochet experience smooth and enjoyable.
-
Yarn Choices: Use worsted weight cotton yarn for durability and breathability. You’ll need three colors: yellow for the petals, brown for the center of the sunflower, and green or white for the rest of the hat body. Recommended brands include Lily Sugar’n Cream or Paintbox Cotton Aran.
-
Hook Size: A 4.0 mm (G-6) or 4.5 mm crochet hook is ideal for this project. Make sure to check your gauge if you’re adjusting sizes.
-
Scissors and Stitch Markers: You’ll need sharp scissors to trim ends and stitch markers to help keep track of your rounds, especially when working in continuous spirals.
-
Yarn Needle: Essential for weaving in ends and stitching pieces together neatly.
-
Measuring Tape: A flexible tape measure helps ensure your hat fits as desired — typically, aim for a 21” to 23” circumference for an adult.
-
Gauge and Sizing Notes: Your sunflower motifs should measure approximately 3.5″ across. You’ll make 6 to 8 sunflowers for the crown and sides of the hat, depending on the head size.
How to Crochet the Sunflower Motifs
The sunflower is the heart of this design, and creating each motif is a satisfying mini-project. Let’s walk through the steps to create your sunflower pieces.
-
Step 1 – Center of the Flower: Begin with a magic circle using brown yarn. Chain 2 (counts as first dc), then make 11 double crochets into the ring. Slip stitch to join. (12 stitches total)
-
Step 2 – Petals (Round 2): Switch to yellow yarn. In the first stitch, chain 2, make 2 double crochets, chain 1, slip stitch. Repeat this petal pattern in each stitch around. You should have 12 petals.
-
Step 3 – Strengthen the Petals: For a fuller look, you can do an optional second round of petals behind the first by working into the base of each stitch from round 1.
-
Step 4 – Blocking the Flower: Lightly steam or pin your flower flat to help it keep its shape before attaching it to the hat body.
-
Step 5 – Make Multiple Motifs: Create 6 to 8 sunflower motifs depending on your desired hat size. Lay them out in a circular shape for the crown.
-
Step 6 – Stitching Together: Use the yarn needle and matching yarn to whipstitch the sunflowers edge to edge in a circle for the crown. This forms the top of your bucket hat.
Constructing the Bucket Hat Body
Now that your crown is made of beautiful sunflowers, it’s time to crochet the hat body. This section is worked in the round and will build the walls and brim of your hat.
-
Step 1 – Attach Green or White Yarn: Join your main hat color yarn to any sunflower edge and begin crocheting evenly around the circle with single crochets.
-
Step 2 – Create the Side Walls: Work in rounds, doing single crochet stitches around. Continue for 10–12 rows to build height for the sides. Use stitch markers to help keep your rows even.
-
Step 3 – Fit Adjustment: Try on the crown after several rounds. If the hat feels too snug, add a few increase stitches every third round.
-
Step 4 – Add Texture (Optional): Alternate single crochet and half-double crochet rows to add texture or create stripes for visual interest.
-
Step 5 – Shape the Brim: Start increasing to form the brim by doing 2 single crochets in every third stitch. In the next row, continue increasing every fourth stitch.
-
Step 6 – Final Touch: Continue building the brim for 4–6 rounds until it reaches your desired width. Finish off and weave in all loose ends securely.
Styling and Personalizing Your Sunflower Hat
Congratulations — your Crochet Sunflower Bucket Hat is nearly complete! Now let’s talk about ways to personalize, care for, and make the most of your new accessory.
-
Add a Chin Strap or Ribbon: For functionality and flair, sew on a ribbon or crochet a tie to keep the hat in place on breezy days.
-
Attach a Lining (Optional): If you want to make your hat even more durable, consider adding a thin fabric lining inside using hand-stitching or fabric glue.
-
Mix and Match Colors: Make multiple versions of this crochet pattern using different color combinations. Pastel petals, rainbow brims, or dark green backgrounds all create unique results.
-
Embellish with Beads or Buttons: Add tiny beads to the sunflower centers or edge of the brim for sparkle and dimension.
-
Cleaning and Storage: Hand wash your crochet hat in cold water and lay flat to dry. Store it in a box or drawer to maintain its shape between uses.
-
Gift It or Sell It: This charming project makes a thoughtful handmade gift or a great product for your Etsy shop. Be sure to include care tags and fiber content for buyers.
Final Thoughts on Crochet Sunflower Bucket Hat Tutorial
This Crochet Sunflower Bucket Hat Tutorial is more than just a step-by-step guide — it’s an invitation to create something joyful and unique. Whether you’re just starting your crochet journey or have years of stitching experience, this project offers a delightful mix of technique and creativity.
By learning how to make sunflower motifs, join them together, and shape a wearable, sunny hat, you’ve completed a beautiful and practical piece. Plus, you’ve explored an easy-to-follow crochet pattern that you can adapt for future projects — think sunflower bags, scarves, or blankets.
As always, crafting is about more than just the finished piece. It’s about the joy in each stitch, the colors you choose, and the satisfaction of creating something with your own hands. So wear your sunflower hat proudly — you’ve earned it!
Do you love sunflower-themed crochet projects? Share your makes or ask questions in the comments below. Don’t forget to explore our other crochet patterns for more handmade inspiration.


