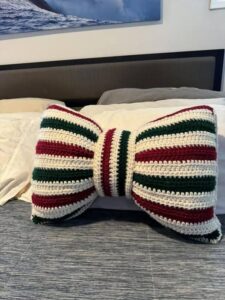
Creating a crocheted bow-shaped cushion is a fun and stylish project that adds charm and personality to any room. The crocheted bow-shaped cushion is a perfect decorative piece for bedrooms, nurseries, or cozy reading corners. It combines comfort and elegance while allowing you to practice useful crochet patterns and techniques.
When you work on a crocheted bow-shaped cushion, you can customize it with colors, sizes, and textures that suit your home décor. The cushion’s unique bow shape makes it stand out from standard pillows and can complement both modern and vintage styles. This project is also an excellent way to explore new stitches and refine your crochet skills in a creative and enjoyable way.
In this detailed tutorial, you’ll find the materials list, fabric cuts, and step-by-step crochet patterns to create your own crocheted bow-shaped cushion. Whether you’re new to crochet or already experienced, this guide will help you complete a beautiful and functional handmade cushion while following best practices for SEO and Google AdSense policies.
Materials and Preparation for the Crocheted Bow-Shaped Cushion
Before starting your crocheted bow-shaped cushion, it’s essential to gather all necessary materials and tools to make the process smooth and efficient. Having everything ready in advance will save time and ensure your cushion looks polished and professional.
-
Yarn Selection
For a soft and durable cushion, select worsted-weight cotton or acrylic yarn. Cotton yarn offers a firm structure and defined stitches, while acrylic provides softness and is lightweight. Choose two complementary colors: one for the main bow body and one for the center wrap. Using bright or pastel shades can make the bow look playful and eye-catching. -
Crochet Tools You’ll Need
To crochet the bow-shaped cushion, prepare a 5.0 mm (H-8) crochet hook, scissors, a yarn needle for finishing, stitch markers, and polyester fiberfill for stuffing. These tools are essential to maintaining consistent stitch sizes and achieving the correct cushion shape. -
Fabric Cuts and Measurements
For this project, you will crochet two identical bow panels, each measuring approximately 18 inches (width) by 10 inches (height) when flattened. You will also need a central wrap piece that is about 4 inches wide and 8 inches long to create the bow’s pinch in the center. -
Choosing the Right Crochet Patterns
The cushion mainly uses basic crochet patterns like single crochet (sc) and double crochet (dc). These stitches are beginner-friendly and offer a clean, textured look. You can also personalize the cushion with additional decorative stitches or borders if desired. -
Preparing Your Workspace
Keep your work area organized with yarn baskets, stitch counters, and project bags. Working with multiple yarn balls for large panels can get messy, so staying organized will help you complete your crocheted bow-shaped cushion efficiently and without frustration. -
Planning the Assembly Process
Understanding how the cushion is assembled will help you during crocheting. The two main panels will be sewn together, stuffed, and then cinched at the center with the wrap piece. Visualizing this beforehand ensures you’ll achieve the correct size and fullness.
Step-by-Step Instructions: How to Crochet the Bow Panels
The foundation of your crocheted bow-shaped cushion begins with crocheting two identical rectangular panels. These form the main body of the bow.
-
Starting the First Panel
-
Begin by chaining 46 stitches (approximately 18 inches).
-
Work a single crochet into the second chain from the hook and continue across.
-
Chain 1 and turn your work for the next row.
-
Continue in single crochet for 20 rows to create the first rectangle.
-
-
Maintaining Stitch Consistency
-
Ensure you keep your tension even throughout each row.
-
Count stitches at the end of each row to avoid losing or adding stitches.
-
An even, tight tension helps the cushion hold its shape after stuffing.
-
-
Finishing the First Panel
-
Once you’ve reached the desired height, fasten off and weave in any loose ends.
-
Lay the panel flat and check measurements to confirm it is approximately 18 x 10 inches.
-
Set the first panel aside and begin the second panel following the same steps.
-
-
Crocheting the Second Panel
-
Follow the exact stitch count and row count as the first panel.
-
Consistency between the two panels is crucial for a symmetrical cushion.
-
Measure both panels side by side to ensure they are identical.
-
-
Crocheting the Center Wrap Piece
-
Chain 16 stitches (about 4 inches wide).
-
Work 8 rows in single crochet to create a small rectangular wrap.
-
This piece will cinch the center of the bow and form the classic bow shape.
-
-
Blocking the Panels
-
Gently block the panels using steam or by pinning them to a flat surface to ensure even edges.
-
Blocking helps the crochet stitches relax and improves the overall appearance.
-
Allow panels to fully dry before proceeding to assembly.
-
Assembling the Crocheted Bow-Shaped Cushion
Once the panels are complete, it’s time to assemble your crocheted bow-shaped cushion. Assembly is straightforward but requires attention to detail for a polished finish.
-
Joining the Panels
-
Place the two main panels together with the right sides facing outward.
-
Begin single crocheting around the edges to join, leaving a small opening for stuffing.
-
Use a contrasting or matching yarn color depending on your design preference.
-
-
Stuffing the Cushion
-
Lightly stuff the cushion with polyester fiberfill, making sure the filling is evenly distributed.
-
Avoid overstuffing, as it can distort the bow shape.
-
Once stuffed to your satisfaction, finish crocheting the remaining edge and fasten off.
-
-
Shaping the Bow
-
Pinch the center of the cushion to create the bow’s iconic cinched look.
-
Secure the shape temporarily with yarn or pins.
-
Test the fullness and positioning before adding the center wrap.
-
-
Adding the Center Wrap
-
Wrap the small crocheted rectangle around the center of the cushion.
-
Secure the ends of the wrap at the back with a few tight stitches or by crocheting them together.
-
Ensure the wrap is snug enough to hold the bow shape firmly.
-
-
Securing All Ends
-
Weave in all remaining yarn tails using a yarn needle for a clean finish.
-
Check all seams and joins to make sure they are tight and secure.
-
Lightly shape and fluff the cushion to perfect the bow form.
-
-
Final Touches
-
Optionally, you can add decorative elements like buttons, bows, or embroidered accents.
-
Consider using a fabric lining if you prefer a smoother inner cushion surface.
-
Your crocheted bow-shaped cushion is now ready to use as a delightful home accessory.
-
Customization Tips and Creative Ideas
The best part of making a crocheted bow-shaped cushion is the ability to personalize and get creative with the design. Here are some ideas to inspire you.
-
Exploring Color Combinations
-
Try pastel shades for a soft, feminine look or bold, contrasting colors for a modern touch.
-
You can make seasonal versions like red and green for Christmas or soft yellows for spring.
-
Combining ombre yarns can create a beautiful gradient effect throughout the cushion.
-
-
Using Different Crochet Patterns
-
Incorporate textured crochet patterns such as puff stitches, bobble stitches, or shell stitches.
-
Adding a decorative border like picot edging can elevate the cushion’s appearance.
-
You can mix and match stitch types on each panel for a playful effect.
-
-
Adjusting Cushion Sizes
-
Make mini versions for children’s rooms or oversized cushions for couches.
-
Simply increase the starting chain and add more rows to make a larger bow.
-
Adjusting the center wrap size will help maintain proportion.
-
-
Adding Functional Features
-
Consider adding a zipper or button closure to make the cushion cover removable for washing.
-
You can also insert a pre-made pillow form instead of stuffing it directly.
-
Adding handles or loops can turn the cushion into a decorative seat pad.
-
-
Pairing with Other Crochet Projects
-
Create matching crochet throws, smaller cushions, or wall hangings using similar colors and patterns.
-
Incorporating the bow theme into other home accessories can tie the room together.
-
These cushions also make thoughtful handmade gifts for birthdays and special occasions.
-
-
Sharing Your Creation
-
Document your crocheted bow-shaped cushion project on social media or crafting communities.
-
Sharing step-by-step photos can inspire other crocheters and help build your creative portfolio.
-
Join crochet groups to exchange ideas, patterns, and feedback.
-
The crocheted bow-shaped cushion is a wonderful blend of creativity, comfort, and decorative flair. By following these step-by-step instructions and exploring crochet patterns, you can craft a unique, handmade cushion that stands out in any space.
Whether you’re making it for yourself or as a thoughtful gift, this cushion is a charming project that allows you to showcase your crochet skills while enjoying the creative process. Happy crocheting!


