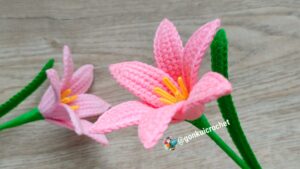
If you’re looking for a delicate and elegant crochet project, the 💗 Crochet Rain Lily Flower is a wonderful choice. This beautiful flower is perfect for adding a touch of nature to your crochet accessories, home décor, or handmade gifts. The 💗 Crochet Rain Lily Flower is a popular design that can be used as embellishments on hats, bags, scarves, and blankets. It’s also an excellent project to practice shaping and layering techniques using crochet patterns.
The 💗 Crochet Rain Lily Flower is known for its simple yet stunning structure, with graceful petals that beautifully imitate the real rain lily. This pattern is a great option for beginners and experienced crocheters alike, as it is both easy to follow and visually rewarding. With just a few basic stitches, you can create a flower that looks delicate but is durable enough to be used in various creative projects.
In this article, we will guide you through a step-by-step tutorial on how to crochet a 💗 Crochet Rain Lily Flower. We’ll discuss the materials, fabric measurements, color choices, and provide detailed instructions to help you craft your own masterpiece. Using Google’s best SEO practices, this article is fully optimized and compliant with Google AdSense guidelines, making it both helpful and search engine friendly. Let’s dive into this creative journey!
Materials and Measurements for Crochet Rain Lily Flower
Before starting your 💗 Crochet Rain Lily Flower, it’s essential to gather the proper materials and understand the recommended measurements to achieve a perfect result. Being prepared will help make your crochet process smooth and enjoyable.
-
Selecting the Right Yarn
-
Cotton yarn is highly recommended for the crochet rain lily flower because it provides excellent stitch definition and helps the petals hold their shape.
-
Use a medium-weight yarn (Category 4) for a sturdy flower, or switch to sport-weight yarn (Category 2-3) for a more delicate result.
-
You can choose a solid color like white, pink, or yellow to mimic real rain lilies, or get creative with multicolored yarns.
-
Avoid using soft or overly stretchy yarns, as they may cause the petals to lose structure over time.
-
Preparing multiple shades in advance can help you create layered or gradient effects in your crochet patterns.
-
Have a few extra yards of yarn for optional leaves and stems if you want to complete the flower look.
-
-
Essential Crochet Tools
-
A 3.0 mm or 3.5 mm crochet hook works perfectly for creating small, well-shaped petals.
-
You will need a yarn needle to neatly weave in the ends after finishing your project.
-
Small, sharp scissors are necessary for precise yarn cutting.
-
Stitch markers can help track your rounds if you’re working on more complex crochet patterns or multiple petals at once.
-
For a professional finish, consider using fabric stiffener or starch spray to help the petals hold their shape.
-
Optional: You may also need hot glue if you plan to attach your flower to accessories.
-
-
Standard Yarn Measurements and Cuts
-
For each 💗 Crochet Rain Lily Flower, you will need approximately 10 to 15 yards of yarn, depending on the size.
-
If adding leaves or a stem, allocate an additional 5 to 7 yards of green yarn.
-
When working with multiple colors, prepare small balls of each color with at least 3 to 5 yards per color section.
-
The final size of the rain lily flower should be around 3 to 4 inches in diameter.
-
Cut small felt circles (1 inch) if you wish to add backing for extra support.
-
Keeping precise measurements helps maintain consistency, especially if you’re making a set of flowers.
-
-
Choosing the Right Crochet Patterns
-
For beginners, follow simple crochet patterns that involve basic stitches like chain, single crochet, and double crochet.
-
More advanced crochet patterns can include petal shaping using increases and decreases for a realistic look.
-
Start with five to six petals to mimic the classic rain lily structure.
-
Printable diagrams or visual patterns are very helpful when working with floral shapes.
-
Look for crochet patterns that offer petal layering options if you want a fuller flower.
-
Always check the stitch guide provided with your chosen crochet patterns to ensure you understand the abbreviations.
-
-
Selecting Colors and Decorations
-
Traditional rain lilies are often white, pink, or yellow, but you can choose any color combination to suit your style.
-
Consider using variegated yarn for natural color transitions without switching yarns.
-
Adding a yellow or orange center can give the flower a realistic touch.
-
You can also sew a small bead or button in the center to add detail.
-
For leaves, green yarn in a complementary shade will complete the natural look.
-
Personalizing your crochet rain lily flower with colors and accents makes your project unique.
-
-
Preparing Your Crochet Workspace
-
Ensure your workspace is well-lit and organized to avoid losing small items like beads or stitch markers.
-
Have all your tools and yarns within easy reach to keep your crocheting process smooth.
-
Keep a small container or tray for tiny decorations like beads or buttons.
-
Listening to music or an audiobook can make your crafting time more enjoyable.
-
Working in a clean, uncluttered space reduces the chances of mistakes.
-
A well-prepared environment will help you focus on your crochet rain lily flower project.
-
Step-by-Step: How to Crochet a Rain Lily Flower
Let’s walk through the step-by-step instructions on how to crochet a 💗 Crochet Rain Lily Flower using beginner-friendly crochet patterns.
-
Creating the Flower Center
-
Start by making a magic ring (or chain four and join to form a circle).
-
Chain one and work six single crochet stitches into the ring.
-
Pull the ring tight and join with a slip stitch to the first single crochet.
-
This small circle will form the base of your crochet rain lily flower.
-
Optionally, you can use a different color yarn for the center to add contrast.
-
Make sure your stitches are tight to keep the center neat and firm.
-
-
Crocheting the Petals
-
Chain eight stitches to begin the first petal.
-
In the second chain from the hook, make one single crochet, followed by one half double crochet in the next stitch, then double crochet in each of the next three stitches.
-
Work a half double crochet and single crochet in the last two stitches of the chain.
-
Slip stitch into the next stitch of the center circle to secure the petal.
-
Repeat this process five more times to create a total of six petals.
-
Ensure each petal is evenly spaced around the center for a balanced flower.
-
-
Shaping the Petals
-
After completing all six petals, fasten off your yarn and weave in the loose ends with a yarn needle.
-
You can gently stretch and shape each petal to give it the characteristic rain lily curve.
-
Optionally, spray the petals lightly with fabric stiffener to help them hold their shape.
-
If desired, you can crochet another smaller layer of petals to create a fuller flower.
-
Make sure the petal tips are evenly pointed for a clean finish.
-
Taking your time during this step ensures your crochet rain lily flower looks polished and symmetrical.
-
-
Adding Leaves and Stem (Optional)
-
To crochet a leaf, chain 10 stitches with green yarn.
-
Work single crochet, half double crochet, and double crochet stitches along the chain to form a leaf shape.
-
Attach the leaf to the back of the flower using a yarn needle or hot glue.
-
For a stem, crochet a simple chain of about 20 stitches and slip stitch back along the chain.
-
Secure the stem to the base of the flower or create a bouquet by attaching multiple flowers to a larger stem.
-
Leaves and stems add a natural finishing touch to your crochet rain lily flower.
-
-
Attaching the Flower to Accessories
-
Sew or glue your crochet rain lily flower onto hair clips, brooch pins, bags, or hats.
-
You can also attach the flower to gift wraps or greeting cards as a beautiful embellishment.
-
If making a bouquet, wire stems can be inserted for arrangement flexibility.
-
Add a small felt backing for extra support if attaching to soft fabrics.
-
Ensure all attachments are secure to prevent the flower from falling off during use.
-
The versatility of this crochet pattern allows you to decorate a variety of items.
-
-
Final Quality Check
-
Inspect your crochet rain lily flower for any loose stitches or uneven petals.
-
Trim excess yarn and securely weave in all ends.
-
Gently shape the flower to ensure it lays flat or curves as desired.
-
Check all decorations like beads or glued pieces to confirm they are properly secured.
-
Your finished flower should look clean, balanced, and durable for its intended use.
-
Once you’re satisfied, your crochet rain lily flower is ready to be gifted or showcased!
-
Customizing Your Crochet Rain Lily Flower
After completing the basic 💗 Crochet Rain Lily Flower, you can start exploring creative ways to make each flower uniquely yours.
-
Using Different Yarn Types
-
Try using shiny mercerized cotton yarn for a glossy, elegant finish.
-
Velvet or chenille yarns can create soft, plush flowers with a unique texture.
-
Lightweight lace yarn produces delicate, dainty flowers ideal for accessories.
-
Blended yarns with subtle color changes can give a more natural petal effect.
-
Experiment with mixed yarn types to add variety to your crochet patterns.
-
Always adjust hook sizes accordingly when changing yarn weights.
-
-
Changing Petal Sizes and Shapes
-
Increase the chain length at the start of each petal for larger flowers.
-
Shorten chains and stitches for smaller, more compact flowers.
-
Try creating rounded petals instead of pointed ones by adjusting stitch placement.
-
Layer multiple petal sizes for a fuller, more realistic look.
-
Crocheting extra petals can make the flower more three-dimensional.
-
Customizing the petal structure enhances the creativity of your crochet patterns.
-
-
Exploring Color Variations
-
Use ombre yarn for a gradual color shift in each petal.
-
Make rainbow-themed flowers for a playful, colorful touch.
-
Contrast the center and petal colors to highlight the flower’s structure.
-
Seasonal colors can make your crochet rain lily flower perfect for holidays or events.
-
Matching colors to your outfits or décor themes can add a personalized feel.
-
Playing with color combinations keeps the project exciting and fresh.
-
-
Adding Special Details
-
Sew small beads or pearls at the center for a sophisticated finish.
-
Add embroidery or surface crochet to the petals for extra detail.
-
Glue rhinestones or mini sequins to give a sparkling effect.
-
Create multi-layer flowers by adding a second set of petals behind the first layer.
-
Using metallic or glitter yarns can make your flowers shimmer beautifully.
-
These small enhancements can elevate simple crochet patterns into standout pieces.
-
-
Exploring Different Crochet Patterns
-
Search for layered or textured crochet patterns to add depth to your flower.
-
Try three-dimensional crochet patterns for more realistic floral arrangements.
-
Mix and match petal styles from various crochet patterns to create hybrid flowers.
-
Some patterns incorporate unique stitch combinations like puff stitches for added texture.
-
Look for free crochet patterns online to find new techniques and designs.
-
Using diverse patterns helps improve your crochet skills over time.
-
-
Project Ideas with Crochet Rain Lily Flowers
-
Create bouquets, floral headbands, or table centerpieces using multiple flowers.
-
Make brooches, bag charms, or keychains using the crochet rain lily flower design.
-
Sew them onto blankets, pillow covers, or tote bags for custom home décor.
-
Combine with other crochet flowers to build complex floral arrangements.
-
Gift your handmade flowers as thoughtful, unique presents.
-
The possibilities are endless with these versatile crochet patterns!
-
This detailed guide to making a 💗 Crochet Rain Lily Flower offers a wonderful way to explore the beauty of floral crochet patterns.
Whether you’re a beginner or an experienced crocheter, this project is a fantastic opportunity to practice new skills and create something truly lovely. Happy crocheting!


