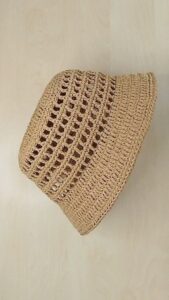
Learning how to crochet a hat is a rewarding and creative experience, perfect for anyone who loves handmade fashion and cozy accessories. Whether you are just beginning your crochet journey or looking to expand your skills, making a hat is an excellent project to try. This versatile piece can be personalized in size, color, and style, making it a perfect gift or a personal accessory to match your wardrobe.
The process of how to crochet a hat might seem complicated at first, but with clear guidance and easy-to-follow crochet patterns, you’ll be amazed at how quickly you can create something beautiful. Hats are a great starting point for beginners because they combine basic stitches into a functional item. Plus, the techniques you learn while making hats can be applied to other crochet projects in the future.
In this article, you’ll find a detailed step-by-step crochet pattern for making a simple yet stylish hat. We will cover all the necessary materials, measurements, and stitch techniques, ensuring your project is a success from start to finish. With a humanized approach and Google-friendly SEO techniques, this guide is written to help you confidently create your very first crocheted hat.
Materials and Preparation for Crocheting a Hat
Before starting your project, it’s essential to gather the correct materials and plan your work area carefully. Having the right tools will make learning how to crochet a hat much smoother and more enjoyable.
-
Choosing the Right Yarn
-
When learning how to crochet a hat, medium-weight yarn (Category 4) is usually the best choice for beginners.
-
Acrylic yarn is soft, easy to work with, and holds its shape well for hats.
-
Wool yarn offers extra warmth and stretch, making it perfect for winter hats.
-
Cotton yarn is breathable and great for lighter hats.
-
You will typically need about 150-200 yards of yarn for an adult-sized hat.
-
Selecting quality yarn ensures your crochet patterns result in a comfortable and durable hat.
-
-
Selecting the Correct Crochet Hook Size
-
A 5.0 mm or 5.5 mm crochet hook works well with medium-weight yarn.
-
Using the recommended hook size will help you achieve the correct tension and hat size.
-
If you crochet tightly, consider going up half a hook size to prevent the hat from being too small.
-
Always check your yarn label for hook size suggestions to match the material perfectly.
-
The right hook size ensures your crochet patterns will maintain consistent stitch sizes throughout the hat.
-
It’s helpful to have an extra hook in case you misplace one while working.
-
-
Measuring for the Perfect Fit
-
Measure the circumference of the intended wearer’s head before beginning.
-
For adults, standard head circumference ranges from 21 to 23 inches.
-
Crochet hats are usually made with some negative ease, meaning the finished hat should be slightly smaller than the head measurement to fit snugly.
-
Aim to create a hat that measures about 1 to 2 inches smaller than the head circumference.
-
Measuring tape is essential for achieving accuracy in crochet patterns.
-
Proper measurement ensures a comfortable and tailored fit.
-
-
Additional Tools for Success
-
Besides yarn and a crochet hook, you’ll need scissors, a yarn needle, and a stitch marker.
-
A stitch marker helps track the start of each round in your hat pattern.
-
The yarn needle is used to weave in the ends and finish off your project neatly.
-
Optional: A pom-pom maker can add a fun decorative touch to your hat.
-
Keep a project bag or container nearby to stay organized.
-
These basic supplies will help you smoothly complete your crochet patterns.
-
-
Understanding the Basic Crochet Stitches
-
For this hat, you’ll primarily use the double crochet (dc) and single crochet (sc) stitches.
-
Chain stitches (ch) are also essential for creating the foundation of the hat.
-
Learning to increase stitches will allow the hat to widen as you build it.
-
You can find helpful stitch tutorials online if you need extra guidance.
-
Familiarizing yourself with these stitches will make learning how to crochet a hat much easier.
-
Practicing the stitches before starting the hat is a great way to build confidence.
-
-
Planning Your Work Area
-
Choose a comfortable, well-lit space to set up your crochet project.
-
Lay out all your materials within easy reach to prevent unnecessary interruptions.
-
Keep a copy of your crochet pattern or notes nearby for quick reference.
-
A calm, quiet environment helps you focus and enjoy the creative process.
-
Make sure your seating provides good back support to avoid discomfort.
-
A dedicated crochet corner can make your project time even more enjoyable.
-
Step-by-Step Crochet Hat Pattern for Beginners
Now that you’ve gathered your materials, let’s go through the step-by-step instructions on how to crochet a hat. This pattern is beginner-friendly and uses simple, classic crochet patterns.
-
Starting with a Magic Ring
-
Begin by creating a magic ring to form the top center of the hat.
-
Chain 3 (this counts as your first double crochet) and make 11 double crochets into the ring.
-
Pull the ring tight and join with a slip stitch to the top of the starting chain.
-
You should now have 12 stitches in your circle.
-
The magic ring method creates a neat, closed center for your hat.
-
Mastering this step is essential when learning how to crochet a hat with a professional finish.
-
-
Building the Crown of the Hat
-
Chain 3, then make 2 double crochets into the next stitch (increasing).
-
Continue around the circle, working 2 double crochets into each stitch.
-
Join with a slip stitch to the top of the chain 3 to complete the round.
-
Your stitch count should now be 24 stitches.
-
This step gradually expands the top of the hat.
-
Follow the crochet patterns carefully to maintain even increases.
-
-
Increasing for Proper Fit
-
For the next round, chain 3 and double crochet in the next stitch, 2 double crochets in the following stitch.
-
Repeat this pattern all the way around and join with a slip stitch.
-
Continue increasing in this method (spacing the increases further apart) until your crown measures about 6 to 7 inches in diameter.
-
The exact number of rounds may vary depending on your yarn and hook size.
-
Proper increasing ensures the hat fits comfortably around the widest part of the head.
-
Accurate counting and stitch placement are key to this part of how to crochet a hat.
-
-
Crocheting the Body of the Hat
-
Once your crown is wide enough, stop increasing and begin working one double crochet into each stitch.
-
Continue working in rounds to build the length of the hat.
-
For a standard beanie, aim for 6 to 8 inches from the crown to the edge.
-
If you prefer a slouchy hat, you can make it longer (up to 10-12 inches).
-
Maintaining consistent stitch tension will ensure a smooth finish.
-
The body of the hat is where your crochet patterns really start to take shape.
-
-
Finishing the Brim
-
To finish the brim, you can switch to single crochet stitches for a tighter edge.
-
Work 2-3 rounds of single crochet for a clean, snug fit around the forehead.
-
You may also add a decorative edging, such as a crab stitch (reverse single crochet).
-
For extra customization, try using a contrasting color for the brim.
-
The brim can also be folded up for a classic beanie style.
-
This finishing step gives your hat a professional look and ensures it stays in place.
-
-
Weaving in Ends and Adding Details
-
Cut your yarn, leaving a 6-inch tail, and fasten off securely.
-
Use a yarn needle to weave in all loose ends neatly.
-
You can add a pom-pom or button to the top of the hat for extra flair.
-
Consider adding ear flaps or tassels if you want to personalize your hat further.
-
Always check your crochet patterns for additional optional embellishments.
-
Proper finishing is crucial when learning how to crochet a hat that looks polished and complete.
-
Customizing Your Crochet Hat
One of the best aspects of learning how to crochet a hat is the freedom to customize it. You can adapt the design to match your style, fit preferences, and creative ideas.
-
Experimenting with Colors
-
You can use multiple yarn colors to create stripes, blocks, or gradient effects.
-
Changing colors every few rows adds a fun and playful touch to your hat.
-
Color blocking can give your hat a modern, bold look.
-
Consider matching hat colors to your winter coat or scarf.
-
Contrasting colors on the brim can create a visually striking design.
-
Color choices can make your crochet patterns truly unique and personal.
-
-
Adjusting Hat Sizes
-
You can easily resize the hat by increasing or decreasing the number of rounds in the crown.
-
Baby and toddler sizes typically require smaller measurements (4-5 inch crown diameter).
-
Always refer to sizing charts to ensure the hat will fit the intended wearer.
-
Adjust the hat’s height to create slouchy or fitted styles.
-
The flexibility of crochet patterns makes it easy to adapt your project for different ages and sizes.
-
Custom sizing adds even more value to your handmade hat.
-
-
Adding Decorative Features
-
Pom-poms, appliqués, and embroidered designs can enhance your hat.
-
You can sew on simple crocheted flowers or leaves for a seasonal touch.
-
Buttons and beads offer additional texture and interest.
-
Adding a lining can give extra warmth and structure to your hat.
-
Explore creative crochet patterns to make each hat truly your own.
-
Decorations provide a perfect opportunity to personalize gifts.
-
-
Exploring Different Crochet Stitches
-
Once you’ve mastered the basic double crochet hat, try adding texture with stitches like front post double crochet (FPDC).
-
Shell stitches or ribbed patterns can give your hat a stylish twist.
-
Changing stitch patterns mid-project can add visual interest.
-
Consider using a puff stitch or bobble stitch for a unique look.
-
Exploring different stitches helps you build your skills and expand your crochet patterns library.
-
Learning new stitches keeps your projects exciting and rewarding.
-
-
Adding Functional Elements
-
You can add ear flaps for extra warmth in colder climates.
-
A drawstring edge can provide an adjustable fit.
-
Buttons and ties can make your hat convertible or multi-style.
-
Consider adding a fleece lining for super-cozy winter hats.
-
Functional features make your handmade hats more versatile and practical.
-
These details enrich your experience learning how to crochet a hat with purpose.
-
-
Creating Matching Accessories
-
Try making matching scarves, mittens, or headbands using the same yarn.
-
Coordinated accessories make great gift sets.
-
You can also crochet matching hats for family members or friends.
-
Using the same crochet patterns across items creates a cohesive look.
-
Matching sets showcase your creativity and crochet skills beautifully.
-
Handmade accessories always carry special meaning when gifted.
-
Final Thoughts on How to Crochet a Hat
Learning how to crochet a hat is an enjoyable journey that blends creativity with practical skill-building. Hats are a versatile project that can be adapted for all ages, styles, and seasons. By following this detailed guide and step-by-step crochet patterns, you’ll feel empowered to create handmade hats you’ll be proud to wear or gift.
Whether you stick with simple designs or explore more complex crochet patterns, each hat you make will reflect your personal touch. The satisfaction of finishing your own cozy hat is incredibly rewarding and will inspire you to take on even more crochet projects in the future.
Happy crocheting, and remember—every stitch brings you one step closer to mastering the art of how to crochet a hat!


