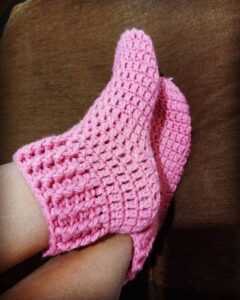
Learning how to make crochet socks is an incredibly rewarding project for anyone who loves handmade accessories. Crocheting socks is not only practical but also a fun way to personalize your wardrobe with cozy, unique designs. By exploring crochet patterns, you can create socks that fit perfectly and match your favorite styles.
When it comes to making socks, crochet offers a creative alternative to traditional knitting. With crochet, you can craft beautiful textures and shapes using simple stitches. Even if you are new to this craft, starting with beginner-friendly crochet patterns will guide you step by step through the process of making comfortable socks.
In this guide, you will learn how to make crochet socks from start to finish, including choosing the right yarn, hook sizes, measuring your feet correctly, and following a detailed crochet sock pattern. Let’s dive into this creative journey that blends skill, patience, and style.
Materials and Measurements for Crochet Socks
Choosing the Right Yarn
- Selecting the right yarn is crucial when learning how to make crochet socks. Soft, durable, and breathable yarns ensure comfort and longevity.
- Wool-blend yarns are excellent choices because they provide warmth while allowing your feet to breathe.
- A popular option is using fingering weight or sport weight yarn to create lightweight and wearable socks.
- Make sure the yarn has some elasticity, which helps the socks conform to your feet.
- Yarns labeled specifically for socks usually contain a small percentage of nylon to improve durability.
- Always pick yarns that feel soft to the touch to maximize comfort in your crochet socks.
Selecting the Crochet Hook Size
- The crochet hook size directly impacts the tension and size of your socks. Using a smaller hook than recommended will create a tight, dense fabric perfect for socks.
- Typically, a 2.5 mm to 3.5 mm crochet hook works well with sock yarn.
- Always check your yarn label for the recommended hook size, but remember to create a tight gauge for durability.
- A tight stitch ensures the socks will not stretch out excessively with wear.
- Using the correct hook size is essential for following accurate crochet patterns for socks.
- A steel hook can be a good option if you prefer precision in your crochet work.
Measuring Your Feet
- Proper measurements are vital when learning how to make crochet socks that fit perfectly.
- Measure the circumference of the ball of your foot and the length from heel to toe.
- The sock should have about one inch of negative ease to ensure a snug fit.
- Using a soft measuring tape is recommended to capture accurate foot dimensions.
- Compare your measurements with the sizing guide in your chosen crochet patterns.
- Measuring correctly helps avoid socks that are too tight or too loose.
Additional Supplies Needed
- Besides yarn and a crochet hook, gather scissors, a yarn needle, and stitch markers.
- Stitch markers help keep track of rounds and prevent losing your place in the pattern.
- A yarn needle is essential for weaving in the ends after finishing your socks.
- Optional: A measuring gauge can help you check your stitch tension before starting.
- A row counter can help you track progress accurately if you are working on multiple socks.
- Having all your tools ready makes your crochet project more enjoyable and efficient.
Choosing the Right Crochet Patterns
- Beginners should start with simple crochet patterns that use basic stitches like single crochet or half-double crochet.
- Look for patterns labeled “easy” or “beginner-friendly” to build confidence.
- Seamless sock patterns are ideal as they avoid uncomfortable seams underfoot.
- Toe-up and cuff-down patterns are the two main styles; choose the one that feels most comfortable for you.
- Many free crochet patterns for socks are available online to help you get started.
- Following well-written patterns ensures step-by-step success as you learn how to make crochet socks.
Preparing Your Workspace
- Choose a comfortable, well-lit area for crocheting to avoid eye strain.
- Keep your tools organized in a project bag or container to stay focused.
- Ensure your seating provides good back support for long crochet sessions.
- Keep a printed or digital copy of your crochet patterns close by for easy reference.
- Have a notebook handy for jotting down stitch counts or adjustments as you work.
- A peaceful, clutter-free environment makes the process of learning how to make crochet socks more enjoyable.
Step-by-Step Crochet Sock Pattern for Beginners
Starting with the Toe
- Begin by creating a magic ring and working six single crochet stitches into it.
- Pull the ring tight and slip stitch to join the round.
- In the next round, increase by working two single crochets in each stitch, bringing the total to 12 stitches.
- Continue increasing each round until the toe cap matches the width of your foot.
- Use stitch markers to help track the beginning of each round.
- Mastering the toe is a crucial step in learning how to make crochet socks with precision.
Building the Foot Section
- Once you reach the desired width, stop increasing and continue working in spirals to build the foot length.
- Crochet in single crochet stitches until the foot section measures about one inch less than the total foot length.
- Ensure your tension remains consistent throughout to maintain the sock’s shape.
- The foot section should comfortably hug your foot without being too tight.
- Following your crochet patterns carefully here ensures a perfect fit.
- Accurate stitch counting is essential to avoid unintentional increases or decreases.
Creating the Heel
- For the heel, you can choose between a traditional heel flap or a short-row heel; this guide covers a simple short-row heel.
- Work back and forth in rows across half the stitches to shape the heel cup.
- Decrease at the ends of each row to curve the heel naturally.
- Once the cup is formed, increase back to the original stitch count to continue in the round.
- This step is key in learning how to make crochet socks that fit snugly and comfortably.
- Take your time to carefully follow the heel instructions in your crochet patterns.
Crocheting the Leg Section
- After completing the heel, continue crocheting in the round to build the leg portion of the sock.
- You can adjust the length based on personal preference, from ankle socks to mid-calf or knee-high socks.
- Experiment with colors or textures to add a decorative touch to the leg section.
- Ensure consistent stitch tension to maintain a smooth appearance.
- The leg section is where you can add ribbing or other crochet patterns for design interest.
- Customizing the length and style makes learning how to make crochet socks even more enjoyable.
Finishing the Cuff
- Crochet a ribbed cuff using front and back post double crochet stitches for elasticity.
- Work 4-6 rounds of ribbing to ensure a snug fit around the ankle or calf.
- You can also add a decorative edge using shell stitches or picot edging if desired.
- The cuff should comfortably hold the sock in place without being too tight.
- A well-crafted cuff adds a polished finish to your crochet socks.
- Mastering the cuff is an important milestone in learning how to make crochet socks that stay in place.
Weaving in Ends and Final Touches
- Cut the yarn, leaving a six-inch tail, and fasten off securely.
- Use a yarn needle to weave in all loose ends carefully to prevent unraveling.
- Try on the sock to check the fit and adjust if needed before making the second sock.
- Add decorative elements like buttons, bows, or small appliques if you wish.
- Wash and block the socks gently to set their shape.
- Completing the final touches ensures your socks look professional and feel comfortable.
Customizing Your Crochet Socks
Exploring Different Yarn Colors and Patterns
- Add personality to your socks by incorporating multiple yarn colors or using variegated yarn.
- Stripes, gradients, and color-blocking make your socks visually appealing.
- Consider matching your sock colors to other handmade accessories.
- Using self-striping yarn can create beautiful patterns without needing to change yarn frequently.
- The flexibility of crochet patterns allows you to be as creative as you like.
- Color experimentation is a fun way to make each pair unique.
Adjusting Sizes for the Perfect Fit
- Easily resize socks by adjusting the number of stitches in the toe and foot sections.
- Follow sizing charts to ensure proper fit for children, adults, or large feet.
- Adjust the leg height to create custom ankle, crew, or knee-high socks.
- Checking gauge before starting ensures that the sock size matches your intended measurements.
- Resizing skills are valuable as you continue learning how to make crochet socks for different recipients.
- Custom sizing makes handmade socks extra special and practical.
Adding Special Stitch Designs
- Explore lace patterns, cables, or textured stitches to elevate your socks.
- Alternating stitches can create beautiful designs and provide extra elasticity.
- Front post and back post stitches add depth and interest to sock designs.
- Special stitch patterns can make each pair stand out as a unique creation.
- Always test new stitches on a swatch before adding them to your socks.
- Advanced crochet patterns offer endless creative opportunities.
Creating Matching Accessories
- Consider making matching hats, scarves, or mittens to complete your handmade set.
- Use leftover yarn to create coordinating accessories like wrist warmers or headbands.
- Matching sets make thoughtful gifts and showcase your crochet skills beautifully.
- Coordinating accessories allow you to practice more crochet patterns.
- These projects help you expand your creativity while making practical items.
- Handmade sets are always well-received and add a personal touch to gift-giving.
Exploring Sock Types
- Try different sock styles like slipper socks, yoga socks (toe-less), or bed socks for cozy nights.
- Each sock type uses similar techniques but offers unique design opportunities.
- Slipper socks can be made thicker for home use and extra comfort.
- Yoga socks are great for flexibility and breathability during workouts.
- Bed socks are perfect for relaxation and warmth during colder months.
- Learning how to make crochet socks in various styles expands your crochet expertise.
Adding Functional Features
- Add non-slip soles to slipper socks by applying fabric paint to the bottom.
- Reinforce toe and heel sections with additional yarn for durability.
- Create adjustable drawstrings or ties for better ankle support.
- Include a decorative but functional buttoned flap for unique sock designs.
- Consider using a soft lining for enhanced comfort.
- Functional features make your socks both stylish and practical.
Final Thoughts on How to Make Crochet Socks
Learning how to make crochet socks is a fulfilling and creative journey that blends comfort, style, and personal expression. With the right materials, accurate measurements, and carefully followed crochet patterns, you can create socks that are as practical as they are beautiful. Whether you make socks for yourself, family, or friends, each stitch brings you closer to mastering this rewarding craft.
As you continue exploring the world of crochet, you’ll discover that socks offer endless opportunities for customization and creativity. Enjoy the process, experiment with different styles, and embrace the joy of handmade comfort!


