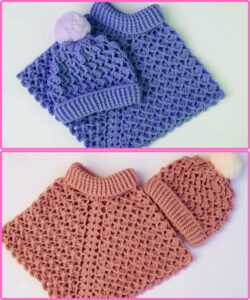
Creating a beautiful and cozy crochet hat set with turtleneck poncho is a delightful project for crafters of all levels. Combining both functionality and style, this set is perfect for chilly weather and offers a fashionable, handmade touch to your wardrobe. Using well-chosen crochet patterns, you can easily personalize this ensemble to suit your taste and comfort.
Making a crochet hat set with turtleneck poncho allows you to explore different textures, stitches, and color combinations. This versatile project is not only a great addition to your own collection but also makes a thoughtful handmade gift. By selecting the right crochet patterns and materials, you can ensure that your finished pieces are both stylish and warm.
In this detailed step-by-step guide, we will cover everything you need to know about crafting your own crochet hat set with turtleneck poncho. From materials, fabric cuts, and stitch selection to assembly and finishing, this tutorial will walk you through ech part of the process. Let’s dive into creating this fashionable and practical crochet set.
Materials and Measurements for Crochet Hat Set with Turtleneck Poncho
Selecting the Right Yarn
- When making a crochet hat set with turtleneck poncho, it is essential to choose a soft, warm yarn like wool or a wool-acrylic blend for maximum comfort.
- The yarn should be medium weight (worsted weight, category 4) to create a cozy but not overly bulky texture.
- Consider hypoallergenic yarns for sensitive skin, especially if you plan to wear the poncho and hat directly on your body.
- Select a color palette that complements your wardrobe or opt for vibrant tones to make a statement.
- Using gradient or self-striping yarns can add a unique flair to your crochet patterns without changing yarns frequently.
- Purchase approximately 800g of yarn to comfortably complete both the hat and poncho.
Choosing the Correct Crochet Hook
- A 5.5 mm (I-9) crochet hook is ideal for working with worsted weight yarn for this project.
- The hook size should match the recommended gauge on your yarn label to achieve the proper stitch tension.
- If you crochet tightly, you may need to use a larger hook to maintain the softness and drape of the fabric.
- Loose crocheters should select a smaller hook to ensure the stitches are tight enough to keep warmth.
- Always make a gauge swatch to ensure your finished project will have the correct measurements.
- Having the right hook will make your crochet hat set with turtleneck poncho look professional and well-fitted.
Measuring for a Perfect Fit
- For the hat, measure the head circumference of the person who will wear it; typically, 21-23 inches is a standard adult size.
- The hat should have a snug fit but still be comfortable, allowing for a little stretch.
- The turtleneck poncho should fit comfortably around the shoulders and drape to your preferred length, typically about 24-26 inches from neck to hem.
- Measure shoulder width to ensure the poncho comfortably covers without being too tight.
- Take measurements while wearing light clothing to ensure the poncho fits over various outfits.
- Custom measurements provide a polished, tailored finish to your crochet hat set with turtleneck poncho.
Additional Tools Needed
- Prepare scissors, a yarn needle, and stitch markers before beginning your project.
- Stitch markers are especially useful for keeping track of increases and rounds in both the hat and poncho.
- A flexible measuring tape will help ensure all parts meet your intended dimensions.
- You may also want to have a pom-pom maker if you wish to add a decorative touch to the hat.
- Having extra yarn on hand ensures you won’t run short if adjustments are needed.
- A row counter or notebook can help you track progress on your crochet patterns.
Selecting the Best Crochet Patterns
- Opt for simple yet textured crochet patterns like half-double crochet, double crochet, or ribbing to give the hat and poncho visual interest.
- Consider adding a ribbed band to the hat and turtleneck for a snug, stylish fit.
- Look for patterns that work in the round for a seamless appearance.
- Choosing beginner-friendly crochet patterns will ensure you can complete the project without frustration.
- Textured stitches, like front post and back post double crochet, can add dimension to the set.
- Patterns with detailed instructions and diagrams will make the process smoother and more enjoyable.
Preparing Your Workspace
- Set up a clean, comfortable area where you can spread out your yarn and tools.
- Good lighting is essential to easily see stitches and follow your crochet patterns.
- Use a project bag or basket to keep everything organized between sessions.
- Print or save the pattern instructions nearby for easy reference.
- Having a dedicated space helps maintain focus and keeps your project on track.
- Keeping your workspace tidy will ensure your crochet hat set with turtleneck poncho progresses efficiently.
Step-by-Step Instructions: Crochet Hat
Creating the Foundation for the Hat
- Begin by making a magic ring and chaining two to start the first round.
- Work 12 double crochet stitches into the magic ring and join with a slip stitch.
- For the next rounds, increase by adding two double crochet stitches in every stitch.
- Continue increasing in a circular pattern until the crown diameter measures about 6.5 inches.
- Ensure your stitches are even to maintain the hat’s symmetry.
- This foundation will comfortably fit an average adult head.
Building the Body of the Hat
- Once the crown is the correct size, work even rounds of double crochet without increasing.
- The height of the hat should reach about 8-9 inches from the crown to the brim.
- Maintain a consistent stitch pattern to ensure a uniform texture.
- Try the hat on periodically to check the fit and length.
- You can add rows if you prefer a slouchy style.
- The body of the hat forms the majority of your crochet hat set with turtleneck poncho.
Creating the Brim
- Use front post and back post double crochet stitches to create a stretchy, ribbed brim.
- The brim should be about 1.5 to 2 inches wide for a snug fit.
- This technique adds a professional, finished look to the hat.
- The ribbed brim also helps the hat stay securely on your head.
- You can adjust the brim width to your liking for a tighter or looser fit.
- The brim completes the hat, making it both functional and stylish.
Optional Decorative Features
- Add a pom-pom on top for a fun, playful touch.
- Consider crocheting small flowers or appliques to embellish the hat.
- Using a contrasting color for the brim can create a striking look.
- Personalizing your hat with initials or unique stitch patterns adds charm.
- These decorative touches can make your crochet hat set with turtleneck poncho truly unique.
- Small design elements elevate your handmade project.
Finishing the Hat
- Weave in all loose ends securely using a yarn needle.
- Check for any loose stitches and reinforce them if necessary.
- Steam block the hat lightly to shape it without flattening the texture.
- Try on the finished hat to ensure it fits comfortably and sits properly.
- A well-finished hat should feel cozy and snug, not too tight.
- Proper finishing ensures your hat will last and look beautiful over time.
Final Adjustments
- If the hat feels too loose, you can add a few extra rounds to the brim for a tighter fit.
- For a slouchier hat, add additional body rows before the brim.
- You can adjust the size by changing the number of stitches in the crown.
- Customizing the fit ensures maximum comfort and style.
- Always double-check measurements for a polished final product.
- Adjustments help you perfect your crochet hat set with turtleneck poncho for individual preferences.
Step-by-Step Instructions: Turtleneck Poncho
Starting the Neckband
- Chain enough stitches to fit comfortably around the neck, typically 60-70 chains.
- Join in the round, making sure the chain is not twisted.
- Work in front post and back post double crochet for about 4 inches to create a ribbed turtleneck.
- Ensure the neckband is snug but comfortable for easy wear.
- The ribbed neckband gives the poncho a structured, polished appearance.
- The turtleneck is the foundation of your crochet hat set with turtleneck poncho.
Expanding the Poncho Body
- Begin increasing stitches evenly in the next round to start forming the poncho shape.
- Use double crochet stitches for a soft drape and even texture.
- Increase every few stitches to create a gradual flare.
- Repeat increases every few rounds to allow the poncho to comfortably cover the shoulders.
- Continue until the poncho reaches your desired length, typically 24-26 inches from the neck.
- Smooth increases ensure the poncho sits well and moves freely.
Adding Texture and Design
- Consider using alternating rows of half-double crochet and double crochet to create a subtle texture.
- Adding front post stitches can create a beautiful cable effect.
- You can also incorporate stripe patterns with contrasting yarn colors.
- Experiment with lace patterns if you prefer a lighter, more decorative poncho.
- These design choices personalize your crochet hat set with turtleneck poncho.
- Texture and color bring life to your handmade pieces.
Creating the Hem
- Finish the poncho with a ribbed hem using front post and back post double crochet stitches.
- The hem should be about 2 inches wide to balance the overall look.
- A ribbed hem helps the poncho drape nicely and adds a professional finish.
- Consider adding a scalloped or picot edge for decorative flair.
- You can also leave the hem plain for a clean, minimalist style.
- The hem completes the structure of your crochet hat set with turtleneck poncho.
Final Assembly and Finishing Touches
- Weave in all loose ends neatly using a yarn needle.
- Check all joins and edges for security and durability.
- Lightly steam block the poncho to shape it and even out stitches.
- Ensure the turtleneck sits properly and comfortably on the neck.
- Try on the poncho to check the fit and drape before wearing it out.
- Proper finishing enhances the quality and longevity of your project.
Optional Embellishments
- Add buttons along one shoulder or side for a stylish closure option.
- Crochet decorative flowers or motifs to attach around the neckline.
- Consider adding fringe at the hem for a boho look.
- Personal touches make your crochet hat set with turtleneck poncho stand out.
- Embellishments can match or contrast with the hat for a cohesive look.
- Creativity in decoration adds to the charm of your handmade set.
Final Thoughts on How to Make Crochet Hat Set with Turtleneck Poncho
Creating a crochet hat set with turtleneck poncho is a fulfilling and enjoyable project that combines comfort, style, and practicality. With the right crochet patterns, yarn, and tools, you can craft a beautiful, customized set that will keep you warm and fashionable during the colder months.
From carefully selecting materials to adding personalized details, every step of this project offers an opportunity to express your creativity. Whether you’re making this set for yourself or as a thoughtful handmade gift, the result will be a treasured addition to any winter wardrobe.
Enjoy the process of making your crochet hat set with turtleneck poncho, and take pride in your unique, handcrafted creation!


