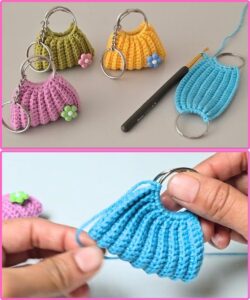
The Amigurumi bag keychain tutorial is a delightful project perfect for crochet enthusiasts looking to create a small, practical, and adorable accessory. Amigurumi, the Japanese art of crocheting small stuffed items, brings an extra level of charm to everyday items like keychains. Through this detailed tutorial, you will learn how to make your own amigurumi bag keychain using simple crochet patterns and basic materials.
The Amigurumi bag keychain tutorial is beginner-friendly and allows for plenty of customization. You can choose your favorite yarn colors, adjust the size, and add unique decorative elements. This project is a great way to practice your crochet skills while making a useful and stylish item.
Creating a crochet bag keychain not only sharpens your crafting abilities but also gives you the opportunity to create thoughtful handmade gifts. This tutorial will walk you through each step of the process, from selecting the right materials to finishing touches. Get ready to dive into the world of amigurumi with this easy-to-follow crochet pattern.
Materials and Measurements for Amigurumi Bag Keychain
Choosing the Right Yarn
- For this Amigurumi bag keychain tutorial, lightweight cotton or acrylic yarn is the best choice.
- Cotton yarn is recommended for its durability and clean stitch definition, which is essential for small items.
- You can select solid colors or experiment with variegated yarn to add personality to your keychain.
- Each keychain typically requires less than 30 grams of yarn, making it a perfect stash-busting project.
- Using leftover yarn from other crochet patterns is a great way to minimize waste.
- Ensure your yarn is not too thick to maintain a compact, neat appearance.
Selecting the Crochet Hook
- A 2.0 mm to 2.5 mm crochet hook is ideal for creating tight stitches in this Amigurumi bag keychain tutorial.
- Smaller hooks prevent gaps between stitches, which is important for maintaining the structure.
- Always match your hook size to the yarn weight to achieve the correct tension.
- Test your gauge with a small swatch to ensure consistency throughout the project.
- A smaller hook will also make the finished keychain more sturdy and long-lasting.
- Using the right hook size ensures that the keychain can withstand daily use.
Essential Additional Supplies
- Polyester fiberfill or cotton stuffing to give the bag its soft, puffy shape.
- A keyring or lobster clasp to turn the finished amigurumi bag into a keychain.
- A yarn needle for sewing and weaving in ends.
- Stitch markers to help keep track of your rounds.
- Small buttons, beads, or charms to add decorative elements to your bag.
- Scissors for trimming yarn and finishing the project neatly.
Fabric Cutting and Measurements
- The finished amigurumi bag should measure approximately 2 to 3 inches in height.
- The width should be around 2 inches to create a balanced proportion.
- Each strap or handle can measure about 1.5 inches long when crocheted.
- Ensure that all measurements are consistent to achieve a symmetrical shape.
- Additional fabric decorations like felt patches can be cut to small sizes for embellishments.
- Keep all elements proportional to the size of the keychain to maintain a cohesive design.
Choosing the Best Crochet Patterns
- Look for crochet patterns that use simple stitches like single crochet and basic increases and decreases.
- Amigurumi patterns that work in continuous rounds will give your keychain a seamless look.
- Beginner-friendly patterns with clear instructions are recommended.
- You can customize the pattern with color changes, buttons, or small appliques.
- Follow patterns that are specifically designed for small projects to avoid scaling issues.
- Simple and versatile patterns will allow you to make multiple variations of the keychain.
Preparing Your Workspace
- Set up a comfortable workspace with good lighting and a clean surface.
- Keep all your supplies within easy reach to streamline your process.
- Organize small items like buttons and stitch markers in a tray to avoid misplacing them.
- Keep your crochet pattern instructions visible for easy reference.
- Use a comfortable chair to ensure a relaxed crocheting experience.
- Preparing your workspace in advance will help you stay focused and efficient throughout the Amigurumi bag keychain tutorial.
Step-by-Step Instructions: Crochet the Bag Base
Creating the Foundation Circle
- Begin the Amigurumi bag keychain tutorial with a magic ring.
- Work six single crochet stitches into the ring to start the base of the bag.
- Pull the ring tight and join with a slip stitch to form the first round.
- Increase evenly by making two single crochet stitches in each stitch around.
- Continue increasing until the base measures about 2 inches in diameter.
- This forms the solid foundation of your bag keychain.
Building the Sides of the Bag
- Once the base is complete, continue crocheting in rounds without increasing.
- This will build the sides of the amigurumi bag evenly upward.
- Work six to eight rounds of single crochet to create the desired bag height.
- Use stitch markers to keep track of the starting stitch in each round.
- Maintain tight stitches to ensure the bag retains its structure.
- This step gives your bag its main compartment.
Shaping the Bag Opening
- To shape the bag opening, you can add one or two rounds of single crochet in a contrasting color.
- This decorative edge can act as a visual accent and help define the opening.
- Keep your stitches tight and even to maintain the bag’s shape.
- You can also add a small crocheted flap if you prefer a bag with a closure.
- Experiment with adding a tiny button for extra detail.
- The opening should remain firm to hold its shape and allow easy keychain attachment.
Creating the Bag Strap
- For the strap, chain approximately 10 to 12 stitches, depending on your preferred length.
- Attach the chain to the opposite side of the bag with a slip stitch to form a handle.
- Work a row of single crochet along the chain to reinforce the strap.
- Make sure the strap is centered and even for a balanced look.
- Reinforce both attachment points to ensure durability.
- This handle doubles as a secure spot for keyring attachment.
Stuffing the Bag
- Lightly stuff the amigurumi bag with polyester fiberfill to give it a puffy, structured shape.
- Avoid overstuffing, as the bag should remain soft and flexible.
- Distribute the stuffing evenly to maintain the bag’s symmetrical appearance.
- After stuffing, close the opening if desired, or leave it open for a pouch-style design.
- Use a yarn needle to neatly weave in all loose ends.
- Proper stuffing gives the bag a polished, finished look.
Attaching the Keyring
- Use the strap or handle loop to attach the keyring securely.
- You can also crochet an extra loop specifically for the keyring attachment.
- Make sure the keyring is tightly fastened to prevent detachment.
- Test the connection by gently pulling on the keyring to ensure stability.
- Attach any additional decorative elements, such as small charms or beads.
- The final assembly completes the basic structure of the Amigurumi bag keychain tutorial.
Decorating and Customizing Your Bag Keychain
Adding Colorful Stripes
- Introduce color changes every few rounds to create decorative stripes.
- Use contrasting or complementary colors to make the bag visually appealing.
- Ensure that color transitions are seamless by weaving in ends carefully.
- Stripes add a playful, personalized touch to your crochet pattern.
- You can also alternate between solid and variegated yarn for unique effects.
- Experiment with color placement to achieve your desired look.
Attaching Tiny Buttons and Beads
- Sew on small buttons to mimic bag clasps or add visual interest.
- Beads can be stitched around the bag opening or along the strap.
- Ensure all embellishments are securely attached to withstand regular use.
- Decorative elements give the keychain a custom, polished feel.
- Choose beads and buttons that complement your yarn colors.
- Adding these touches enhances the overall charm of your Amigurumi bag keychain tutorial.
Creating Miniature Appliques
- Crochet tiny flowers, hearts, or stars to attach to the front of the bag.
- Mini appliques can add texture and depth to your design.
- Securely stitch appliques in place to ensure durability.
- Mix and match shapes and colors for a playful appearance.
- Personalizing with appliques makes each bag unique.
- These small details are what make your crochet pattern stand out.
Adding Embroidered Details
- Use contrasting yarn or embroidery thread to add small stitched designs.
- Simple patterns like initials, shapes, or outlines can make the bag more personal.
- Embroidery allows for creative freedom and intricate details.
- Carefully plan your design to maintain symmetry and balance.
- Secure all threads on the inside of the bag to keep the exterior neat.
- Embroidered touches enhance the sophistication of your Amigurumi bag keychain tutorial.
Customizing the Bag Shape
- You can modify the base to be oval, square, or even heart-shaped.
- Adjusting the shape adds variety to your collection of keychains.
- Ensure that the sides and strap adapt proportionally to the new base.
- Shape variations can reflect the user’s personality or specific themes.
- Custom-shaped bags make excellent gifts or collectibles.
- Exploring different shapes expands your mastery of crochet patterns.
Experimenting with Yarn Textures
- Try using textured or novelty yarn to give the bag a unique surface.
- Blending smooth and textured yarns can create interesting visual contrasts.
- Use metallic yarns for a shiny, glamorous finish.
- Always test the durability of specialty yarns before using them in keychains.
- Textured yarn can change the feel and appearance of the Amigurumi bag keychain tutorial.
- Exploring different textures helps develop your crochet versatility.
Final Thoughts on Amigurumi Bag Keychain Tutorial
The Amigurumi bag keychain tutorial is a wonderful crochet project that combines functionality with creativity. It is perfect for beginners looking to explore amigurumi or seasoned crafters interested in quick, customizable patterns. Using simple crochet patterns, you can create a wide variety of adorable bag keychains.
This tutorial emphasizes the importance of careful stitching, proper stuffing, and detailed finishing touches to produce a high-quality keychain. The ability to customize colors, shapes, and embellishments ensures that each creation is unique and personal.
Whether you are making these keychains for yourself, as gifts, or to sell at craft fairs, the Amigurumi bag keychain tutorial offers a rewarding and enjoyable crochet experience. Happy crocheting!


