The crochet phone pouch is a practical and stylish accessory that allows you to safely carry your phone while adding a handmade touch to your daily essentials. By using creative crochet patterns, you can design a phone pouch that is not only functional but also beautifully customized to your taste. Whether you are new to crocheting or an experienced crafter, this project is a great way to develop your skills while creating something useful.
Making a crochet phone pouch gives you the freedom to choose your favorite yarn colors, adjust the size to fit your specific phone model, and add personal embellishments like buttons or appliques. The process is simple and enjoyable, making it a great beginner-friendly project that introduces the key techniques in crochet patterns.
In this blog post, you will learn exactly how to create your own crochet phone pouch from start to finish. This step-by-step guide will cover the materials you need, measurements, essential stitches, and the complete assembly process. You will also find plenty of customization options to make your pouch truly unique.
Materials and Measurements for Crochet Phone Pouch
Choosing the Right Yarn
- For the crochet phone pouch, the best yarn options are medium-weight (worsted) cotton or acrylic yarns.
- Cotton yarn offers excellent durability and stitch clarity, which is important for both protection and aesthetics.
- Acrylic yarn is lightweight and provides flexibility, making it a comfortable option for everyday use.
- Each pouch typically requires about 50 grams of yarn, depending on your desired pouch size.
- You can select solid colors, stripes, or variegated yarn for a personalized touch.
- Use leftover yarn from previous crochet patterns to minimize waste and maximize creativity.
Selecting the Crochet Hook
- A 3.5 mm to 4.0 mm crochet hook is recommended for creating tight, sturdy stitches.
- Using a smaller hook ensures the pouch holds its shape and securely protects your phone.
- Match your hook size to the yarn weight to achieve the correct tension throughout the project.
- If you crochet loosely, consider using a slightly smaller hook to maintain firmness.
- Test your gauge with a swatch to confirm consistent sizing before starting the pouch.
- Proper hook selection is essential to ensure the pouch fits your phone snugly.
Additional Supplies Needed
- A yarn needle for sewing and weaving in loose ends.
- A button, snap, or Velcro strip to secure the pouch flap.
- Stitch markers to keep track of your starting points when working in rounds.
- Scissors for trimming yarn neatly.
- Optional: a decorative strap or a wristlet handle to make carrying easier.
- Optional: small charms, appliques, or embroidery thread for adding custom decorations.
Measuring Your Phone
- Measure the height, width, and thickness of your phone to determine the pouch size.
- Add approximately 1 inch to both the height and width to allow for ease and seam allowances.
- The additional space ensures the pouch comfortably fits your phone without being too tight.
- For larger phones, consider adding extra rounds to achieve the required length.
- You can adjust the stitch count or rounds to make a snug or loose fit based on preference.
- Accurate measurements are crucial for creating a properly fitting crochet phone pouch.
Fabric Cutting and Preparations
- This project is fully crocheted, so no fabric cutting is required.
- However, if you plan to add a fabric lining, cut the lining slightly smaller than the crochet piece.
- Prepare your yarn, button, and decorative elements before beginning to streamline the process.
- Ensure your workspace is clean and well-lit for easy stitching.
- Having all your materials ready will help you focus and enjoy the crochet patterns.
- Pre-planning the design will make assembly smoother and more enjoyable.
Choosing the Best Crochet Patterns
- Simple stitches like single crochet or half double crochet are ideal for this project.
- Consider using textured crochet patterns such as the moss stitch or the waffle stitch for added interest.
- Beginners can opt for basic stitches, while advanced crocheters can experiment with more intricate designs.
- Seamless patterns worked in the round can offer a polished, professional finish.
- You can customize the stitch pattern to create different visual effects and textures.
- Choose patterns that provide both aesthetic appeal and functional structure for the pouch.
Step-by-Step Instructions: Crochet the Phone Pouch Base
Creating the Foundation Chain
- Begin the crochet phone pouch by chaining a length equal to the width of your phone plus one inch.
- For example, if your phone is 3 inches wide, chain enough stitches to create a 4-inch foundation.
- This extra space ensures your phone will slide in and out of the pouch easily.
- Work single crochet stitches into each chain, forming the first row.
- Turn your work and continue crocheting rows until you reach the desired pouch length.
- This simple base will create the front and back panels of your pouch.
Building the Sides of the Pouch
- After the base is complete, you can crochet around the entire rectangle to build up the sides.
- Work in rounds, using single crochet stitches to maintain a tight and durable edge.
- Continue crocheting in the round until the pouch reaches the height of your phone plus one inch.
- Use stitch markers to keep track of your starting point in each round.
- Keep your stitches consistent to ensure the pouch maintains its shape.
- The sides form the body of your crochet phone pouch, providing protection and structure.
Shaping the Pouch Flap
- Once the desired height is reached, stop working in the round and begin crocheting back and forth in rows to form the flap.
- The flap should cover approximately one-third of the pouch’s front panel.
- You can shape the flap with straight edges or create a pointed or rounded finish.
- Decrease stitches gradually if you want to add shaping to the flap.
- Add decorative edging using slip stitches, picot stitches, or scallops to enhance the design.
- The flap not only secures your phone but also adds visual interest to your crochet patterns.
Creating the Closure Mechanism
- To secure the flap, crochet a small loop at the tip of the flap for a button closure.
- Alternatively, you can sew on a snap or attach a Velcro strip for easy opening and closing.
- Ensure the closure is tight enough to prevent the phone from slipping out.
- Position the button or snap carefully to align with the flap loop.
- Test the closure several times to confirm it holds securely.
- A reliable closure mechanism ensures the practicality and safety of your crochet phone pouch.
Adding the Strap or Wristlet
- To make the pouch portable, crochet a simple chain strap or a wristlet handle.
- Chain to your desired length and reinforce with single crochet stitches for durability.
- Attach each end of the strap to the pouch sides using slip stitches or a yarn needle.
- Make sure the strap is firmly secured to withstand regular use.
- A detachable strap can also be added using lobster clasps for more flexibility.
- The strap adds convenience and functionality to your crochet patterns.
Final Assembly and Finishing Touches
- Weave in all loose ends using a yarn needle to give the pouch a neat appearance.
- Block the pouch gently if necessary to even out stitches and improve shape.
- Add optional decorative elements like appliques, beads, or embroidery for personalization.
- Test the pouch by inserting your phone to ensure it fits properly and the closure works well.
- Make any final adjustments to the strap length, flap shape, or embellishments.
- Completing these finishing steps ensures your crochet phone pouch looks professional and functions as intended.
Customizing Your Crochet Phone Pouch
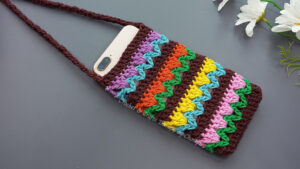
Adding Colorful Stripes
- Create stripes by changing yarn colors every few rounds or rows.
- Use complementary colors to make the stripes visually appealing.
- Weave in ends carefully to maintain a tidy interior.
- Stripes can add a fun, playful look to your crochet patterns.
- Experiment with varying stripe widths to achieve different effects.
- Adding stripes personalizes your pouch and makes it unique.
Incorporating Texture with Special Stitches
- Use textured stitches like the bobble stitch or waffle stitch for a distinctive feel.
- Textures add both visual depth and grip to the pouch surface.
- Maintain even tension to keep the texture consistent throughout.
- Experiment with combinations of smooth and textured rows.
- Textured designs make the pouch more attractive and practical.
- Exploring different stitches expands your crochet patterns skills.
Decorating with Appliques and Embroidery
- Add small crochet appliques such as hearts, flowers, or stars to the pouch front.
- Sew the appliques securely to prevent them from loosening over time.
- Embroider initials or simple designs for a personalized touch.
- Use contrasting thread colors to make the embroidery stand out.
- Custom decorations can transform your pouch into a thoughtful gift.
- These embellishments make your crochet phone pouch a truly one-of-a-kind accessory.
Adding a Lining (Optional)
- If you prefer extra protection, consider sewing a fabric lining inside the pouch.
- Choose soft, lightweight fabric to avoid adding bulk.
- Cut the fabric slightly smaller than the crochet piece to ensure a snug fit.
- Hand-sew or use fabric glue to attach the lining securely.
- A lining can also help prevent small items from snagging on the crochet stitches.
- This additional step adds a polished, high-quality finish to your crochet patterns.
Creating Different Sizes for Other Devices
- Adapt the same crochet patterns to make pouches for tablets, e-readers, or small notebooks.
- Measure each device carefully and adjust your foundation chain and rounds accordingly.
- Larger pouches may require sturdier yarn and wider straps for support.
- Creating matching pouches for all your devices makes for a stylish set.
- Offering various sizes also provides great handmade gift options.
- Custom-sizing your pouches demonstrates your growing crochet expertise.
Experimenting with Yarn Types
- Try using chunky yarn for a cozy, padded pouch.
- Use mercerized cotton for a smooth, shiny finish.
- Blended yarns can add interesting textures and color effects.
- Always check that your chosen yarn provides the durability needed for everyday use.
- Experimenting with different yarns keeps the project exciting and versatile.
- Changing yarn types helps you discover new ways to elevate your crochet patterns.
Final Thoughts on Crochet Phone Pouch
The crochet phone pouch is a perfect beginner project that combines practicality, creativity, and customization. With basic stitches and easy-to-follow crochet patterns, you can create a stylish pouch that safely carries your phone while showcasing your personal touch.
This project is not only functional but also allows for endless variations through color, texture, and decorative elements. Whether you make one for yourself, as a gift, or to sell at craft markets, the crochet phone pouch is a charming and useful accessory that reflects your crochet skills.
Enjoy experimenting with different styles, sizes, and finishes as you bring your crochet phone pouch to life. Happy crocheting!


