Learning how to make an Amigurumi Cherry Keychain is a delightful way to dive into the world of amigurumi. These small, adorable keychains are quick to create and can be perfect as gifts, personal accessories, or even items to sell. Whether you are a beginner or an experienced crocheter, this project introduces you to simple stitches and shaping techniques that are essential in amigurumi patterns.
Crafting an amigurumi cherry keychain offers plenty of room for creativity. You can adjust the size, use your favorite colors, and add cute embellishments like smiley faces or leaves to personalize your cherry. Since amigurumi patterns focus on creating small, stuffed figures, this keychain project is the perfect opportunity to practice working in the round and refining your stitch consistency.
In this tutorial, we will walk through each step in detail, from choosing materials to assembling the final piece. The clear instructions will help ensure your success in making a charming amigurumi cherry keychain that is both beautiful and functional. By the end, you will have a handmade accessory that you can proudly show off or gift to someone special.
Materials and Measurements for Amigurumi Cherry Keychain
Selecting the Right Yarn
- For the amigurumi cherry keychain, you should use a light to medium weight yarn, such as sport weight or DK cotton.
- Cotton yarn is highly recommended because it holds its shape well and gives a smooth, neat finish to amigurumi patterns.
- Acrylic yarn is also an option but may stretch more, especially for smaller items like keychains.
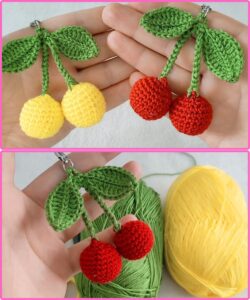
- You will need small amounts of red (for the cherries), green (for the stem and leaves), and a tiny bit of brown (for the connecting stem).
- Using leftover yarn from other amigurumi patterns is a sustainable and cost-effective option.
- Approximately 10-15 grams of yarn for each cherry should be sufficient.
Choosing the Crochet Hook Size
- A smaller crochet hook, such as 2.0 mm to 2.5 mm, is ideal for making tight stitches in amigurumi patterns.
- Tight stitches are important to prevent the stuffing from showing through the gaps.
- If you crochet loosely, consider using an even smaller hook to maintain the right tension.
- Ensure your hook size is appropriate for the thickness of your yarn to achieve the best results.
- Testing your gauge on a small swatch can help ensure consistency in stitch size.
- Proper hook selection contributes significantly to the professional finish of your amigurumi cherry keychain.
Additional Materials You Will Need
- Polyester fiberfill stuffing to fill the cherries and keep their shape.
- A yarn needle for sewing pieces together and weaving in loose ends.
- Small scissors to cut the yarn precisely.
- A keychain ring or lobster clasp to attach the finished keychain.
- Stitch markers to keep track of your rounds while working in continuous spirals.
- Optional: embroidery thread or safety eyes if you want to add facial details to the cherries.
Measuring and Preparing
- Each cherry will measure approximately 2-3 cm in diameter, depending on your yarn and tension.
- The stem and leaves should be sized proportionally to the cherries, typically about 4-5 cm in total length.
- The completed amigurumi cherry keychain should be small and lightweight for convenient use.
- Prepare all your materials in advance to make the process smooth and enjoyable.
- Double-check that your keychain ring is the right size to comfortably attach to bags or keys.
- Having everything ready will make following the amigurumi patterns more efficient.
Key Crochet Stitches Used
- Magic ring: Essential for starting amigurumi patterns with a tight center.
- Single crochet: The primary stitch used throughout the entire project.
- Increase (inc): Making two single crochets in one stitch to expand the shape.
- Decrease (dec): Crocheting two stitches together to taper the shape.
- Slip stitch: Used to join rounds and finish off cleanly.
- Chain stitch: Used for making the stem that connects the cherries.
Optional Embellishments
- Small embroidered faces can add character to your cherries.
- Tiny bows or ribbons can be attached to the stem for extra decoration.
- Use beads or small buttons as accents.
- Experiment with different yarn textures, like using sparkly yarn for a fun effect.
- Adding initials or tiny tags can personalize the keychain even more.
- Customizing your amigurumi cherry keychain makes it a unique accessory.
Step-by-Step Instructions: Making the Amigurumi Cherries
Starting the Cherry Base
- Begin the amigurumi cherry keychain by creating a magic ring with red yarn.
- Work six single crochets into the magic ring and pull it tightly to close.
- Continue working in spirals, using a stitch marker to indicate the first stitch of each round.
- In the second round, increase in each stitch to reach 12 stitches total.
- In the third round, alternate between single crochets and increases to gradually shape the cherry.
- The base should begin forming a rounded ball as you progress.
Building the Cherry Shape
- Continue working several rounds of single crochet without increases to build the height of the cherry.
- Monitor the shape to ensure it is evenly rounded and consistent.
- If you want a larger cherry, you can add extra rounds before decreasing.
- Use tight stitches to keep the stuffing securely inside the cherry.
- Consistency in tension is key to achieving a smooth, professional look.
- The cherry should start resembling a perfect little sphere.
Stuffing and Closing the Cherry
- Once the cherry is about three-quarters complete, start filling it with fiberfill.
- Stuff firmly but not too tightly to avoid distorting the shape.
- Continue crocheting, using decreases to close the cherry gradually.
- As the opening narrows, add any final bits of stuffing if needed.
- Use a yarn needle to weave in the remaining yarn end securely.
- Finish off with a slip stitch and trim any excess yarn neatly.
Repeating for the Second Cherry
- Follow the same amigurumi patterns to create a second cherry identical in size.
- Ensure the tension and stitch counts match to maintain symmetry.
- Stuff and close the second cherry in the same way as the first.
- Weave in all ends neatly to keep the cherries clean and presentable.
- Having two cherries adds a cute, realistic touch to the keychain.
- You can make additional cherries if you want to create a fuller bunch.
Creating the Connecting Stem
- With brown yarn, chain 10-12 stitches to form the stem.
- Attach one end of the chain securely to the top of one cherry using a yarn needle.
- Attach the other end to the second cherry, making sure the stem length looks natural.
- Weave in all ends to prevent fraying.
- You can adjust the chain length to create a tighter or looser connection between cherries.
- The stem brings the two cherries together as a cohesive amigurumi cherry keychain.
Crocheting the Leaves
- Use green yarn to chain six stitches and work back along the chain with single crochets.
- Create small, pointed leaves by adding a slip stitch at the tip.
- Make two or three leaves for a fuller appearance.
- Attach the leaves to the top of the cherries where the stem connects.
- Sew the leaves securely with a yarn needle and weave in all ends.
- The leaves add a final, charming detail to the amigurumi cherry keychain.
Assembling the Keychain and Adding Final Touches
Attaching the Keyring
- Secure the keychain ring to the connecting stem using a sturdy knot or jump ring.
- Ensure the attachment is firm to handle daily use without loosening.
- You can also crochet a small loop to attach the keyring more securely.
- Test the attachment by giving it a gentle tug to confirm stability.
- Using a lobster clasp instead of a ring can provide easier attachment to bags or keys.
- A secure keyring ensures the longevity of your amigurumi cherry keychain.
Finishing Details
- Check all joins and seams to make sure they are tight and well-hidden.
- Use scissors to trim any excess yarn ends cleanly.
- Shape the cherries gently with your hands to perfect their form.
- Add optional faces with embroidery thread for an extra cute effect.
- You can sew on small embellishments like bows or beads if desired.
- Finishing these small details enhances the overall look of your amigurumi patterns.
Customizing Your Keychain
- Try using different color combinations, such as pink cherries or gold leaves, for a unique look.
- Adjust the size by using thicker yarn and a larger hook for jumbo cherries.
- Create themed keychains by adding additional amigurumi fruits or charms.
- Personalize with initials or special tags to make thoughtful gifts.
- Consider adding scent sachets inside the cherries for a fragrant touch.
- Customizing your amigurumi cherry keychain makes each piece truly one-of-a-kind.
Using and Gifting the Keychain
- The amigurumi cherry keychain is lightweight and perfect for daily use.
- It can be attached to backpacks, purses, or keys as a stylish accessory.
- Handmade keychains make excellent gifts for birthdays, holidays, or party favors.
- You can create multiple keychains quickly, making them ideal for craft fairs.
- Each keychain is a reflection of your creativity and crochet skills.
- Sharing your handmade keychains spreads joy and appreciation for amigurumi patterns.
Caring for Your Keychain
- To clean, gently wipe with a damp cloth or hand wash if necessary.
- Avoid soaking to preserve the shape and prevent stuffing from shifting.
- Let the keychain air dry completely before using again.
- Regularly check the keyring attachment to ensure it remains secure.
- Store away from sharp objects that may snag the yarn.
- Proper care will keep your amigurumi cherry keychain looking beautiful over time.
Exploring More Amigurumi Patterns
- Once you master the cherry keychain, explore other small amigurumi patterns like strawberries, hearts, or animals.
- Use the same techniques to create coordinated sets or themed collections.
- The possibilities with amigurumi are endless and always fun to explore.
- Learning new shapes and stitches will enhance your crocheting abilities.
- Join online communities or follow crochet blogs for pattern ideas and inspiration.
- Expanding your amigurumi patterns library will keep your projects exciting and creative.
Final Thoughts on Amigurumi Cherry Keychain
The amigurumi cherry keychain is a perfect introduction to the delightful world of amigurumi patterns. This small yet charming project allows you to practice essential crochet skills like working in the round, increasing, and decreasing while creating something practical and cute.
Following this step-by-step guide ensures you can confidently craft a beautiful and durable amigurumi cherry keychain. Whether you make it for yourself, as a thoughtful gift, or to sell, this little accessory is sure to bring smiles and brighten someone’s day.
Enjoy the creative process and don’t hesitate to experiment with colors, sizes, and decorations. Happy crocheting!


