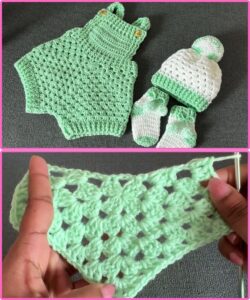
Creating an easy crochet baby romper is not only a rewarding project for crafters but also results in an adorable and practical garment for little ones. Whether you’re a beginner or an experienced crocheter, following a step-by-step crochet pattern for a baby overall helps you create a handmade item full of charm and comfort. Baby rompers are ideal gifts for showers or keepsakes that parents will treasure.
This crochet baby overall is designed with simplicity in mind—minimal shaping, easy-to-follow stitches, and adjustable features to fit babies aged 0–6 months. With just basic tools and yarn, you can produce a cozy, soft romper perfect for layering in cool weather or wearing alone during springtime. It’s a versatile piece that is both functional and stylish.
In this tutorial, we’ll guide you through each step of crafting a crochet baby romper, from choosing materials to final assembly. We’ll also provide important tips to ensure that your garment is both adorable and safe for babies. If you’re ready to learn how to crochet a romper from start to finish, let’s get started!

Materials and Measurements for the Crochet Baby Romper
-
Yarn and hook selection: Use soft, baby-friendly yarn such as 100% cotton or an acrylic-cotton blend (DK weight or light worsted #3). You’ll need about 150 grams (approx. 300 yards) for one 0–6 month romper. A 4.0 mm (G) crochet hook is ideal for this project.
-
Other supplies: You’ll also need 2–4 small wooden or plastic buttons (approx. 15 mm in diameter), scissors, a stitch marker, a yarn needle for weaving in ends, and a measuring tape. These tools help ensure precision and a neat finish.
-
Gauge and sizing: For a baby aged 0–6 months, the finished crochet baby romper should measure approximately 14 inches (35 cm) long and 9 inches (23 cm) wide across the chest. You can size up by adding more rows or increasing stitch counts proportionally.
-
Fabric cuts and shaping: Since this is a full crochet pattern, there are no fabric cuts needed. Instead, shaping is done through increases and decreases in your crochet stitches. The leg and arm openings are shaped by skipping stitches or chaining.
-
Color planning: For a classic look, choose soft pastel colors like baby blue, light gray, or cream. For modern appeal, earth tones or a two-color stripe pattern can add character. Be sure to use colorfast, washable yarn for easy care.
-
Preparation tip: Always make a small swatch (10×10 cm) to test your tension before beginning the full pattern. This helps ensure that your final measurements are accurate and the garment fits as expected.
Step-by-Step Instructions for the Romper Body
-
Start with the back panel: Chain 40 (adjust as needed for width) and work 1 row of half double crochet (hdc). Continue working hdc rows until the piece measures approximately 7 inches (18 cm) tall. This forms the back panel of the crochet baby romper.
-
Create leg openings: To begin shaping the legs, skip 5 stitches at the start and end of the next row and continue working only the center stitches. This creates a U-shape between the legs. Repeat for 2–3 rows.
-
Front panel construction: Chain 40 again for the front panel and repeat the same hdc pattern. Stop when it measures 6 inches (15 cm). You’ll shape the neckline in the next step.
-
Neckline and straps: At 6 inches, begin shaping the neckline by working hdc only across the outer 10 stitches on each side, leaving the center unworked. Continue for another 2 inches to form the shoulder straps.
-
Join panels: Place front and back panels together, aligning the bottom and sides. Use slip stitches or whipstitch to join the sides and crotch. Leave 5 inches open on each side from the top for armholes.
-
Leg openings: Attach yarn to the leg openings and work 2–3 rounds of single crochet to create a neat finish. Optionally, you can add ribbing using front and back post stitches for stretch.
Finishing Touches: Edging, Buttons, and Straps
-
Edging the top and armholes: Using single crochet, work evenly around the armholes and neckline for a clean edge. This also helps reinforce the structure of the crochet baby overall and prevents stretching.
-
Creating buttonholes: On the front straps, chain 2 and skip 2 stitches in the final row to create a small buttonhole. Reinforce with an extra row of single crochet to keep the hole from stretching out.
-
Attach buttons: Hand-sew buttons on the inside of the back panel where the front straps can cross and button down. Always make sure buttons are secure and double-stitched to avoid any choking hazard.
-
Optional pocket: Add a decorative front pocket by crocheting a 3″x3″ square in the same or contrasting yarn. Attach it using slip stitch or whipstitch across the front panel.
-
Finishing ends: Use a yarn needle to weave in all ends neatly. Secure knots inside the fabric and trim excess yarn. A tidy finish ensures your romper looks polished and feels soft against baby’s skin.
-
Washing and care instructions: For safety and longevity, recommend machine washing on gentle cycle and air drying flat. This maintains the shape and softness of the yarn over time.
Tips for Beginners and Creative Variations
-
Beginners’ guide: If you’re new to crochet, practice basic stitches like single crochet (sc), half double crochet (hdc), and double crochet (dc) before starting. These are the foundation of most crochet patterns.
-
Pattern customization: To make larger sizes, increase your foundation chain and add extra rows proportionally. Always measure your work frequently to maintain shape and fit.
-
Color blocking: Create a trendy look by using contrasting yarn for the top and bottom halves of the romper. Use seamless color changes by carrying yarn along the row or fastening off and rejoining cleanly.
-
Themed designs: Add appliqués such as stars, hearts, or animal faces for a fun and playful look. These can be sewn or crocheted separately and attached afterward.
-
Add matching accessories: Pair the crochet baby romper with a matching baby beanie, booties, or a headband. This makes a beautiful handmade set for gifts or baby photo shoots.
-
Safety check: Always check that all parts (especially buttons) are firmly attached and yarn ends are secure. Avoid yarns with glitter, loose threads, or embellishments that could irritate delicate skin.
By following this easy and structured crochet pattern, you’ll be able to create a crochet baby romper that’s not only adorable but also practical and wearable. Whether you’re making one for your baby, as a gift, or even for your craft shop, this project is sure to bring joy and satisfaction.
Remember, practice makes progress. Don’t be afraid to customize, change up the stitches, or try new colors. With a bit of creativity and these clear steps, you’ll master the art of crocheting a baby overall in no time.


