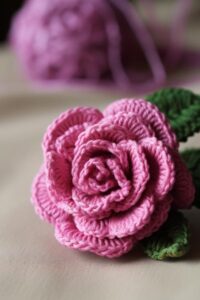
Learning how to crochet a rose is a wonderful way to combine creativity with skill, whether you’re a beginner or a seasoned crafter. Crochet flowers are versatile decorative elements that can be used in everything from home décor to clothing embellishments, greeting cards, hair accessories, and even wedding bouquets. The beauty of a crocheted rose lies in its intricate appearance and the satisfaction that comes with creating something elegant by hand.
In this easy crochet lesson, we’ll guide you step-by-step through creating your own beautiful rose. With only basic crochet stitches and a little patience, you’ll be amazed at how quickly your flower takes shape. The process is fun and relaxing, and it’s a great introduction to crochet patterns for beginners who want to try their hand at small, manageable projects.
By the end of this tutorial, you’ll know how to crochet a rose from start to finish using just yarn, a crochet hook, and your imagination. We’ll also provide helpful tips for customizing your rose with different colors, textures, and petal shapes. Whether you’re making a single rose or an entire bouquet, this guide has everything you need to get started!
Materials and Tools You Need to Crochet a Rose
-
Yarn selection: For a classic rose look, choose medium weight (worsted) or DK yarn in your desired color—typically red, pink, or white. For a more whimsical touch, try multicolor yarn or even cotton thread for delicate petals.
-
Hook size: A 3.5 mm to 4.0 mm crochet hook is ideal for most standard yarns. If you’re using thinner yarn or thread, opt for a smaller hook to maintain a tight stitch and detailed texture.
-
Other essentials: You’ll need scissors, a yarn needle for weaving in ends, and optionally, floral wire and green yarn if you want to add a stem and leaves to your rose. A hot glue gun is helpful if you plan to attach your flower to a pin or accessory.
-
Gauge and size: Since crochet flowers don’t need to fit a particular size, gauge is not critical. However, if you’re creating multiple roses for a project, try to maintain consistency in your stitch tension for a uniform look.
-
Color combinations: To create a two-toned rose, use one color for the inner petals and another for the outer ones. You can also add green petals at the base to simulate sepals for a more realistic finish.
-
Preparation tip: Make a small swatch using your chosen yarn and hook to ensure the stitch looks tight and neat. Loose stitches may cause your petals to flop, while overly tight stitches can make it difficult to shape your rose.
Step-by-Step Crochet Pattern to Make a Rose
-
Create the base chain: Begin by chaining 51 (or more for a fuller rose). This chain will form the foundation for the entire flower. Make sure your tension is even, but not too tight.
-
Row of petals: Starting in the second chain from your hook, work the following pattern: (sc, hdc, dc, hdc, sc) into the same stitch. Skip the next stitch and repeat in the following chain. Continue this pattern until you reach the end of the row.
-
Shaping the rose: After completing the petal row, begin rolling your work from one end to the other to form the rose shape. The curved petals should naturally overlap to resemble a blooming flower.
-
Secure the base: Thread your yarn needle with a long tail left from the start or end of your work. Stitch through the base of the rolled flower several times to secure it. Make sure all layers are sewn together tightly to hold the shape.
-
Optional leaves: To add leaves, chain 12, then work 1 sc, 1 hdc, 1 dc, 1 treble crochet (tr), 1 dc, 1 hdc, and 1 sc back down the chain. Fasten off and attach the leaf to the base of the flower using the yarn needle.
-
Finishing: Weave in any loose ends and fluff out your petals. Your crochet rose is now ready to be added to any craft project, worn as a brooch, or displayed in a vase with other flowers!
Creative Ways to Customize Your Crochet Rose
-
Size variation: For a large, statement rose, increase your starting chain to 70 or more. For smaller roses, use a shorter chain like 30 and thinner yarn. Adjust the petal stitches accordingly to keep proportions balanced.
-
Textured petals: Experiment with puff stitches or popcorn stitches for a bolder petal texture. These more advanced stitches create raised petals that look incredibly lifelike and full.
-
Layered flowers: For a multi-dimensional look, crochet two strips of petals and stack them together. Sew the smaller rose on top of the larger one to create a layered flower with depth and elegance.
-
Color blending: Combine two strands of yarn in complementary colors as you crochet for a marbled effect. This works beautifully for roses with variegated or gradient-style petals.
-
Add a stem: If you’d like to create a realistic rose, insert floral wire through the base and wrap it with green floral tape or crochet a green chain around it. Add leaves to complete the stem.
-
Project ideas: Attach your crochet rose to a headband, baby hat, scarf, or blanket. They’re also great as embellishments for gift wrap, cards, or DIY wedding décor like boutonnieres and bouquets.
Tips for Beginners and Crochet Pattern Variations
-
Start with the basics: If you’re new to crochet, master basic stitches like chain (ch), single crochet (sc), half double crochet (hdc), and double crochet (dc) first. These are the building blocks of most crochet patterns.
-
Use video tutorials: Watching video demonstrations can help clarify the techniques used to shape the petals and assemble the rose. Visual learning is especially helpful when tackling 3D projects like this.
-
Practice makes perfect: Don’t be discouraged if your first rose doesn’t look perfect. Try again with a new yarn or change the number of chains to suit your style. Each rose you make improves your skill.
-
Written vs. chart patterns: Some crafters prefer written crochet patterns, while others enjoy diagram-style (chart) instructions. Try both to see which method works best for you as you practice.
-
Advanced versions: Once you’re comfortable with the basic rose, try other flower designs like daisies, tulips, or sunflowers using more intricate stitches and layering techniques. The world of crochet flowers is vast and creative!
-
Sell or gift your creations: Hand-crocheted roses make excellent additions to handmade gift boxes, or you can sell them at local craft fairs or on Etsy. Be sure to use high-quality materials for a professional finish.
Crocheting a rose is one of the most enjoyable and rewarding beginner projects in the world of crochet. It allows for creative freedom, minimal material investment, and plenty of room for personalization. Whether you want to make a single bloom or a bouquet of crochet flowers, the skills you develop through this simple project will set the foundation for more advanced patterns down the road.
Now that you’ve learned how to crochet a rose, why not try other flower types and build your own floral garden from yarn? With just a hook, some yarn, and a little time, you’ll soon have a beautiful collection of handmade blooms.
If you loved this crochet pattern and want more flower tutorials, be sure to subscribe to our blog or join our newsletter for fresh ideas and patterns each week! Happy crocheting! 🌸🧶


