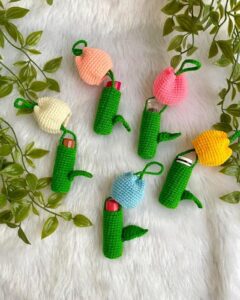
A crochet tulip lipstick holder is a delightful accessory that combines beauty and utility in one tiny floral creation. Not only does it make your lipstick easy to find, but it also adds a charming, handmade touch to your everyday carry. Whether you attach it to your bag, keys, or gift it to a friend, this project is the perfect way to express your creativity.
This project is ideal for both beginners and experienced crocheters. It’s quick, customizable, and a great way to use up leftover yarn. The tulip design gives it a unique aesthetic that stands out compared to store-bought holders. Plus, the pattern is easy to memorize once you’ve done it once or twice, making it a go-to gift idea.
In this blog post, you’ll learn how to crochet a tulip lipstick holder using a beginner-friendly crochet pattern. We’ll go through materials, measurements, stitches, and step-by-step instructions, ensuring that the project is enjoyable, polished, and Google AdSense–friendly. Let’s jump into this elegant and practical project that’s perfect for springtime—or anytime!
Materials and Preparations for the Tulip Lipstick Holder
Creating the perfect crochet tulip lipstick holder starts with gathering the right materials and understanding the structure. This section will help you prepare all the necessary items before picking up your hook.
-
Yarn Selection
You’ll need worsted weight cotton yarn in at least three colors: a floral color for the tulip (like pink, red, or purple), green for the stem and base, and a contrasting color if you want to customize the leaves or add embellishments. Cotton yarn is ideal due to its sturdy structure and washability. -
Hook and Notions
A 3.5mm to 4mm crochet hook will keep your stitches tight and structured. Additionally, gather a yarn needle, scissors, a stitch marker (optional), and a keyring or lobster clasp if you plan to hang the holder. -
Finished Dimensions
The final tulip holder should measure approximately 4 inches tall and 1.25 inches wide, making it a snug fit for most lipstick or lip balm tubes. It’s compact and ideal for carrying around or gifting. -
Stitch Guide
You’ll be using basic stitches: chain (ch), single crochet (sc), half double crochet (hdc), and slip stitch (sl st). If you know how to crochet in the round and create simple shapes, this pattern will feel familiar and comfortable. -
Preparation Tips
Wind your yarn before starting to avoid tangles. If you’re using scrap yarns, make sure they’re similar in weight and texture to ensure uniform stitching. Pre-cut a 10-inch tail from your floral yarn to use for sewing on embellishments or leaf details. -
Optional Additions
Want to go the extra mile? Add a small button or snap closure, embroider a small face or initials, or attach beads or felt leaves to the side. These small touches make your crochet item even more special.
Crochet Pattern: Creating the Base and Flower Top
Let’s start crafting your crochet tulip lipstick holder. This section focuses on building the base and tulip shape using beginner-friendly crochet techniques.
-
Start with a Magic Ring
Begin with your green yarn. Make a magic ring and work 6 single crochets (sc) into the ring. Pull it tight and slip stitch to the first sc. This will form the closed bottom of your lipstick holder. -
Building the Cylinder Base
Work in continuous rounds.
Rnd 1: 2 sc in each stitch around (12 sts)
Rnd 2: Sc in next stitch, 2 sc in next repeat around (18 sts)
Rnd 3–10: Sc in each stitch around. You can adjust the number of rounds to match your lipstick height. -
Switch to Tulip Color
Change to your flower color. This change will create the floral bloom at the top.
Rnd 11–13: Sc in each stitch around. These rows form the top part of the tulip and will soon be shaped into petals. -
Forming the Petals
Divide the round into six sections (3 sts per petal). For each petal:
Row 1: Sc in 3 sts, turn
Row 2: Ch 1, hdc in each st, turn
Row 3: Ch 1, sc2tog, sc in next st, turn
Row 4: Sc2tog, fasten off
Repeat this petal pattern around the top. You should have 6 tulip petals. -
Shaping the Leaves (Optional)
Using green yarn, chain 6.
Row 1: Sl st in 2nd ch, sc, hdc, dc, tr.
Fasten off and sew two leaves at the base of the tulip using a yarn needle. This gives a more realistic floral look. -
Adding a Closure Loop (Optional)
Chain 10 and secure it to the inside back of the tulip bloom to form a loop. Sew a small button on the front base, and your lipstick will stay secure inside even when carried around.
Assembly and Finishing Touches
Once your basic shape is complete, it’s time to assemble and polish your crochet tulip lipstick holder to make it gift-ready and functional.
-
Weaving in the Ends
Use a yarn needle to weave in all your loose yarn ends on the inside of the holder. Keep it neat, especially if you plan to sell or gift the item. -
Attaching to Keychain
Use a small jump ring or crochet a small loop on the side of the tulip and attach it to a keyring or lobster clasp. This allows the holder to clip easily onto a bag or belt loop. -
Blocking the Petals
Lightly block the tulip petals by misting them with water and pinning them open on a soft surface. This helps shape them outward and gives the tulip a full-bloom appearance. -
Test the Fit
Insert your lipstick or lip balm to test the fit. Adjust the stitch count or rounds if needed, especially if you’re using non-standard-sized lip products. -
Embellishing Your Work
Consider adding mini flowers, tiny beads, or even a felt bee or ladybug to the tulip for extra flair. Just make sure these additions are securely fastened. -
Packaging for Gifts
If giving as a gift, place the tulip holder in a small organza bag or crochet a simple pouch. It makes for a thoughtful, handmade presentation.
Why You’ll Love This Crochet Pattern
The crochet tulip lipstick holder isn’t just a pretty project—it’s practical, rewarding, and great for all skill levels. Here’s why it might become your new favorite crochet pattern.
-
Quick and Fun to Make
Most crocheters can finish this project in under two hours. It’s a great weekend or evening craft that gives satisfying results fast. -
Ideal for Scrap Yarn
You can make several holders using leftover yarn. The small amount of yarn needed makes it a great eco-conscious and budget-friendly project. -
Great Gift for Any Occasion
Whether it’s for Mother’s Day, a bridal shower, or a thank-you gift, a handmade crochet tulip lipstick holder feels personal and thoughtful. -
Easy to Customize
Play with flower colors, petal shapes, and even yarn textures. Use sparkly yarn for a glam version or earth tones for a rustic garden theme. -
Beginner Friendly, Yet Beautiful
The basic stitches and shaping techniques make this accessible to new crocheters, but the finished piece looks advanced and intricate. -
High Market Appeal
If you sell crochet items online or at markets, these holders are cute, functional, and unique—perfect for adding to your product catalog. Include a tube of lip balm for a ready-to-sell item.
Final Thoughts on This Crochet Pattern
The crochet tulip lipstick holder is the perfect combination of creativity and utility. It brings floral beauty to your daily life while offering a practical way to carry lip balm or lipstick. Whether you’re gifting it or using it yourself, the project is satisfying from the first chain to the last stitch.
This crochet pattern allows you to practice shaping, color changes, and basic stitch combinations, helping you grow your crochet skills in a rewarding way. Plus, the project is endlessly customizable and always appreciated by its recipients.
Try making one in every color of the rainbow and brighten your day—or someone else’s! Ready to get started? Grab your yarn and hook, and let’s bloom with creativity, one stitch at a time. 🌷


