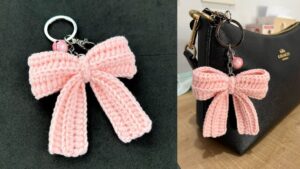
If you’re searching for a delightful, quick, and useful crochet project, look no further than this crochet bow keychain. This charming accessory is not only adorable but also functional. It’s a perfect way to use up leftover yarn, add a handmade touch to your keys or bag, or create a personalized gift for friends and family. Plus, it’s easy enough for beginners while still being fun for more experienced crocheters.
The crochet bow keychain uses basic stitches and can be completed in less than an hour. It’s a fantastic project if you’re just getting started or looking for something satisfying to make between larger projects. Best of all, you only need a small amount of yarn and a few simple materials.
In this tutorial, we’ll walk through every step of this cute crochet pattern, from selecting materials to finishing the piece. Whether you want to make a few as party favors or just decorate your bag with a touch of handmade flair, this project will be one you return to again and again.
Materials and Tools for Your Crochet Bow Keychain
-
Yarn Requirements
Use small amounts of worsted weight yarn in your favorite colors. Cotton yarn is a great choice because it holds shape well, but acrylic yarn also works beautifully. -
Hook Size and Gauge
A 3.5 mm (E) or 4.0 mm (G) crochet hook is ideal. The gauge is not crucial for this pattern, but using a smaller hook ensures the bow stays firm and compact. -
Notions and Accessories
You’ll need a yarn needle, scissors, and a keychain ring. Optionally, add a lobster clasp if you want to easily clip your bow onto bags or backpacks. -
Optional Lining and Embellishments
If desired, you can cut a small piece of felt (5 cm x 2 cm) to line the back or use beads, buttons, or embroidery to embellish the bow. -
Skill Level
This crochet pattern is beginner-friendly and uses only basic stitches like chain (ch), single crochet (sc), and slip stitch (sl st). -
Estimated Time
The entire project takes about 30–45 minutes to complete, making it a great last-minute gift or quick crochet fix.
Step-by-Step Instructions to Crochet the Bow
-
Start with a Magic Ring
Begin by making a magic ring. Into the ring, work 6 single crochets. Pull the ring tight and join with a slip stitch into the first stitch to form a small circle. This circle will form the center of your bow. -
Crochet the First Side of the Bow
Chain 9. In the second chain from the hook, work 1 single crochet. Continue working 1 sc into each chain across. You should have 8 sc stitches. Chain 1 and turn. -
Repeat Rows for Shape
Work 3 more rows of 8 single crochets (chain 1 and turn at the end of each row). This will create a rectangular shape which is one half of your bow. -
Mirror the Other Side
After completing 4 rows, fasten off the yarn. Rejoin yarn into the other side of the central circle. Chain 9 and repeat the same process to form the second wing of the bow. -
Finishing the Bow Shape
Once both sides are complete, fold the piece in half lengthwise and sew the edges together to form a symmetrical bow. Use the same color yarn to wrap the center several times to cinch it and define the bow shape. -
Secure the Ends
Use a yarn needle to weave in all loose ends. You can add a drop of fabric glue at the back of the bow to hold everything in place for extra durability.
Attaching the Bow to the Keychain Ring
-
Prepare the Ring
Use a jump ring or directly attach the keyring to the center of the bow using yarn or thread. Make sure it’s securely fastened to avoid wear and tear. -
Use a Lobster Clasp for Versatility
If you want to clip your bow to a zipper or bag handle, thread the yarn through a lobster clasp instead of a regular ring. -
Strengthen the Attachment
Wrap yarn around the keyring several times and knot it tightly. Use a needle to weave in any excess yarn securely. -
Test for Durability
Tug lightly on the keychain to ensure it’s securely fastened. If needed, stitch it more tightly or reinforce with glue. -
Add Optional Details
You can personalize the bow with beads, initials, or small crocheted flowers to give each one its own character. -
Create Multiple Styles
Once you’ve mastered this crochet pattern, try making sets in different colors or textures—metallic yarns, variegated hues, or even sparkly threads.
Additional Design Variations and Sizing Tips
-
Mini Bow Keychains
To make smaller versions, use lighter-weight yarn like sport or fingering weight and a smaller hook (2.5–3.0 mm). These make adorable charm-size accessories. -
Oversized Statement Bows
Increase the number of chains and rows to create a bolder look. For example, ch 12 and work 6 rows of single crochet for each side of the bow. -
Textured Bows
Experiment with stitches like half double crochet or puff stitch for a different feel. This gives a lovely 3D effect and adds personality to each bow. -
Double Layered Bows
Make two bows and layer one on top of the other, sewing through the center for a lush, layered style. Mix colors for contrast. -
Bow Ties for Plushies or Dolls
This crochet bow pattern also doubles as a cute bow tie for amigurumi animals or dolls. Just add a longer band to tie it around the neck. -
Scented Bows for Drawers
Add a drop of essential oil to the center of the bow and use it as a scented charm inside closets or drawers. Just wrap it in a breathable cloth.
Why You’ll Love This Crochet Pattern
-
Quick and Easy
The crochet bow keychain takes under an hour to make and doesn’t require complex stitches, making it ideal for on-the-go projects. -
Minimal Yarn Needed
It’s a great stash-buster. You can use leftover bits from larger projects to make dozens of colorful bows. -
Perfect for Gifting
These bows make thoughtful and personal gifts. Add one to a birthday card or baby shower gift for a handmade touch. -
Beginner Friendly
With basic stitches and simple shaping, this is a great entry point into the world of crochet patterns. -
Customizable and Stylish
From pastels to bright neons, you can customize the colors to match your outfit, mood, or the season. -
Fun for Craft Markets
If you sell handmade crafts, these are popular items at booths and pop-ups. Add tags with your logo and people will love them as cute impulse buys.
Conclusion
Crafting a crochet bow keychain is a satisfying and joyful experience. This simple yet stylish crochet pattern allows for endless creativity, and you’ll love how quickly they come together. Whether you’re making one for yourself, a friend, or to sell at a local market, this is a practical and delightful project that never goes out of style.
With just a few materials, some yarn, and your favorite hook, you’ll have a collection of bows in no time. They’re proof that even small crochet creations can make a big impact. So grab your yarn, get comfortable, and start stitching your way to beautiful, personalized keychains!


