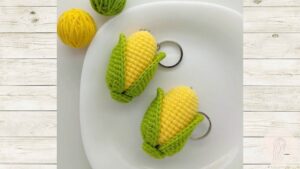
If you’re looking for a quick, adorable, and practical handmade gift idea, this Amigurumi Corn Keychain Souvenir is a perfect choice. It combines fun design with the charm of miniature crochet, making it a standout for party favors, cultural events, or just to brighten someone’s day. Whether you’re new to Amigurumi or already love working with small Amigurumi patterns, this corn keychain is satisfying to make and impossible not to smile at.
One of the best things about Amigurumi is how versatile it is. You can turn almost anything into a cuddly mini figure—and food-shaped items are always a hit. The Amigurumi Corn Keychain adds a playful twist to your keyrings or bags and makes a lovely handmade souvenir. Plus, it’s a great stash-buster for those bits of yarn left over from bigger projects.
In this blog post, you’ll find a step-by-step guide on how to make this charming corn. We’ll walk through the stitches, materials, Amigurumi pattern instructions, and optional embellishments so you can create your own unique keychain. Let’s get started with the materials and measurements first.
🧵 Materials and Measurements for the Amigurumi Corn
Making your Amigurumi Corn Keychain starts with gathering the right materials. This project doesn’t require much yarn and is ideal for using up your leftover scraps. Below are the recommended supplies and sizes for a standard corn keychain.
-
Yarn Colors Needed
-
Yellow: for the corn kernels
-
Green: for the husk/leaves
-
Optional: Pink or black for facial details (eyes, mouth, blush)
-
Yarn weight: DK or worsted weight cotton or acrylic yarn
-
-
Crochet Hook
-
Size: 2.5mm or 3.0mm (depending on yarn thickness)
-
Using a smaller hook helps keep your stitches tight and stuffing secure
-
-
Additional Supplies
-
Keychain ring or lobster clasp
-
Tapestry needle
-
Scissors
-
Stitch marker
-
Fiberfill stuffing
-
Optional: 6mm safety eyes or embroidery thread for face
-
-
Finished Size
-
Height: approx. 3.5 inches (9 cm)
-
Width: approx. 1.5 inches (4 cm)
-
-
Fabric Cuts (if adding felt backing)
-
Optional small piece of felt (2″ x 2″) to reinforce the base
-
Color: match the corn body or husk
-
-
Time Estimate
-
1 to 1.5 hours for an experienced crocheter
-
2 to 3 hours for beginners, including assembly and embroidery
-
🌽 Crochet the Corn Body (Kernel Section)
This section forms the main part of your Amigurumi Corn Keychain. It’s worked in continuous rounds using basic Amigurumi pattern techniques. Use yellow yarn and a stitch marker to track each round.
-
Round 1 – Magic Ring
-
Create a magic ring and work 6 single crochet (sc) into the ring.
-
Pull tight and place a stitch marker at the beginning.
-
-
Round 2 – Increase
-
Work 2 sc in each stitch around. (12 stitches)
-
-
Round 3
-
1 sc in the first stitch, 2 sc in the next – repeat around. (18 stitches)
-
-
Rounds 4–9
-
Work 1 sc in each stitch around for 6 rounds.
-
This gives the corn body its cylindrical shape.
-
-
Optional Facial Features
-
Add safety eyes between Rounds 5 and 6, about 5 stitches apart.
-
Embroider a smile or “kawaii” face using black thread or yarn.
-
-
Round 10 – Decrease
-
1 sc in the first stitch, sc2tog in the next two stitches – repeat around. (12 stitches)
-
Begin lightly stuffing with fiberfill at this stage.
-
🌿 Making and Attaching the Corn Husk (Leaf Section)
Now that the corn body is complete, it’s time to add the signature green husk, which gives the corn its recognizable shape. This part is made in rows and sewn around the base.
-
Husk Leaf Pattern (Make 2 or 3)
-
Chain 6
-
Row 1: Starting in 2nd ch from hook, sc in next 5 (5)
-
Row 2–5: Ch 1, turn, sc in each st across
-
Row 6: Ch 1, turn, sc2tog, sc, sc2tog (3)
-
Row 7: Ch 1, turn, sc3tog (1), fasten off
-
-
Shape the Husk
-
Slightly curl the top of each leaf to make it look more natural
-
Use your fingers to twist or roll the tips
-
-
Attach Leaves to Base
-
Position leaves evenly around the bottom half of the corn
-
Use green yarn and a tapestry needle to sew them on one by one
-
-
Optional Inner Leaf Layer
-
If desired, make smaller leaves using chain 4 and repeat same structure
-
These smaller husks give depth and dimension
-
-
Secure All Ends
-
Hide all yarn tails inside the corn body
-
Make sure the leaves are secure but still have some movement
-
-
Add Loop for Keyring
-
With green or yellow yarn, chain 10 and sew both ends to the top of the corn
-
Slip your keyring through this loop or sew directly onto it
-
🧸 Final Assembly and Decorative Options
Once the corn and its husk are ready, it’s time to stuff, close, and decorate your Amigurumi Corn Keychain Souvenir. This step adds the final personality touches and prepares it for gifting or selling.
-
Stuffing
-
Add a little more fiberfill if needed, shaping the body as you go
-
The corn should be firm but still soft to touch
-
-
Closing the Top
-
Use a tapestry needle and the tail yarn to weave through the front loops of the last round
-
Pull tight to close, knot, and weave in the end
-
-
Facial Details (Optional)
-
Add pink blush cheeks using embroidery thread or felt circles
-
Sew on a tiny bow or hat to make the keychain even cuter
-
-
Packaging for Souvenirs
-
Place the keychain in a small organza or mesh gift bag
-
Add a custom label that says “Handmade with Love” or “Sweet Corn for You!”
-
-
Make a Set
-
Create multiple color variations (pastel corn, rainbow kernels)
-
Offer them as party sets, seasonal gifts, or craft fair bundles
-
-
Attach Keychain Ring
-
Use a lobster clasp or split ring to attach your loop
-
Make sure it’s tightly secured so the corn doesn’t detach during use
-
🎁 Ideas for Gifting and Selling This Amigurumi Corn Keychain
The fun doesn’t stop once your Amigurumi Corn Keychain is complete. There are so many creative ways to share it! Below are ideas for presenting, gifting, and monetizing your finished product.
-
Party Favors
-
These make adorable additions to farm-themed or harvest parties
-
Add name tags and use as personalized giveaways
-
-
School Fundraisers
-
Make multiple corn keychains and sell them for charity events
-
Add fun puns like “You’re A-maize-ing!”
-
-
Cultural Souvenirs
-
Corn holds cultural significance in many regions
-
Use these keychains as symbolic handmade souvenirs
-
-
Etsy or Local Craft Fairs
-
List as a ready-made or custom item in your shop
-
Offer sets with other food-themed Amigurumi like carrots or tomatoes
-
-
Keychain Display Ideas
-
Hang them from purses, backpacks, or even zipper pulls
-
Kids and teens especially love them for their cuteness
-
-
Holiday-Themed Versions
-
Add Santa hats for Christmas corn
-
Use heart blush and pink leaves for Valentine’s Day corn
-
Final Thoughts: Why You’ll Love This Amigurumi Pattern
This Amigurumi Corn Keychain Souvenir is a fun and beginner-friendly project that can be made in just a few hours. It’s perfect for using up leftover yarn, practicing small-scale shaping, and adding personality to your accessories. With a little creativity, you can turn this simple Amigurumi pattern into dozens of unique keychains that reflect your personal style.
Remember to keep your stitches tight, enjoy the creative process, and don’t be afraid to experiment with colors and embellishments. Whether you’re making one for a friend, a party favor, or to sell online, this corn keychain is sure to bring a smile to anyone who sees it.


