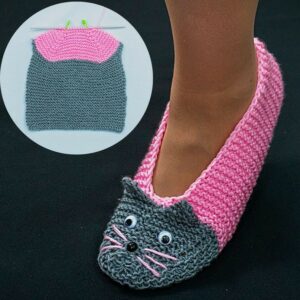
Looking for a delightful handmade gift or a cozy addition to your own wardrobe? This kitten-shaped crochet sock pattern is the purr-fect mix of charm and comfort. Whether you’re a seasoned crocheter or just learning the ropes, this project allows you to create something cute and functional that you’ll love slipping your feet into.
The kitten-shaped crochet sock is ideal for those who want to blend creativity with comfort. Designed to mimic the soft and sweet appearance of a kitten—complete with little ears, a face, and even a tail—this sock brings personality to your feet. It’s also an excellent way to explore unique shaping and detailing techniques while practicing your skills.
In this post, we’ll guide you step-by-step through how to crochet a kitten-shaped sock using an easy-to-follow crochet pattern. You’ll learn how to measure, shape, and embellish your socks for maximum cuteness. Let’s start with the essential materials and fabric measurements to help you prepare.
🧶 Materials and Measurements for the Kitten Crochet Sock
Before diving into the actual crochet steps, it’s crucial to gather your materials and understand the fabric cuts and measurements needed. This ensures your crochet kitten sock will fit correctly and hold its shape.
-
Yarn Selection
-
Use medium-weight (worsted) yarn for a soft but durable sock.
-
Choose pastel or natural kitten colors like gray, cream, beige, or pink.
-
Small scraps of black and pink yarn will be needed for facial details.
-
-
Crochet Hook
-
Recommended size: 4.0 mm (G-6)
-
You may adjust size based on gauge or personal comfort.
-
-
Other Supplies
-
Tapestry needle for sewing and weaving ends
-
Stitch markers
-
Scissors
-
Fiberfill (optional for stuffed tail or ears)
-
-
Fabric Cuts and Sizing
-
Foot Length: Approx. 9 inches (customizable)
-
Foot Width: 3.5 to 4 inches
-
Sock Height: Up to mid-calf (6–7 inches from heel)
-
-
Accessories
-
Safety eyes or embroidered eyes (6mm)
-
Optional felt patches for whiskers or paws
-
-
Gauge
-
16 stitches x 20 rows = 4 inches square in single crochet
-
Always swatch before starting to ensure proper fit
-
🐾 Step-by-Step: Crochet the Sock Base
Now that your supplies are ready, we’ll begin by making the base of the kitten-shaped crochet sock. This part covers the foot and leg, shaped in rounds and rows using basic stitches.
-
Toe Section
-
Start with a magic ring and make 6 single crochets (sc).
-
Work in continuous rounds, increasing evenly to form a circular toe.
-
Continue until the circle’s diameter fits the width of the foot.
-
-
Foot Section
-
Stop increasing and work even sc rounds until the foot reaches desired length (around 7–9 inches).
-
Use stitch markers to ensure even alignment.
-
-
Heel Construction
-
Use short rows to shape the heel.
-
Fold the sock flat and mark heel points.
-
Work in turned rows back and forth across half the sock width for the heel cup.
-
-
Joining Heel
-
Once heel cup is complete, fold and seam using slip stitches or whipstitch.
-
Rejoin the yarn at the ankle to begin working up the leg.
-
-
Leg Section
-
Continue in rounds for the sock’s shaft (6–8 inches).
-
For a kitten leg look, switch to a different color for the “paw” cuffs.
-
Optional: Add puff stitches to create little “toe pads.”
-
-
Cuff Finish
-
End with 3 rounds of half double crochet (hdc) or ribbed stitch for a clean finish.
-
Fasten off and weave in all ends securely.
-
🐱 Creating the Kitten Face and Ears
What turns this sock into something special is the adorable kitten face and ears! This section covers how to craft those iconic details using simple shapes and crochet patterns.
-
Crocheting the Ears
-
Make two small triangles:
-
Row 1: ch 2, 2 sc in second ch (2 sts)
-
Row 2: ch 1, turn, 2 sc in each st (4 sts)
-
Row 3: ch 1, turn, sc across (4 sts), fasten off
-
-
Sew ears to the top rim of the sock (front center).
-
-
Eyes
-
You can use 6mm black safety eyes or crochet small black circles (magic ring with 6 sc).
-
Position eyes evenly above the toe area for a natural look.
-
-
Nose and Mouth
-
Use pink yarn to embroider a small triangle for the nose.
-
Stitch a tiny “W” shape for the mouth below the nose.
-
-
Whiskers
-
Embroider 3 straight lines on each cheek using black yarn or thread.
-
Make sure whiskers are even and not too tight to prevent puckering.
-
-
Optional Cheeks
-
Add small pink circles (magic ring + 6 sc) to mimic blushing cheeks.
-
These can be glued or sewn into place.
-
-
Stuffing Ears (Optional)
-
If you want perky ears, lightly stuff them with fiberfill before sewing.
-
This adds volume and durability, especially for children’s socks.
-
🐈 Adding the Tail and Final Details
No kitten-shaped crochet sock would be complete without a tail! In this section, we’ll explain how to make a curly or straight tail and attach final embellishments that bring your kitten to life.
-
Making the Tail
-
Chain 25 for a long tail or 15 for a stubby version.
-
Work 2 sc into each chain stitch to create a spiral tail.
-
Fasten off and sew securely to the back heel area of the sock.
-
-
Paw Print Details (Optional)
-
Crochet tiny circles for paw pads and attach them to the sole.
-
Use puff stitch or bobble stitch to mimic real kitten toes.
-
-
Decorative Add-Ons
-
Add a small bow under the kitten’s face using ribbon or crochet
-
Use buttons or beads for added sparkle.
-
-
Personalization Ideas
-
Embroider initials or a name into the sole or cuff.
-
Use different yarn textures like velvet or fuzzy yarn for a playful effect.
-
-
Washing Instructions Tag
-
If gifting or selling, include a care tag: hand wash only, air dry.
-
Mention that safety eyes are not recommended for babies under 3 years.
-
-
Final Touch
-
Try your sock on and check for tightness or loose threads.
-
Admire your work—this adorable crochet pattern is one to be proud of!
-
🎁 Gifting, Styling, and Selling the Kitten Crochet Sock
Now that your kitten-shaped crochet sock is complete, here are ways to share or profit from your finished piece. Handmade socks make excellent gifts and shop products, especially when they stand out with character and quality.
-
Gift Packaging Ideas
-
Wrap in tissue paper and place in a gift box.
-
Add a custom “handmade with love” label or thank-you tag.
-
-
Matching Sets
-
Create a matching headband, mitten, or hat with the same kitten theme.
-
Offer a “cat lover’s bundle” as a premium item.
-
-
Photo Prop
-
These socks are perfect for baby and toddler photo shoots.
-
Coordinate with cat-themed outfits or props.
-
-
Craft Fair Display
-
Use small mannequins or sock hangers to showcase the design.
-
Hang price tags with visible care instructions and materials used.
-
-
Seasonal Variations
-
Make Halloween versions with black yarn and orange accents.
-
Add a Santa hat for a Christmas kitten sock.
-
-
Online Sales Tips
-
Take bright, clean photos from multiple angles.
-
Use keywords like “crochet kitten sock,” “animal crochet pattern,” and “cat slipper crochet” in your product title and description.
-
Final Thoughts
Crocheting a kitten-shaped crochet sock is a fun, functional, and heartwarming project. Not only does it keep your feet warm, but it also adds a whimsical, handmade touch to your wardrobe or gift-giving. With just a few basic supplies and a little creativity, you can turn an ordinary sock into an adorable feline companion using this beginner-friendly crochet pattern.
Whether you’re making it for yourself, gifting it to a friend, or selling it at a craft fair, this kitten sock is sure to spark joy and plenty of compliments. Remember to take your time with the details, and most importantly—enjoy the process of creating something so unique and full of personality.


