If you’ve been searching for an easy yet stylish crochet pattern, this How to Crochet a Crossbody Bag tutorial is just what you need. Combining practicality and fashion, this bag is perfect for everyday use—hands-free, roomy, and simple to make with minimal materials.
Designed with beginners in mind, this step-by-step guide uses basic stitches—single crochet, half-double crochet, and slip stitches—making it approachable and fun. We’ll walk you through from cutting your fabric panels (for lining) to adding the strap, bonus embellishments, and finishing touches.
In this guide, you’ll learn how to cut and prepare your materials, crochet the bag body, assemble the lining and strap, and add your own flair. Let’s get your hook warmed up and dive into your next favorite crochet project!
🧶 Materials & Fabric Cuts for Your Crossbody Bag
Gathering your materials and pre-cut fabric ensures a smooth crafting session. This section covers everything you need:
-
Yarn Choice
-
Worsted-weight cotton or acrylic yarn (Category 4). Choose a main color and an accent color if desired.
-
Approximate yarn needed: 250–300 g for bag body and strap.
-
-
Crochet Hook
-
Recommended size: 5.0 mm (H/8). Adjust to 4.5 mm if your tension is loose.
-
-
Fabric for Lining
-
One rectangle: 12″ high × 14″ wide (30 × 36 cm).
-
Optional pocket panel: 6″ × 8″ (15 × 20 cm).
-
-
Notions
-
Matching thread, sewing needle, tapestry needle.
-
Half-inch magnetic snap or small zipper.
-
Scissors, stitch markers.
-
-
Yarn Cuts
-
Bag body: 300 g total (main+accent).
-
Strap: none—built into crochet.
-
Lining fabric: one panel + optional pocket.
-
-
Finished Size
-
Approximately 11″ wide × 9″ high × 2″ flat.
-
Strap length: about 48″ (122 cm), ideal for crossbody wear.
-
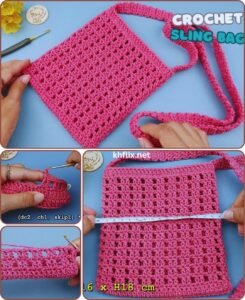
H2: Crochet the Bag Body – Rounds 1 to 15
This is the core of your crochet pattern, where the bag takes shape—two panels joined at the base.
-
Panel 1 – Front
-
Chain 31. Row 1: sc across (30 sc).
-
Row 2–14: ch 1, sc across working in back loops only for ribbed texture.
-
Row 15: ch 1, turn, then work 1 row of even half-double crochet to flatten edge.
-
Fasten off.
-
-
Panel 2 – Back
-
Repeat rows 1–15 for a matching panel.
-
-
Joining at Bottom
-
With right sides facing, align panels and slip-stitch or single-crochet along the 11″ bottom edge to form the base.
-
-
Forming the Sides
-
Sew both side seams using single crochet or whip stitch, leaving the top open.
-
Fasten off and weave in tails.
-
-
Stitch Around Top Edge
-
With yarn attached at one side seam, work one round of sc evenly around the top opening.
-
This stabilizes the opening for lining and closure attachment.
-
-
Optional Decorative Border
-
Add a contrasting color row or scalloped edge around the top for flair.
-
H2: Add Lining & Fastener
Lining gives your bag structure and polish, while a fastener secures your belongings—this section shows you how.
-
Prepare Lining Panels
-
Hem top edge of lining panel: fold ¼″, press, then ½″, and stitch for a clean finish.
-
If using a pocket, hem its top edge and center it on the lining’s right side about 3″ from the top, stitching three edges to attach.
-
-
Insert Lining into Bag
-
Slide the panel inside so right sides face outward.
-
Fold top edge of lining over the crochet edge, pinning in place.
-
-
Stitch Lining
-
Sew around the top through both layers, using a whip stitch or sewing machine.
-
Turn bag right-side out.
-
-
Add Magnetic Snap or Zipper
-
For snap: align snap halves into the lining and crochet border—mark and sew into place.
-
For zipper: stitch one side of zipper to interior crocheted row, then the other side.
-
-
Topstitch Option
-
Add a topstitch around the snap or zipper area for durability and style.
-
-
Turn Inside Out
-
Pocket should face inside. Smooth fabric and evenly tuck lining below the edge.
-
H2: Crocheting & Attaching the Strap
A proper strap lets you wear your bag hands-free. Here’s how to crochet and anchor it:
-
Strap Base
-
Attach yarn at the top side seam.
-
Chain 80–100 (for approx. 48″ length).
-
Row 1: sc in 2nd ch from hook to end.
-
Row 2–4: ch 1, sc across. Fasten off.
-
-
Secure the Strap to Other Side
-
Align strap to the opposite side seam; stitch ends securely using tapestry needle.
-
Reinforce with back-and-forth stitching for strength.
-
-
Strengthening Edges
-
Add a reverse single crochet (crab stitch) around strap sides to firm up edges.
-
Weave in all ends.
-
-
Adjustable Option
-
Leave extra chain at ends, attach a small buckle or slide-ring for adjustability.
-
-
Strap Decoration
-
Use sc or color-block for stripe patterns.
-
Add pom-poms or tassels at chain ends if desired.
-
-
Final Strap Check
-
Give a gentle tug to ensure strap stability.
-
Adjust length as needed before finishing.
-
H2: Final Styling, Customization & Care
You’ve constructed your bag. Now let’s add personality, polish, and instructions for care.
-
Add Embellishments
-
Crochet a flower, pocket flap, or tassel to glue or sew on.
-
Explore color-stripe panel, surface crochet design, or badge.
-
-
Fabric Pockets
-
Sew small interior pockets or attach a pen loop for added utility.
-
Use leftover lining fabric to coordinate.
-
-
Care Tips
-
For cotton yarn: machine wash cold, reshape and air-dry flat.
-
For acrylic: wash normal cold wash, tumble-dry low; snip any fuzz after.
-
-
Selling or Gifting
-
Use tags like “handmade crossbody bag,” “crochet shoulder messenger.”
-
Include card detailing fiber, care, and handmade pride.
-
-
Sizing & Adaptation
-
To expand: ch 35 for larger bottom; add 2–3 rows for height.
-
Use chunkier yarn and larger hook for bigger, sturdier tote.
-
-
Skill Progression
-
After mastering this, try quilted crochet, Tunisian stitch, or lining with zippered pockets.
-
Integrate colorwork, tapestry crochet, or modular panels.
-
🧵 Final Thoughts
You’ve now completed a stylish and practical How to Crochet a Crossbody Bag – Step-by-Step Tutorial, using your chosen crochet pattern. With tailored materials, clean assembly, and finishing touches, you’ve created a functional accessory ideal for daily use or gifting. This bag offers a solid foundation to explore more advanced designs and customization.
Thanks for following along—your creativity shines in each stitch. Share your project photos, and if you’d like printable diagrams or instructional video links, I’d be happy to provide them!
Happy hooking and wear your creation with pride!


