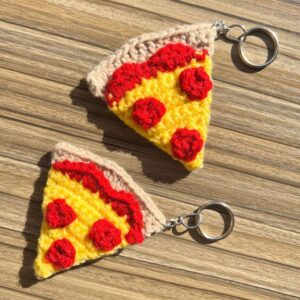
If you’re looking for a fun, quirky, and beginner-friendly crochet project, this Super Easy Crochet Pizza Slice Keychain is the perfect way to use your creativity and make something adorable! Whether you’re a food lover, keychain collector, or simply enjoy working with yarn, this delightful pattern adds a whimsical touch to your keys, backpacks, or gift packages.
This step-by-step guide will teach you how to create your own crochet pizza slice from start to finish. With just basic stitches and a few materials, you can whip up this cute project in less than an hour. It’s a fantastic way to practice crochet pattern reading and a great handmade gift idea for friends, especially fellow pizza lovers.
Throughout this tutorial, we’ll cover all the fabric measurements, stitches, and assembly instructions in detail. You’ll also learn how to personalize your keychain with different toppings like pepperoni, mushrooms, and even cute eyes if you’d like to turn it into a kawaii-style keyring. Let’s get started on this flavorful and fun crochet adventure!
🧶 Materials and Fabric Cuts for the Crochet Pizza Slice Keychain
Before we dive into the actual crochet pattern, let’s gather all the tools and materials you’ll need for this keychain project. This section also includes exact measurements to ensure your pizza slice turns out picture-perfect.
-
Yarn Selection
-
Use worsted weight (Category 4) acrylic or cotton yarn.
-
Main colors needed:
-
Light beige or tan (crust)
-
Yellow or golden (cheese)
-
Red (pepperoni or tomato)
-
Brown or green (optional toppings)
-
-
A small amount of black or white for eyes (optional, if making it kawaii-style).
-
-
Crochet Hook Size
-
A 3.5 mm (E-4) or 4.0 mm (G-6) crochet hook works best for tight, sturdy stitches that maintain shape.
-
Smaller hooks create denser fabric which is ideal for keychains.
-
-
Notions
-
Stitch marker
-
Yarn needle
-
Polyester fiberfill (for stuffing)
-
Scissors
-
Metal keyring and jump ring
-
-
Felt & Embellishments (Optional)
-
Small pieces of felt for toppings like basil leaves or extra detail.
-
Embroidery thread if adding eyes or smiles.
-
-
Fabric Cuts (if lining)
-
Optional inner felt lining: one triangle measuring 2.5 inches on each side for support.
-
No additional fabric is required for standard version.
-
-
Finished Size
-
Approx. 2.5 inches tall and 2 inches wide at the base.
-
Small and lightweight—ideal for a keyring or bag charm.
-
🍕 How to Crochet the Pizza Slice Base
This section walks you through creating the triangular shape of the pizza slice—starting from the tip and working up to the crust using simple crochet stitches.
-
Foundation Chain
-
Start with the pizza slice’s tip.
-
With yellow yarn (cheese), ch 2.
-
Row 1: sc 1 in 2nd ch from hook. (1 stitch)
-
-
Increasing Rows
-
Row 2: ch 1, turn, 2 sc in stitch. (2 stitches)
-
Row 3: ch 1, turn, 1 sc in each stitch. (2 stitches)
-
Row 4: ch 1, turn, 2 sc in each stitch. (4 stitches)
-
Continue this pattern, increasing by 1–2 stitches per row until you reach a triangle base that is approx. 2 inches wide. This should be around 10 rows total.
-
-
Cheese Topping Texture
-
Once triangle is wide enough, fasten off and weave in ends.
-
Optional: use surface slip stitch with gold or orange yarn for a melty cheese effect.
-
-
Crust Edge
-
Switch to light brown yarn.
-
Attach yarn to top wide edge of triangle, work sc evenly across.
-
Work one row in back loops only for texture.
-
Optional: for a puffy crust, work 1 row of puff stitches.
-
-
Back Panel
-
Repeat the exact triangle shape again using only yellow yarn for a clean back.
-
If making kawaii-style: embroider face on front before assembly.
-
-
Assembly
-
Place both panels together, wrong sides facing in.
-
Using yellow yarn, sc around both pieces, stuffing lightly with fiberfill before closing completely.
-
🔴 Adding Toppings and Details
Now it’s time to personalize your slice with toppings. Use colorful yarn and small shapes to make it look delicious and playful.
-
Crochet Pepperoni (Red Circles)
-
With red yarn, make a magic ring.
-
Round 1: Work 6 sc into ring, sl st to first st. Fasten off.
-
Make 2–3 depending on your design.
-
Sew them securely onto the cheese portion of the slice.
-
-
Crochet Mushroom Toppings
-
With beige yarn, ch 3.
-
Row 1: sc in 2nd ch from hook, hdc in next. Fasten off.
-
Optional stem: ch 2 and attach below cap.
-
Sew these near the top edge of your slice.
-
-
Embroidered Details
-
Use black thread to stitch olives or anchovies.
-
Add white French knots for mozzarella blobs.
-
-
Cute Eyes (Optional)
-
Make this a kawaii pizza slice by embroidering eyes using black thread or attaching small safety eyes.
-
Add a pink blush with embroidery floss or fabric marker.
-
-
Smile or Wink
-
A tiny curved line under the eyes adds personality.
-
You can also stitch a little “tongue” for extra charm.
-
-
Final Touch
-
Add a few loops of orange or gold yarn with a tapestry needle to give it a stringy cheese look.
-
🔑 Attaching the Keychain Hardware
The final step is attaching your metal findings to transform your slice into a functional and cute keychain.
-
Locate Placement
-
Choose a corner of the crust area for the attachment point.
-
This provides stability and helps the pizza hang upright.
-
-
Create a Hanging Loop
-
With matching yarn, ch 10.
-
Join with sl st to form a ring.
-
Sew this loop securely into the top crust corner using your yarn needle.
-
-
Attach to Jump Ring
-
Use pliers to open a jump ring.
-
Slide the yarn loop through and close the ring around the keyring.
-
-
Secure for Strength
-
Reinforce the yarn loop area with a couple of extra stitches using a tapestry needle.
-
Tug gently to ensure it holds.
-
-
Test Functionality
-
Clip onto a keyring, zipper, or bag.
-
Check durability and reinforce if needed.
-
-
Optional Extras
-
Add a tiny charm (heart, fork, or pizza slice) using an extra jump ring.
-
Use glow-in-the-dark yarn or beads for a unique twist.
-
🎁 Final Thoughts and Crochet Care Tips
You’ve now completed your Super Easy Crochet Pizza Slice Keychain using a beginner-friendly crochet pattern! These mini food keychains are a hit with all ages and make perfect handmade gifts for birthdays, holidays, or craft fairs.
-
Care Instructions
-
Hand wash in cold water if necessary.
-
Pat dry with a towel and reshape while drying.
-
Avoid harsh wringing to maintain the stuffing and shape.
-
-
Personalization Ideas
-
Make themed slices: veggie, supreme, pineapple, or extra cheese.
-
Add beads, sequins, or glitter thread for a sparkle effect.
-
-
Gift Packaging
-
Wrap in mini pizza boxes or attach to a handwritten card.
-
Use as party favors for pizza parties or crochet-themed giveaways.
-
-
Selling Your Crochet
-
Market as “Handmade Crochet Food Keychains” or “Mini Pizza Bag Charms.”
-
List your items with close-up photos on Etsy or Instagram.
-
-
Expand the Pattern
-
Make matching items: soda bottle keychain, donut keychain, or hamburger plushie.
-
Turn the slice into a brooch or magnet instead.
-
-
Your Next Steps
-
Try other food-themed crochet patterns.
-
Explore amigurumi or kawaii-style characters with the same base triangle shape.
-
Ready to make more delicious stitches? Bookmark this page or pin it to your crochet board so you’ll always have this fun project at hand.
🍕 Happy Crocheting and enjoy your handmade slice of happiness!


