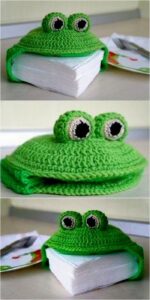
If you’re searching for a creative and fun project to liven up your space or give as a handmade gift, the Cute Crochet Frog Tissue Box For Beginners is a perfect place to start. This adorable and functional accessory is ideal for beginner crocheters who want to create something both practical and irresistibly cute. With its wide eyes, sweet smile, and vibrant green color, this frog tissue box cover is bound to brighten up any room!
This tutorial breaks down the entire crochet pattern into easy-to-follow steps. You don’t need to be an expert — basic crochet stitches and a little patience will take you all the way from a plain tissue box to a huggable frog friend that dispenses tissues with charm.
Not only is this frog cover a delight to make, but it’s also a fantastic way to practice shaping techniques, color changes, and working in the round. Plus, it’s a great stash-busting project for using leftover yarn. So grab your hook, your yarn, and let’s make a crochet tissue box cover that’s as functional as it is fun!
🧶 Materials and Measurements for Your Crochet Frog Tissue Box
Before diving into your stitches, it’s essential to gather your materials and understand the structure of the project. This ensures your crochet pattern comes out just the way you want it.
-
Yarn Requirements
For this crochet frog tissue box, use medium-weight (worsted weight, category 4) acrylic yarn.-
Green: Approx. 150g (body)
-
White: Small amount (eyes)
-
Black: Small amount (eye detail and mouth)
-
Pink (optional): For cheeks or tongue
-
-
Hook Size
Use a 4.0 mm (G-6) or 4.5 mm crochet hook. This size gives a firm fabric that holds shape well around the tissue box. -
Notions
-
Yarn needle for sewing pieces
-
Stitch markers (optional)
-
Scissors
-
Fiberfill or small stuffing for eyes
-
Black safety eyes (optional instead of black yarn)
-
-
Tissue Box Size
This pattern is adjustable, but it’s written for a standard rectangular tissue box size:-
Approx. 9 inches long
-
4.75 inches wide
-
3.5 inches tall
-
-
Basic Stitches Used
-
Chain (ch)
-
Single Crochet (sc)
-
Slip Stitch (sl st)
-
Increase (inc)
-
Decrease (dec)
-
-
Gauge
Gauge is not critical, but tighter stitches result in a neater look. Make sure your piece fits snugly around the tissue box.
🐸 Creating the Main Frog Tissue Box Cover
This is the main rectangular cover that wraps around the tissue box. You’ll be working in rows for the body and in rounds for the facial features and legs.
-
Crochet the Bottom Base
-
With green yarn, ch 35 (or enough to match the length of your tissue box).
-
Row 1: Sc in 2nd ch from hook and across.
-
Continue sc rows until your piece measures approx. 4.75 inches in width.
-
This forms the bottom panel. Fasten off and weave in ends.
-
-
Create the Side Panels
-
Join yarn along one long edge of the bottom panel.
-
Ch 1, then sc in each stitch across.
-
Continue rows until the panel height matches 3.5 inches (box height).
-
Repeat on all four sides to create a full rectangular sleeve.
-
-
Join the Corners
-
Fold the sides upward to form a box shape.
-
Use slip stitch or whipstitch to seam the vertical edges together.
-
Leave the top open.
-
-
Top Lid with Tissue Opening
-
Measure and crochet a rectangle slightly smaller than the base.
-
In the center, leave a 4-5 inch opening for tissue dispensing.
-
Join the top panel to the side edges using slip stitch or whipstitch.
-
-
Smooth Edges
-
Sc around the tissue opening for a clean finish.
-
Optionally, use contrasting yarn (e.g., pink or white) for accent.
-
-
Fit Test
-
Try slipping the cover onto your tissue box. It should fit snugly but not too tight. Adjust rows as needed.
-
👀 Crochet the Frog’s Eyes and Facial Details
Now it’s time to bring your frog to life! This section focuses on the crochet pattern for the eyes, mouth, and optional facial decorations.
-
Crocheting the Eyes
-
With white yarn, make a magic ring.
-
Round 1: 6 sc in ring.
-
Round 2: 2 sc in each st (12)
-
Round 3: (1 sc, inc) repeat around (18)
-
Fasten off. Make two circles.
-
Switch to green yarn and sc around the white eye to add a border.
-
Lightly stuff and sew the eyes to the top corners of the cover.
-
-
Add the Black Pupils
-
Option 1: Use safety eyes in the center of each white circle before attaching.
-
Option 2: Crochet small black circles:
-
Magic ring, 6 sc, sl st, fasten off.
-
Sew onto white part of the eyes.
-
-
-
Mouth Embroidery
-
Use black yarn and a yarn needle.
-
Create a wide U-shape or a simple smile just below the tissue opening.
-
Secure ends inside the cover.
-
-
Optional Pink Cheeks or Tongue
-
With pink yarn, make 2 small circles (magic ring, 6 sc).
-
Sew next to the mouth for blushing cheeks.
-
You can also add a little red tongue on the inside of the mouth for a playful look.
-
-
Nostrils (Optional)
-
Use black yarn to stitch two small vertical lines between the eyes.
-
This adds more character to the frog face.
-
-
Secure Everything
-
Make sure all details are firmly stitched.
-
Tug gently on the embellishments to test security.
-
🐾 Adding the Frog’s Legs and Arms
This step adds dimension and charm to your frog. Legs and arms give the illusion that the frog is hugging your tissue box.
-
Crochet the Front Legs
-
With green yarn, ch 6.
-
Row 1: Sc in each stitch.
-
Continue rows until your leg measures 3–4 inches.
-
At the end, crochet 3 fingers using ch 4 and sl st back along each.
-
Make two. Sew to the front bottom of the box.
-
-
Crochet the Back Legs
-
Use the same base pattern as front legs but add an extra row or two for length.
-
Position these at the back corners of the cover.
-
-
Stuffing for Legs (Optional)
-
Lightly stuff the top portion of each leg for a 3D look.
-
Avoid overstuffing — they should lay flat when resting on the surface.
-
-
Crochet Feet Pads
-
Make small ovals or circles using sc increases.
-
Sew at the end of each leg for added realism.
-
-
Secure All Limbs
-
Sew limbs tightly to avoid flopping.
-
You can also add a few hidden stitches to tack them to the table.
-
-
Balance and Pose
-
Adjust the leg positions so the frog appears balanced and playful.
-
Aim for a “hugging the box” look.
-
🌿 Final Touches and Creative Variations
The last part of this crochet pattern is all about personalization. Have fun adding your own flair or adapting the frog into other adorable creatures!
-
Add a Bow or Crown
-
Use leftover yarn to make a small bow or crown.
-
This is perfect if you’re gifting it to a child.
-
-
Different Colors
-
Don’t limit yourself to green! Try pastel frogs, rainbow frogs, or even glow-in-the-dark yarn.
-
-
Use with Refillable Tissue Inserts
-
Make your frog reusable by designing the bottom to open with buttons or Velcro.
-
That way, you can refill and reuse it endlessly.
-
-
Seasonal Frog Designs
-
Add accessories like scarves in winter or sunglasses in summer.
-
Makes for great decor all year round!
-
-
Create a Whole Animal Set
-
Make matching tissue box covers: panda, bear, cat, or bunny.
-
Use the same base pattern and just change the colors and features.
-
-
Gift Idea and Selling Option
-
Package with a box of tissues and gift ribbon.
-
Great for markets, craft fairs, or online shops.
-
Final Thoughts: Your Cute Crochet Frog Tissue Box Is Complete!
You’ve now completed your Cute Crochet Frog Tissue Box For Beginners using a friendly and easy-to-follow crochet pattern. It’s a wonderful way to brighten your space and impress friends or family with your handmade charm.
Remember to:
-
Handwash only and reshape while drying
-
Store in a dry place away from direct sunlight
-
Tag your finished projects online using #crochetfrogtissuebox
Whether you’re crocheting for fun, home decor, or your first product to sell, this frog is a ribbit-ing success! 🐸


