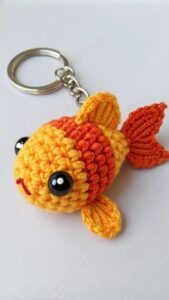
Looking for a charming, quick, and beginner-friendly project that combines functionality and cuteness? Then you’ll love making your own crochet fish keychains! These colorful and compact accessories are perfect for gifts, craft fairs, or even decorating your bags and backpacks. Whether you’re new to the art of crochet or an experienced enthusiast, this fun little project offers a satisfying result in no time.
Crochet fish keychains are not only adorable, but they’re also great stash-busters. You can mix and match colors, add fun embellishments, and personalize each fish with expressive eyes or stripes. These little sea-inspired creations are especially popular with kids, ocean lovers, and those looking for thoughtful handmade souvenirs.
In this article, we’ll walk you through an easy-to-follow crochet pattern that’s beginner-friendly but versatile enough to inspire creativity. You’ll find everything from the materials needed, cutting measurements, pattern steps, and creative ideas to make your fish unique. So grab your hooks and dive into this delightful under-the-sea crafting journey!

🧶 Materials and Preparation: What You’ll Need
Before starting your crochet fish keychains, it’s important to prepare your materials. Keeping your workspace organized helps you stay focused and enjoy the process.
-
Yarn Choices
For this project, use cotton or acrylic crochet yarn in various bright colors. Worsted weight (category 4) yarn works best to give the fish structure. You’ll need around 10-15g per fish. -
Recommended Hook Size
Use a 3.0 mm to 4.0 mm crochet hook. The smaller the hook, the tighter and cleaner the stitches — perfect for keychains. -
Other Notions
-
Keychain rings or lobster clasps
-
Yarn needle for weaving ends
-
Scissors
-
Small amount of stuffing (polyfill or yarn scraps)
-
Safety eyes (6mm or embroidered)
-
-
Stitch Knowledge
This crochet pattern uses basic stitches:-
Chain (ch)
-
Single crochet (sc)
-
Slip stitch (sl st)
-
Increase (inc = 2 sc in one stitch)
-
Decrease (dec = single crochet two together)
-
-
Cutting Measurements for Felt (Optional)
If you want to add small felt fins, cut two side fins and one top fin using these sizes:-
Side fins: 1″ x 0.75″
-
Top fin: 1.5″ x 1″
Use scissors and felt in coordinating or contrasting colors.
-
-
Work Environment
Set up a bright, comfortable space with your tools at hand. Since the project is small, it’s perfect for crafting on the go or while watching your favorite series.
🐠 Step-by-Step Crochet Pattern for the Fish Body
Let’s start with the core of your crochet fish keychain — the body. You’ll work in rounds to shape it and lightly stuff it for a squishy, plush feel.
-
Start With the Body (Make 2 Panels)
-
Round 1: In magic ring, 6 sc.
-
Round 2: Inc in each st around (12).
-
Round 3: (1 sc, inc) around (18).
-
Round 4: (2 sc, inc) around (24).
-
Round 5: (3 sc, inc) around (30).
-
Work 2 more rounds even (30).
-
Fasten off. Make 2 identical panels.
-
-
Joining the Panels
-
Place both circles together (right sides facing out).
-
Start sc around both pieces, matching stitches.
-
At ¾ of the way, stuff gently with fiberfill.
-
Continue until fully joined. Sl st to close. Weave in ends.
-
-
Add the Tail Fin
-
Chain 7.
-
Row 1: Sc in 2nd ch from hook, sc to end (6).
-
Row 2–4: Repeat sc across (6).
-
Row 5: Dec, sc x2, dec (4).
-
Row 6: Sc across (4), then fasten off.
-
Sew the base of the tail to the back of the fish body.
-
-
Crochet the Side Fins (Make 2)
-
Ch 4.
-
Row 1: Sc across (3).
-
Row 2: Dec, sc (2).
-
Row 3: Dec (1).
-
Fasten off and sew each fin to the sides.
-
-
Top Fin (Optional)
-
Ch 5.
-
Row 1: Sc in each ch (4).
-
Row 2–3: Sc across (4), then fasten off.
-
Attach to top center of body.
-
-
Attach Eyes and Details
-
Sew or glue safety eyes about halfway down the body on both sides.
-
Embroider a smile or add stripes using surface slip stitches.
-
Use contrasting yarn for visual pop.
-
🎣 Finishing Touches and Keychain Assembly
You’ve completed the main fish! Now it’s time to convert it into a fun and functional keychain using a few quick steps.
-
Attach the Keychain Ring
-
Use a small jump ring, lobster clasp, or metal chain.
-
Sew or crochet a short chain loop (ch 6, sl st back) at the top of the fish.
-
Slide the metal ring through the loop and close it.
-
-
Secure All Pieces
-
Double-check all fins, eyes, and tails are firmly attached.
-
Tug gently to test the durability — remember this will be handled a lot!
-
-
Decorate (Optional)
-
Add beads or small charms near the keyring.
-
You can also sew initials onto the fish or add felt heart appliqués.
-
-
Personalize Colors
-
Use ombré yarn or variegated threads for a more dynamic look.
-
Make themed versions like rainbow fish, metallic scales, or neon colors.
-
-
Gift-Wrapping Ideas
-
Place in a clear plastic bag with a ribbon and handmade tag.
-
Great for party favors, stocking stuffers, or birthday gifts.
-
-
Care Instructions
-
Spot clean only with a damp cloth.
-
Do not machine wash. Store in a dry area.
-
🧵 Custom Variations and Creative Extensions
Once you’ve mastered the base crochet pattern, you can easily adapt it to make other aquatic or animal-themed keychains.
-
Make a Whale Keychain
-
Elongate the fish body and add a horizontal tail.
-
Use white yarn on the bottom for a whale belly.
-
-
Turn It Into a Mini Plushie
-
Increase stitch counts and make larger versions.
-
Add a loop for hanging instead of a keychain ring.
-
-
Design a Whole School of Fish
-
Make different color combinations to represent a rainbow school.
-
Display in a hanging mobile or window string decor.
-
-
Add Texture With Puff Stitches
-
Use bobble or puff stitches for scales on the fish body.
-
Alternate with smooth sc rows for contrast.
-
-
Make a Matching Coin Pouch
-
Sew a zipper to the top of a larger fish body.
-
Add lining fabric inside using felt or cotton.
-
-
Sell or Share Your Work
-
These crochet fish keychains are perfect for craft fairs and Etsy shops.
-
Always give credit if using someone else’s base pattern.
-
🐟 Why Crochet Fish Keychains Are the Perfect Beginner Project
There’s a reason why so many crocheters start with small accessories like these. They’re quick, satisfying, and don’t require too many materials. The crochet fish keychain pattern is ideal for building confidence with stitches, practicing tension, and finishing a project in just one sitting.
Plus, this project allows for tons of creative freedom. From colors to shapes and accessories, your fish can be as whimsical or realistic as you like. It’s a fantastic way to make use of scrap yarn while creating meaningful handmade items.
Whether you’re crocheting to relax, preparing gifts, or expanding your product offerings, this little fish is the perfect catch. Don’t forget to share your finished creations online using hashtags like #crochetfishkeychain and #crochetpattern so others can enjoy your work too!
Final Thoughts
Now that you’ve explored every step of how to make your own crochet fish keychains, we hope you’re inspired to try your hand at this delightful project. These little cuties are not only fun to make, but they’re also a great way to spread smiles, personalize your belongings, and showcase your crochet skills in a unique way.
Keep exploring, keep stitching, and most of all — keep having fun with every new crochet pattern you try!


