If you’re looking for a quick and charming handmade project, learning how to crochet a mini octopus keychain might be your next favorite idea. These tiny ocean friends are not only adorable but also perfect for beginners trying out their first amigurumi pattern. With just a bit of yarn and basic stitches, you can create a cute octopus to attach to your keys, backpack, or even gift to someone special.
Mini amigurumi keychains like this octopus are excellent projects for scrap yarn, require very little time, and bring instant joy. This crochet project is both relaxing and rewarding, especially because you can finish it in under an hour. You’ll learn how to make a simple spherical head, curly tentacles, and how to safely attach keychain hardware.
In this tutorial, we’ll guide you through a step-by-step crochet pattern including exact yarn amounts, hook size, and optional felt or safety eyes. The entire process is designed to be beginner-friendly, and we’ll also include tips for customizing your tiny octopus. Let’s dive into the world of amigurumi and get started!
🧶 Materials Needed for Your Amigurumi Octopus Keychain
Before diving into the pattern, it’s important to gather all your supplies. Since this is a mini project, you won’t need a lot of materials, making it a budget-friendly DIY. Everything listed is easy to find at your local craft store or online.
-
Yarn Choices
Use DK or worsted weight yarn in any color you like. Popular options include pastel pink, mint green, soft blue, or even variegated yarn for a fun twist. For one octopus:-
Main color (head and tentacles): 15g
-
Contrast color (optional for details): 5g
Cotton yarn gives the best structure for amigurumi.
-
-
Crochet Hook
A 2.5 mm to 3.0 mm hook works well for tight stitches that hold stuffing inside. If you crochet loosely, go down a hook size to ensure a dense finish. -
Additional Tools
-
Yarn needle for sewing parts
-
Stitch marker (helpful for working in the round)
-
Scissors
-
Polyester fiberfill for stuffing
-
2 safety eyes (6mm or smaller), or black embroidery thread
-
Keyring hardware or small lobster clasp
-
-
Optional Felt or Embroidery Thread
You can use small scraps of felt to cut tiny cheeks or embroider a smile to add personality. -
Measuring Cuts and Sizing Tips
Finished size: approx. 1.5″–2″ wide-
Yarn tail for tentacle base: leave 8 inches for sewing
-
Eye patch felt (if using): 1 cm circles
-
Keychain loop: 1.5″ metal ring or 2″ lobster clasp
-
-
Safety Notes
Avoid safety eyes if making for children under 3. Use embroidered or felt eyes instead.
🐙 Step-by-Step Crochet Pattern – Head and Tentacles
The mini amigurumi octopus pattern begins with a round head (the body) and finishes with easy curly tentacles. Work in continuous rounds to avoid visible seams and always use a stitch marker to keep track.
-
Crochet the Head
-
Round 1: In a magic ring, work 6 single crochet (sc) – [6]
-
Round 2: 2 sc in each stitch – [12]
-
Round 3: (1 sc, inc) x6 – [18]
-
Round 4: (2 sc, inc) x6 – [24]
-
Round 5–8: Sc around (24 stitches per round)
The head should be forming into a neat sphere. Pause to insert safety eyes between Rounds 5 and 6, about 5 stitches apart.
-
-
Stuff the Head
-
Fill the head gently with polyfill until firm but not overstuffed
-
Make sure it holds shape, especially around the eye area
-
-
Shape the Face
-
Optional: sew felt cheeks, or embroider a smile
-
For kawaii-style, place cheeks directly below the eyes
-
-
Decrease and Close the Head
-
Round 9: (2 sc, dec) x6 – [18]
-
Round 10: (1 sc, dec) x6 – [12]
-
Round 11: dec x6 – [6], fasten off
-
Use yarn needle to weave the end through the last 6 stitches and pull tight
-
-
Crochet the Tentacles
-
Make 8 tentacles separately
-
Ch 15, 2 sc in each chain across (28)
-
Tentacle will curl naturally
-
Leave a 6–8 inch yarn tail to attach to the base
-
-
Attach Tentacles
-
Sew each tentacle evenly spaced around the base of the head
-
Use your yarn needle to securely stitch into the base
-
Check balance to ensure the octopus sits flat or hangs evenly from a keychain
-
🔑 Turning It into a Keychain – Finishing Touches
After crocheting your octopus and attaching its tentacles, now comes the fun part: turning your creation into a functional keychain. Here’s how to finish it beautifully.
-
Attach Keyring or Hardware
-
Thread a yarn strand through the top of the octopus
-
Tie around the keyring and weave in ends securely
-
Alternatively, sew a jump ring or lobster clasp directly onto the top
-
-
Add More Personality
-
You can glue on tiny bows, beads, or mini hats
-
Use pastel felt to cut accessories like hearts or flowers
-
-
Customize Colors
-
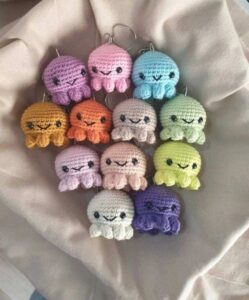
Make a rainbow set by changing the yarn color for each octopus
-
Use leftover yarn scraps from bigger projects
-
-
Embroider Names or Dates
-
Add initials or small dates to the bottom using fine thread
-
This is great for gifting or marking special occasions
-
-
Seal the Safety Eyes (Optional)
-
If concerned about durability, you can add a drop of glue to the back of the safety eyes before securing them
-
-
Package as a Gift
-
Place your octopus in a small box or attach to a thank-you card
-
These make great party favors, stocking stuffers, or classroom rewards
-
🎨 Variations and Creative Ideas
Once you’ve made your first mini amigurumi octopus, it’s easy to get hooked! Try these variations to expand your collection or personalize your gifts.
-
Add a Mini Hat
-
Crochet a tiny top hat or beret for your octopus
-
Use contrasting yarn for a pop of color
-
-
Make a Baby and Mama Set
-
Use thinner yarn or a smaller hook for a baby version
-
Create a larger octopus by doubling your yarn
-
-
Glow-in-the-Dark Yarn
-
Use specialty yarn that glows under UV or in the dark
-
Perfect for kids or keychains used on backpacks
-
-
Add a Bell or Bead
-
Sew a tiny bell inside before stuffing for a jingle effect
-
Or thread a bead on top for flair
-
-
Seasonal Themes
-
Use red and green yarn for Christmas
-
Try candy corn colors for Halloween
-
Go pastel for Easter-themed keychains
-
-
Educational Use
-
These tiny octopuses are great as classroom rewards
-
You can make them in different colors to represent learning milestones or achievements
-
❤️ Why Crochet a Mini Octopus Keychain?
There are so many reasons why this amigurumi pattern is a favorite among crochet lovers. Whether you’re new to crochet or looking to make something quick and satisfying, this project checks all the boxes.
-
Perfect for Beginners
-
This project uses only basic stitches: single crochet, increase, and decrease
-
It’s a great way to practice amigurumi techniques without a huge time commitment
-
-
Quick and Fun
-
Finish one in under 60 minutes
-
Ideal for gifting or stocking up your craft fair table
-
-
Great Use for Scrap Yarn
-
A fantastic way to use leftover yarn from larger projects
-
Low waste and high reward!
-
-
Easy to Customize
-
Mix and match yarns, add accessories, or personalize faces
-
The pattern is a perfect blank canvas
-
-
Cute, Collectible and Giftable
-
Kids, teens, and adults alike love these adorable ocean creatures
-
They make charming additions to keychains, zippers, and even car mirrors
-
-
Portable and Travel-Friendly
-
Small enough to bring in your bag
-
Great for crocheting during trips or while watching TV
-
🧵 Final Thoughts
Learning how to crochet a mini octopus keychain is one of the most enjoyable, beginner-friendly projects in the amigurumi pattern world. It’s quick, cute, and filled with opportunities for personalization. Whether you’re making a bunch for gifts, selling them at markets, or simply relaxing with your crochet hook in hand, this pattern is a joy to stitch.
Remember, all you need is a bit of yarn, a small hook, and your imagination. With each new mini octopus you create, you’ll grow your crochet skills and have an adorable ocean of keychain companions to show for it.
Happy crocheting!


